This topic describes how to use the Transparent Data Encryption (TDE) feature. Once you enable the TDE feature, it cannot be disabled. Proceed with caution.
Background information
ApsaraDB for OceanBase provides the TDE feature for storage and remote procedure calls (RPC).
Storage encryption protects data on disks.
RPC encryption protects the communications between OBServer nodes.
The TDE feature is provided in ApsaraDB for OceanBase V3.2.3, V3.2.4, and V4.2.1.
At present, TDE supports service keys and custom keys.
Service keys
A service key is generated and managed by ApsaraDB for OceanBase.
Custom keys
A custom key is created by using Alibaba Cloud Key Management Service (KMS). After you purchase Alibaba Cloud KMS, you can create your custom keys in the KMS console. For more information, see Create a CMK.
Limitations
Limitations on service keys
Once you enable the TDE feature, it cannot be disabled.
Oracle tenants support AES-256, AES-128, AES-192, and SM4-CBC keys, and MySQL tenants support only AES-256 keys. Once you specify a key type, you cannot change it or convert a key of this type to another type of key.
Limitations on custom keys
Once you enable the TDE feature, it cannot be disabled.
Oracle tenants support AES-256, AES-128, AES-192, and SM4-CBC keys, and MySQL tenants support only AES-256 keys. Once you specify a key type, you cannot change it or convert a key of this type to another type of key.
At present, custom keys are supported only in ApsaraDB for OceanBase V2.2.77 and later.
A unique service role is created for each cloud product. As for ApsaraDB for OceanBase, the AliyunServiceRoleForOceanBase role is created for you to encrypt data in ApsaraDB for OceanBase. You must use your Alibaba Cloud account or an account with the AliyunSTSAssumeRoleAccess permission.
Do not disable keys, schedule a key deletion task, or delete keys in the KMS console. Otherwise, TDE cannot be enabled.
After you create a key in the KMS console, add the
oceanbase:encryption: truetag to the key.You must select an HSM version for KMS.
Enabling TDE does not affect update performance, but it may cause slight performance degradation for other operations. For more information, see TDE test report.
Procedure
In the left-side navigation pane, click Instances and select the target cluster instance to go to the Cluster Instance Workspace page.
In the left-side navigation pane, click Security Settings.
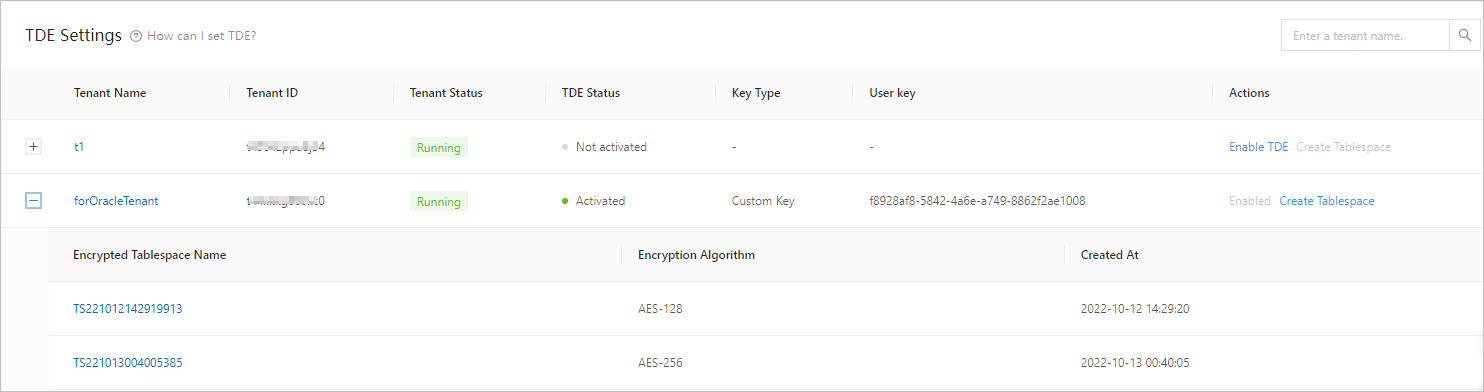
On the TDE tab, configure the TDE settings.

Click Enable TDE in the Actions column.
NoteOnce you enable the TDE feature, it affects the database performance and cannot be disabled. Proceed with caution.
In the dialog box that appears, click OK to specify the key type.
Service keys and custom keys are supported:
A service key is generated and managed by ApsaraDB for OceanBase.
NoteAt present, the key types Aliyun_AES_256 and Aliyun_SM4 are supported. Once you specify a key type, you cannot change it or convert a key of this type to another type of key.
A custom key is created by using Alibaba Cloud KMS. After you purchase Alibaba Cloud KMS, you can create your custom keys in the KMS console. For more information, see Create a CMK.
NoteAt present, the key types Aliyun_AES_256 and Aliyun_SM4 are supported. Once you specify a key type, you cannot change it or convert a key of this type to another type of key.
A unique service role is created for each cloud product. As for ApsaraDB for OceanBase, the AliyunServiceRoleForOceanBase role is created for you to encrypt data in ApsaraDB for OceanBase.
After you specify the key type, click OK.
Create an encrypted tablespace
Click Create Tablespace in the Actions column.
In the Create Tablespace dialog box, specify Encrypted Tablespace Name and Encryption Algorithm.
Click OK.
After you create an encrypted tablespace, you can perform DDL operations by using data R&D tools or other CLI tools to create tables and assign the tables to the specified encrypted tablespace. Here are some examples:
Oracle tenant
create table table_name (column1 int, column2 int) tablespace tablespace_name;MySQL tenant
create table table_name (column1 int, column2 int) tablespace tablespace_name;
NoteTo encrypt data, you must enable TDE, create a tablespace on the TDE tab, and perform the DDL operation to create an encrypted table. Sample DDL statement for creating an encrypted table:
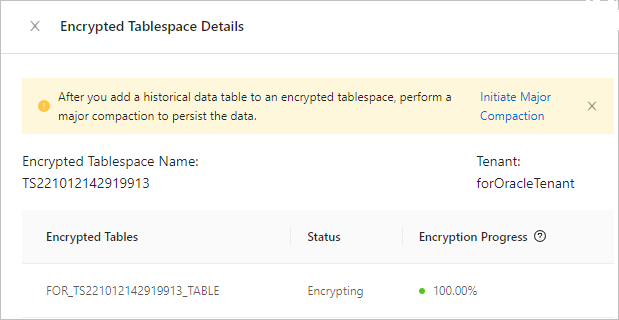
obclient> CREATE TABLE t1 (id int,id2 int) TABLESPACE sectest_ts1;After you add a historical data table to an encrypted tablespace, perform a major compaction to persist the data.
To view the tablespace name, encryption algorithm, and creation time of all encrypted tablespaces in a tenant, click the plus sign (+) in front of the tenant.
You can click the name of an encrypted tablespace to view the encryption status and progress of encrypted tables. The encryption progress indicates the percentage of data blocks that are already encrypted in the data table.
Perform a full compaction for a historical data table
To perform a full compaction for historical data table t1, perform the following steps:
Set the value of the
progressive_merge_numparameter to1.obclient> ALTER TABLE t1 set progressive_merge_num = 1;On the Cluster Instance Workspace page, manually initiate a major compaction. For more information, see Major compaction.
After the major compaction is completed, set the value of the
progressive_merge_numparameter to0.obclient> ALTER TABLE t1 set progressive_merge_num = 0;