This topic describes how to install Ali-Tomcat and Pandora and configure the development environments of Eclipse and IntelliJ IDEA.
Install Ali-Tomcat and Pandora
Ali-Tomcat and Pandora are containers on which services in EDAS depend during runtime, and integrate core features such as service publishing, service subscription, and tracing. Applications must be published to the containers for running.
Use Java Development Kit (JDK) 1.7 or later.
Download Ali-Tomcat-8 or Ali-Tomcat-7 and decompress the downloaded package to a directory, for example, d:\work\tomcat\.
Download the Pandora package and decompress it to the d:\work\tomcat\deploy directory where Ali-Tomcat is saved.
View the Pandora directory structure.
On Linux, run the tree -L 2 deploy/ command in the relevant path to view the directory structure.
[root@iZbp1jdi3rl2wjj5e1f*** tomcat]  tree -L 2 deploy/
            deploy/
                └── taobao-hsf.sar
                    ├── META-INF
                    ├── lib
                    ├── log.properties
                    ├── plugins
                    ├── sharedlib
                    └── version.properties
On Windows, navigate to the corresponding path to view the directory structure.

For more information about how to solve the problems related to the installation and use of Ali-Tomcat and Pandora, see Ali-Tomcat FAQ and Pandora issues.
Configure the Eclipse development environment
To configure Eclipse, you must download the Tomcat4E plug-in and save it to the directory where Ali-Tomcat and Pandora are installed. After the configuration is complete, you can publish and debug local codes in Eclipse.
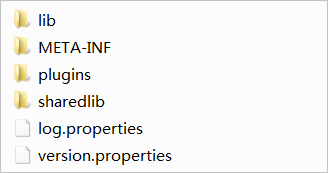
Download the Tomcat4E plug-in. The following figure shows the files and folders extracted from the package.

Open Eclipse. In the menu bar, choose .
In the Install dialog box, click Add to the right of the Work with section. In the Add Repository dialog box, click Local. In the dialog box that appears, select the d:\work\tomcat4e\ directory where the downloaded Tomcat4E package is decompressed, and click OK.
Return to the Install dialog box. Click Select All and then Next.
Complete subsequent steps as instructed. After you install the Tomcat4E plug-in, restart Eclipse to make Tomcat4E take effect.
After Eclipse is restarted, choose from the Eclipse menu.
In the left-side navigation pane, find AliTomcat Webapp and click New launch configuration in the upper part.
On the page that appears, click the AliTomcat tab. In the taobao-hsf.sar Location section, click Browse. Select the local path of Pandora, for example, d:\work\tomcat\deploy\taobao-hsf.sar.
Click Apply or Run. Then, the configuration is complete.
Next time, you can start this project without the need to configure it again.
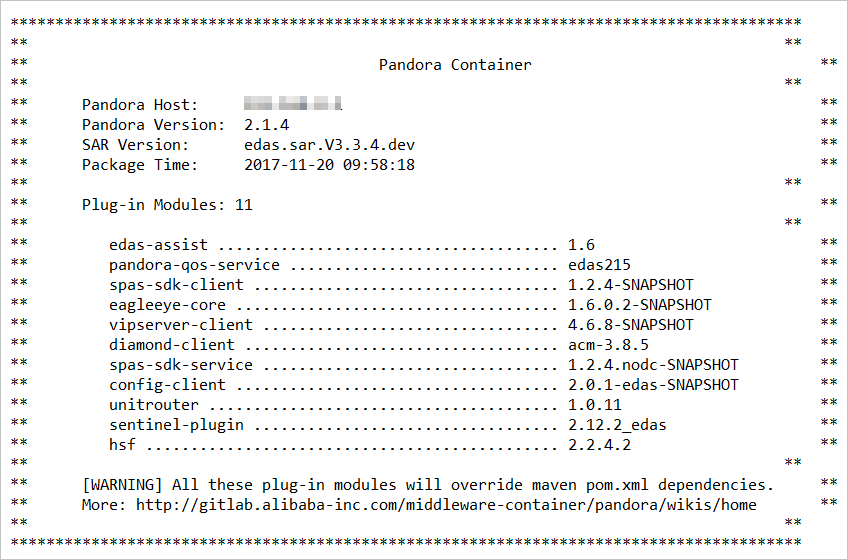
View the output information about the project running. If the following Pandora container information appears, the Eclipse development environment is configured.

Configure the IntelliJ IDEA development environment
Only the commercial release of IntelliJ IDEA is supported. IntelliJ IDEA Community Edition is not supported.
Start IntelliJ IDEA.
In the menu bar, choose .
In the left-side navigation pane of the Run/Debug Configurations page, choose .
Configure Ali-Tomcat.
On the right of the page, click the Server tab. In the Application Server section, click Configure.
On the Application Server page, click + in the upper-right corner. In the Tomcat Server dialog box, set Tomcat Home and Tomcat base directory, and click OK.
Set Tomcat Home to the local path where the Ali-Tomcat package is decompressed. Then, Tomcat base directory is automatically set to the same path.
In the Application Server section, select the configured Ali-Tomcat from the drop-down list.
In the VM Options section, set the JVM startup parameters to the path that points to Pandora, and specify the vipserver port of the local lightweight configuration and registry center.
Example:
-Dpandora.location=d:\work\tomcat\deploy\taobao-hsf.sar -Dvipserver.server.port=8080Replace d:\work\tomcat\deploy\taobao-hsf.sar with the path where Pandora is installed. The
-Dvipserver.server.port=8080parameter specifies the vipserver port that is used to connect the application to the local lightweight configuration and registry center. This effectively accelerates local application startup when you use the new version of the lightweight configuration and registry center in the local development environment.You do not need to add the preceding JVM property when you deploy an application to EDAS.
Click Apply or OK. Then, the configuration is complete.