DataService Studio allows you to create an API by using the codeless UI or code editor. When you use the codeless UI to create an API, you can configure the API in a visualized manner, without the need to write code. This topic describes how to use the codeless UI to create an API.
Prerequisites
A data source is configured on the Data Sources page. For more information, see Add a data source.
A resource group is created for DataService Studio. We recommend that you use a serverless resource group in the production environment. For more information, see Preparations.
Background information
If you have personalized query requirements, you can use the code editor provided by DataWorks to create an API. When you use the code editor to create an API, you can customize SQL statements for the API. The code editor allows you to use features such as table join queries, complex queries, and aggregate functions. For example, if you want to specify a request parameter to query data within a specific value range of a field, you can create an API in the code editor.
Go to the DataService Studio page
Log on to the DataWorks console. In the top navigation bar, select the desired region. In the left-side navigation pane, choose . On the page that appears, select the desired workspace from the drop-down list and click Go to DataService Studio.
Create an API
In the Service Development pane, move the pointer over the
 icon and choose .
 You can also click a business process, right-click API, and then choose .
In the Generate API dialog box, configure the parameters.
Parameter
Description
API Mode
The mode used to create the API. Valid values: Wizard Mode and Script Mode. In this example, select Wizard Mode.
API Name
The name of the API. The name must be 4 to 50 characters in length and can contain letters, digits, and underscores (_). The name must start with a letter.
API Path
The path of the API. The path is the API request path that is relative to the service host address. Example: /user.
NoteThe path can be up to 200 characters in length and can contain letters, digits, underscores (_), and hyphens (-). The path must start with a forward slash (/).
Protocol
The protocol used by the API. Valid values: HTTP and HTTPS.
If you need to call the API by using HTTPS, you must associate an independent domain name with the API in the API Gateway console after the API is published to API Gateway. You must also upload a Secure Sockets Layer (SSL) certificate in the API Gateway console. For more information, see Enable HTTPS for an API operation.
Request Method
The request method. Valid values: GET and POST
NoteIf you select GET for the Request Method parameter, you can select only QUERY for the Parameter Position parameter. If you select POST for the Request Method parameter, you can select QUERY or BODY for the Parameter Position parameter.
Response Type
The format of the data returned by the API. Set the value to JSON.
Visible Scope
The range of users to whom the API is visible. Valid values:
Workspace: The API is visible to all members in the current workspace.
Private: The API is visible only to its owner and permissions on the API cannot be granted to other members.
NoteIf you set this parameter to Private, other members in the workspace cannot view the API in the API list.
Label
Select tags from the Label drop-down list. For more information, see Create and manage API tag.
NoteA tag can be up to 20 characters in length and can contain letters, digits, and underscores (_). You can set at most five tags for an API.
Description
The description of the API. The description can be up to 2,000 characters in length.
Destination Folder
The folder in which you want to store the API. You can select a business process from the drop-down list. After you select a business process, a folder is generated under the business process and the API is stored in the folder. By default, the folder is in the format of Business Processes/Business process name/API, such as Business Processes/ceshi/API.
Click OK.
Configure the API
1. Select a table
Double-click the API in the API list. On the tab that appears, configure the Datasource Type, Datasource Name, Datasource Environment, and Table Name parameters in the Select Table section.
The parameters that you need to configure vary based on the selected data source type. The parameters in the console prevail.
Before you select a table for an API, you must configure a data source in Data Integration. You can enter a table name in the Table Name field to search for the table that you want to use.
For a workspace in standard mode, you can select Production or Environment for the Datasource Environment parameter. For more information, see Differences between workspaces in basic mode and workspaces in standard mode.
If you select a MaxCompute table for an API, you can select Acceleration Service or MCQA for the Acceleration Method parameter for acceleration. Acceleration Service is an acceleration method provided by DataWorks and MCQA is an acceleration method provided by MaxCompute. If you select Acceleration Service, you must make sure that acceleration items are created. For more information, see Acceleration solutions for API-based data queries.
After you create an API, the API configuration tab appears. Then, you can select a table for the API.
2. Configure parameters in the Select Parameters section
In the Select Parameters section, configure request and response parameters for the API.
After you select a table in the Select Table section, all fields in the table appear in the Select Parameters section. In the Set as Req Param column, select the check boxes of the fields that you want to specify as request parameters. In the Set as Resp Param column, select the check boxes of the fields that you want to specify as response parameters.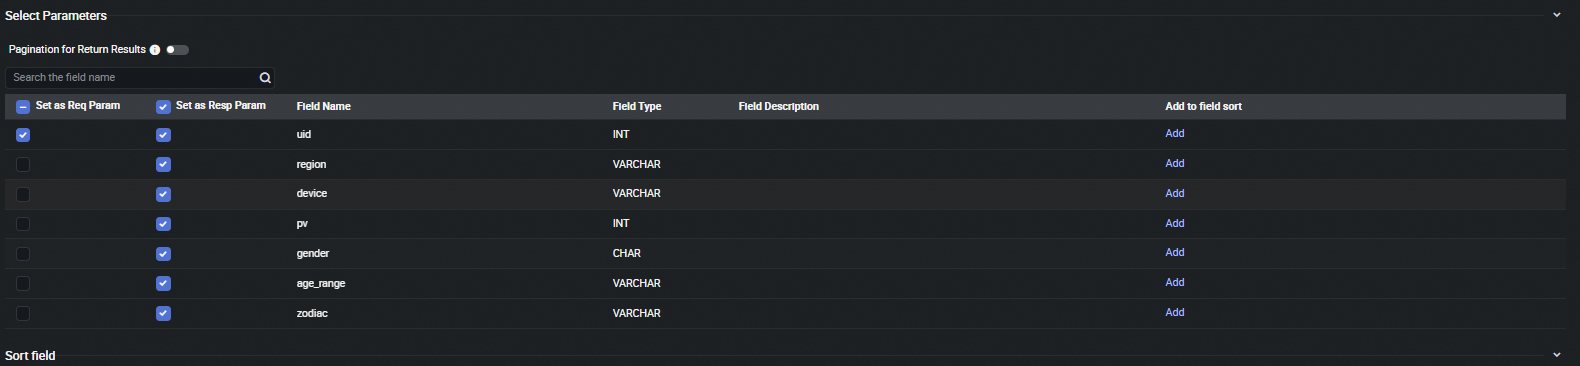
To sort the data that the API returns based on a specific field, find the field and click Add in the Add to field sort column. After you click Add, the field is added to the Sort field section.
The sorting feature allows you to specify the fields based on which the data that the API returns is sorted. A field with a smaller sequence number in the Sort field section has a higher priority in data sorting. You can click Move up or Move down to adjust the sequence of a field. You can select Ascending order or Descending order in the Sort column of each field to specify the sorting mode.
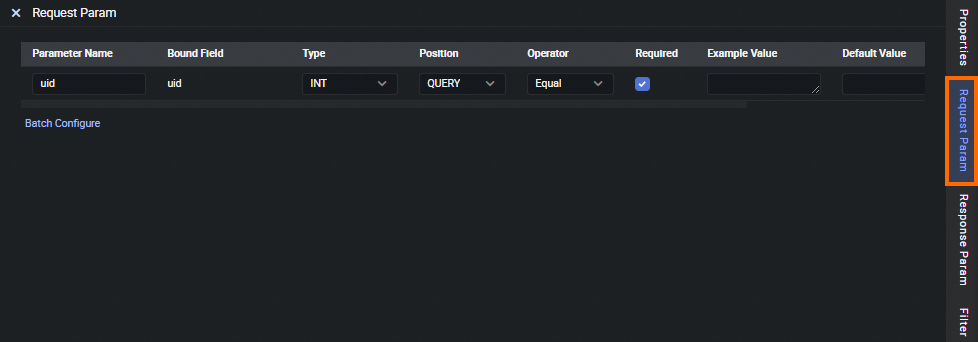
3. Configure the request parameters
In the right-side navigation pane, click the Request Param tab. On the Request Param tab, configure the parameters based on your business requirements.
Before you preview the result, you must configure information such as the example value, default value, and description for each request parameter of the API.
To improve the match efficiency, specify an indexed field as a request parameter.
If you create an API by using the codeless UI, you cannot configure two parameters for a field to generate a value range. If you want to configure multiple parameters for a field, you can create an API by using the code editor. For more information, see Create an API by using the code editor.
Parameter | Description |
Parameter Name | The name of the request parameter. The name can be up to 64 characters in length and can contain letters, digits, underscores (_), and hyphens (-). The name must start with a letter. |
Bound Field | The value cannot be changed. If you want to change the value, use the code editor to create an API. For more information, see Create an API by using the code editor. |
Type | The type of the request parameter. Valid values: STRING, INT, LONG, FLOAT, DOUBLE, and BOOLEAN. |
Position | The position of the request parameter. Valid values: QUERY and BODY. Note If you set the Position parameter to BODY for one or more request parameters, you must configure the Content-Type parameter to define the format of the request parameters in the request body. Valid values of the Content-Type parameter:
|
Operator | The operator that is used to associate or compare the value of the request parameter with the value that you specify. You can select one of the following operators:
Note If you set the Datasource Type parameter to Tablestore in the Select Table section, you can set the Operator parameter only to Equal. |
Required | Specifies whether the request parameter is required. |
Example Value | The example value of the request parameter. |
Default Value | The default value of the request parameter. |
Description | The description of the request parameter. |
4. Configure the response parameters
In the right-side navigation pane, click the Response Param tab. On the Response Param tab, configure the parameters.
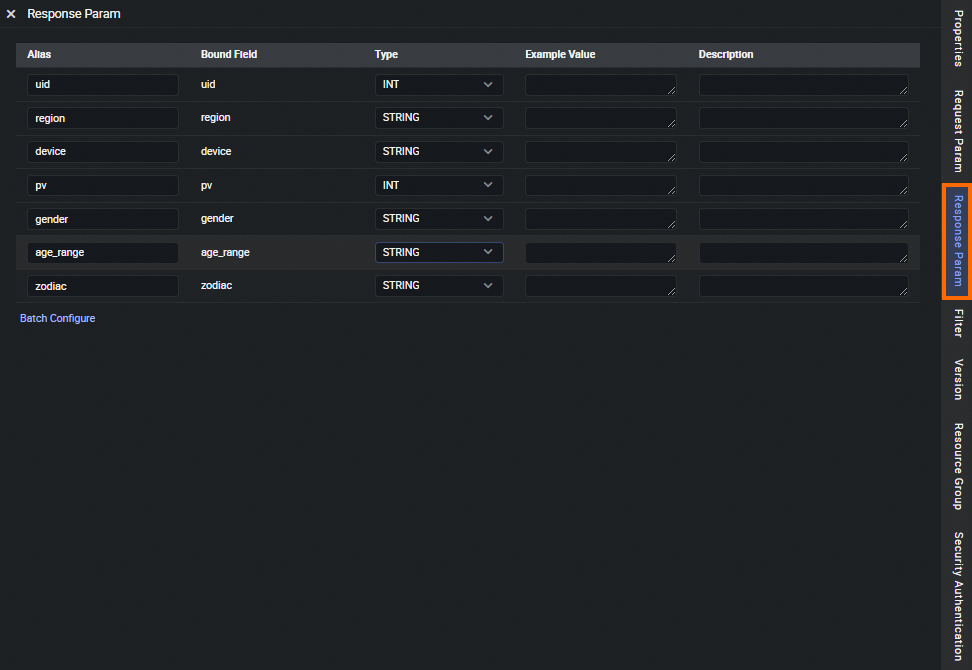
Configure the response parameters.
Parameter
Description
Parameter Name
The name of the response parameter. The name can be up to 64 characters in length and can contain letters, digits, underscores (_), and hyphens (-). The name must start with a letter.
Bound Field
The value cannot be changed.
Type
The type of the request parameter. Valid values: STRING, INT, LONG, FLOAT, DOUBLE, and BOOLEAN.
Example Value
The example value of the response parameter.
Description
The description of the response parameter.
Configure the Pagination for Return Results parameter.
If you do not select Pagination, the API returns up to 2,000 records by default.
If more than 2,000 records may be returned, we recommend that you select Pagination. If you select Pagination, you can go to the Resource Group tab to configure the Maximum Number of Data Records for a Single Request parameter based on the resource group you selected.
The following common parameters are available if you turn on Pagination for Return Results.
Common request parameters
pageNum: the page number.
pageSize: the number of entries returned per page.
Common response parameters
pageNum: the page number.
pageSize: the number of entries returned per page.
totalNum: the total number of entries returned.
NoteRequest parameters are optional for an API. If you do not specify request parameters for an API, you must select Pagination.
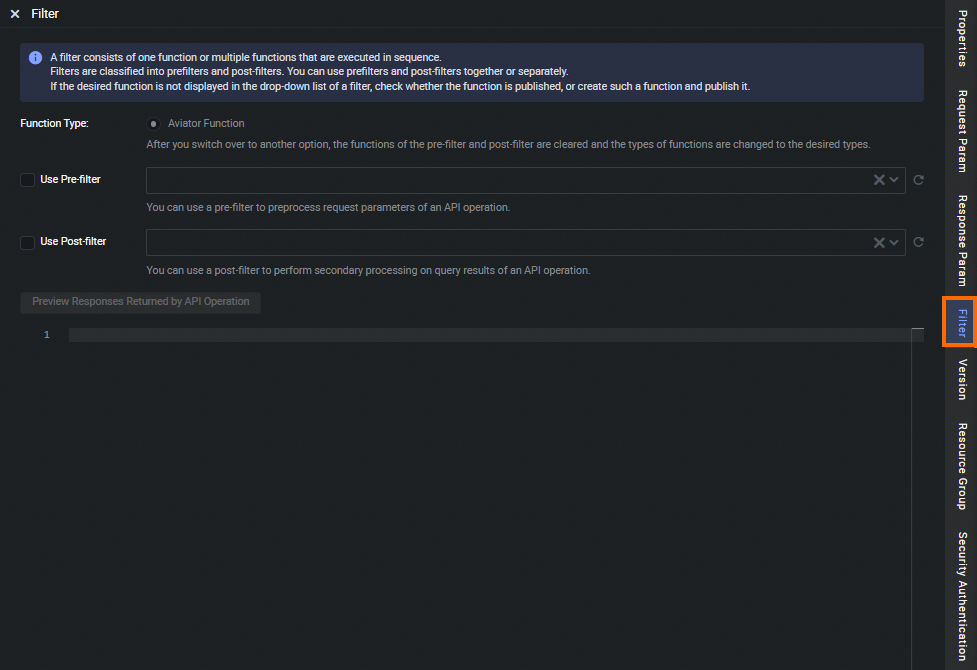
5. Configure a filter
If you need to preprocess the request parameters of an API or process the results returned by an API, you can perform the following steps to configure a filter for the API: In the right-side navigation pane, click the Filter tab. On the Filter tab, select Use Pre-filter or Use Post-filter based on your business requirements. After you configure the Function Type parameter, select one or more functions from the drop-down list next to the Use Pre-filter or Use Post-filter check box. If you select multiple functions, the functions are used to process parameters based on the sequence in which they are selected. Then, you can click Preview Responses Returned by API Operation and check whether the processing results of the selected functions meet your expectations. For more information about how to create and use a filter, see Create an Aviator function and Create a Python function.
If you want to use a Python function as a filter, you must activate DataWorks Professional Edition or a more advanced edition and use the shared resource group for DataService Studio.
If you want to use an Aviator function as a filter, all DataWorks editions are supported, but you must use an exclusive resource group for DataService Studio.
If the function that you want to use is not available in the drop-down list, check whether the function is published. If the function is not published, publish the function. You can also create and publish a function. For more information, see Publish a function.
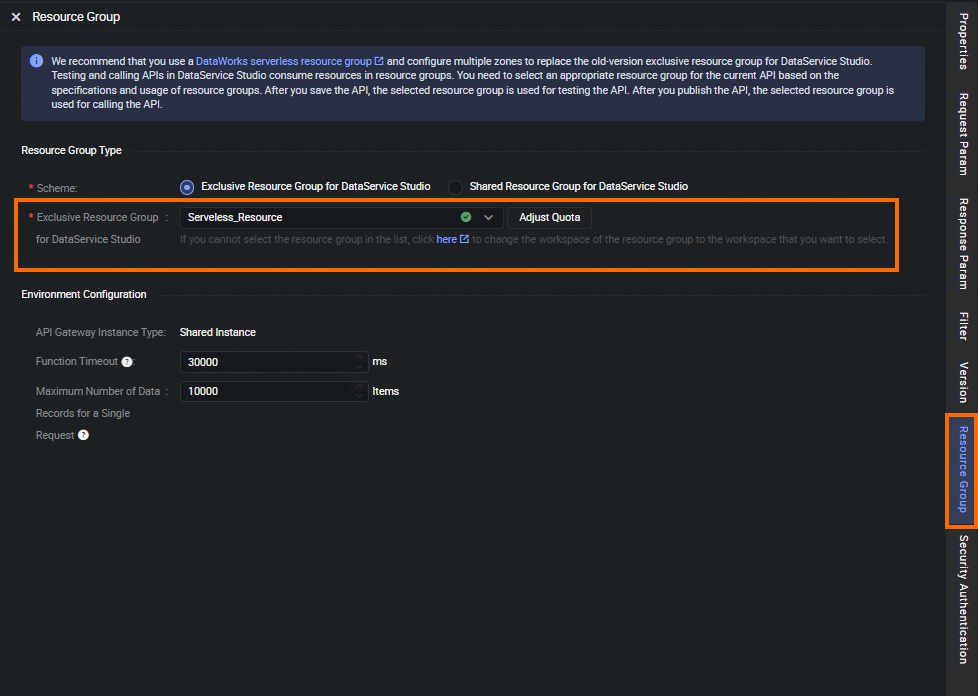
6. Configure a resource group for DataService Studio
In the right-side navigation pane, click the Resource Group tab. In the Resource Group Type section, configure the Schema parameter.
You can select Exclusive Resource Group for DataService Studio or Shared Resource Group for DataService Studio for the Scheme parameter. If you select Exclusive Resource Group for DataService Studio, select an exclusive resource group from the Exclusive Resource Group for DataService Studio drop-down list. If you select Shared Resource Group for DataService Studio, you do not need to select a resource group. DataWorks automatically uses the shared resource group to generate the API.
 Note
NoteIf you select Shared Resource Group for DataService Studio for the Scheme parameter, the resource group can be used only in the test environment. We recommend that you do not use the resource group in the production environment.
If the resource group that you want to use is not displayed in the drop-down list, go to the Resource Groups page, find the resource group, and click Associate Workspace in the Actions column to associate the resource group with the workspace.
If the resource group that you want to use is displayed in the drop-down list but cannot be selected, go to the Resource Groups page, find the resource group, and choose
 > Manage Quota in the Actions column to go to the Manage Quota dialog box. In the Manage Quota dialog box, manually configure the Occupied CUs or Minimum CUs parameter for the resource group for DataService Studio. If the billing method of the resource group is pay-as-you-go, you must configure the Occupied CUs parameter. If the billing method of the resource group is subscription, you must configure the Minimum CUs parameter.
In the Environment Configuration section, you can configure the Memory, Function Timeout, and Maximum Number of Data Records for a Single Request parameters.
The maximum value of the Function Timeout parameter varies based on the type of the resource group you select and the type of the API Gateway instance you use:
Shared API Gateway instances: The maximum value of this parameter is 30000.
Dedicated API Gateway instances: If you select Shared Resource Group for DataService Studio, the maximum value of this parameter is 30000. If you select Exclusive Resource Group for DataService Studio, the maximum value of this parameter is 90000.
NoteThe response time of the API operation depends on the actual execution time of the SQL statement. To prevent request failures caused by response timeout, configure the timeout period based on the actual execution time of the SQL statement.
The maximum value of the Maximum Number of Data Records for a Single Request parameter varies based on the type of the resource group you select:
If you select Shared Resource Group for DataService Studio, the maximum value of this parameter is 2000.
If you select Exclusive Resource Group for DataService Studio, the maximum value of this parameter is 10000.
NoteNo limits are imposed on the total number of returned results. The number of returned results is the same as the actual number of query results.
7. Save and commit the API
Click the ![]() icon in the top toolbar. After the API is saved, the selected resource group takes effect during the test.
icon in the top toolbar. After the API is saved, the selected resource group takes effect during the test.
After the API is configured, you can test the API. For more information, see Test an API.
After the test succeeds, click Submit in the upper-right corner.
In the right-side navigation pane of the API configuration tab, click Version. Find the API version that you want to publish and click Application for publication in the Actions column to go to the application page. Use the default application type Publish data service API and enter the reason for the application in the Reason for application field. Then, click Apply for permission to submit the application.
If you defined an approval policy in DataWorks Approval Center, the API must be approved before the API can be published. For more information, see Overview.
After the API is published, the configuration of the resource group for DataService Studio takes effect when the API is called.
On the Service Development tab, you can find the registered API in the left-side navigation pane and manage the API. For example, you can clone or delete the API. On the Service Management tab, you can find the published API and view the details of the published API. For more information, see View, delete, move, and clone an API, perform batch operations on multiple APIs, and use the code search feature to search for APIs.
Switch from the codeless UI to the code editor
On the configuration tab of an API, you can switch from the codeless UI to the code editor.
In the Service Development pane, click the to which the desired API belongs.
Find the API and double-click the API. The configuration tab of the API appears.
Click the
 icon in the top toolbar.
 In the Note message, click OK. Then, you can view the SQL statements of the API in the Edit Query SQL section.
ImportantDataService Studio allows you to switch only from the codeless UI to the code editor.
After you switch from the codeless UI to the code editor, you cannot switch back to the codeless UI.