This guide walks you through the end-to-end process of establishing a dedicated Express Connect circuit between your on-premises data center and Alibaba Cloud. The entire process, from the initial port request to the final activation of cloud connectivity, typically takes 1 to 3 months to complete.
This topic only describes dedicated circuit. For information on shared circuit, see hosted connections over Express Connect circuits.
Workflow
Establishing a circuit is a collaborative effort that requires coordination among you (the customer), Alibaba Cloud, your circuit provider, and the data center operator. Log on to the Express Connect console and track progress in the Construction Procedure column.
The following figure shows the workflow.

Phase 1: Plan your connection
Step 1: Select an access point
An access point is a physical location where your circuit connects to Alibaba Cloud. Each access point has redundant devices.
When choosing an access point, consider the region, service provider, and port specifications.
Key factors
Factor | Guideline |
Region | Choose the Access point geographically closest to your on-premises data center to minimize latency. |
Internet Service Provider (ISP) | Choose an ISP from the following options.
|
Port requirements
Ensure your equipment matches Alibaba Cloud's port specifications.
Supported port types: 100GE, 40GE, 10GE, and GE (Single-mode optical port).
Alibaba Cloud Side:
Module: Single-mode optical transceiver (10 km reach).
Connection: Dual-core leased line only.
Customer Side:
You must provide your own optical transceiver modules.
Specifications must match the Alibaba Cloud interface.
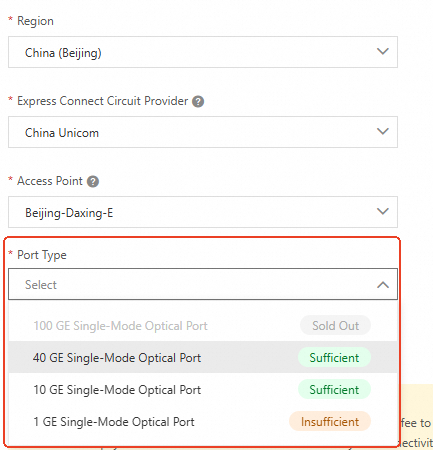
Step 2: Check port inventory
This example uses a dedicated connection port in classic mode to illustrate how to check the inventory.
Log on to the Express Connect console, choose Physical Connection, click Create Physical Connection, and select Classic Mode to request a port.
Select a Region, Express Connect Circuit Provider, and Access Point. View the available ports for each port type.
Phase 2: Install and deliver the circuit
Step 1: Request a dedicated port
Request a dedicated connection port in the console. Then, Alibaba Cloud allocates a port for you.
Step 2: Apply for an LOA
Apply for a Letter of Authorization (LOA) in the console.
Alibaba Cloud reviews the LOA application within two business days.
After approval, Alibaba Cloud matches and installs the optical transceiver module and prepares for the on-site work.
You can request additional LOAs for subsequent data center visits.
LOA processing may be delayed during holidays or network freezes.
Step 3: Download the LOA
After approval, you can download the LOA and get access point and data center details. Alibaba Cloud determines whether it is a third-party data center.
Alibaba Cloud data center: The third-party provider receives a QR code for via SMS from Alibaba Cloud for on-site survey.
Third-party data center: The provider contacts the on-site engineer directly with the LOA.
Step 4: Complete the site survey
Alibaba Cloud assists the on-site engineers in completing the survey within two business days. You must contact your provider to confirm the end-to-end fees. For more information about fees, see Billing overview.
Chinese mainland: The provider must enter the Alibaba Cloud data center suite.
Outside the Chinese mainland: The provider only needs access to the Meet-Me Room without entering Alibaba Cloud data centers.
Device specification
Confirm the transceiver specs, such as transmission rate, wavelength, and distance.
Confirm the cable specs, such as single-mode fiber (SMF), multi-mode fiber (MMF), and LC-LC interface types.
Cabling plan
Determine the access location where the cable is routed to a specific rack.
Confirm the cable route.
Verify the cable length.
Safety measures: Check whether the data center requires anti-static precautions, such as wearing anti-static wristbands.
Operating procedure: Check whether the data center has special operating procedures.
Step 5: Install the circuit
The provider's installation team connects the circuit to the device outside the data center suite.
Step 6: Purchase cross-connects
The data center operator provisions the cross-connects. You pay the cross-connect rental fee to the operator.
Step 7: Complete in-building cabling
This step ensures circuit high reliability and covers the entire process from physical deployment and verification to compliance management and operations and maintenance (O&M) assurance. The provider completes:
Device deployment and configuration
Optical fiber installation and patch cord connection
Optical power testing
Network connectivity, bandwidth, and SLA testing
Step 8: Confirm delivery and pay
Click Confirm Delivery in the console. Alibaba Cloud completes the fiber pigtail installation.
Pay the Resource occupation fee in the console. When the instance status changes to Available, the circuit is active.
Phase 3: Connect to VPC
After the dedicated port is activated, connect your on-premises data center to the VPC.
To connect multiple VPCs, add a Transit Router (TR) between the VPCs and the ECR. For details, see Connect a data center to the cloud.

Configure BGP and BFD
Configure BGP
Establish Border Gateway Protocol (BGP) peerings between the on-premises data center and the VBR, and advertise routes. For more information, see Configure and manage BGP.
NoteThe default ASN of the ECR is 45104. You can specify a custom ASN.
The BGP ASN on the Alibaba Cloud side inherits the ASN of the ECR. The ASN can be a 2-byte or 4-byte ASN that is provided by the on-premises data center.
On the on-premises data center side, configure the BGP route (172.30.0.0/24) to be advertised to Alibaba Cloud.
Route configurations may vary based on the device. For more information, contact your device vendor.
Enable BFD
Configure Bidirectional Forwarding Detection (BFD) on the VBR to accelerate route convergence.
Log on to the Express Connect console.
In the top navigation bar, select the destination region. In the navigation pane on the left, click Virtual Border Router (VBR).
On the Virtual Border Router (VBR) page, find the target VBR instance and click Edit in the Actions column.
In the Modify VBR panel, set the BFD parameters and click OK.
Only BFD-related parameters are described here. Keep the default values for other parameters.
Parameter
Description
Sender Interval
The interval at which BFD messages are sent, in milliseconds (ms).
This topic uses the default value of 1000 ms.
Receiver Interval
The interval at which BFD messages are received, in ms.
This topic uses the default value of 1000 ms.
Detection Multiplier
The maximum number of packet losses that the receiver accepts from the sender on a connection.
This topic uses the default value of 3.
Return to the Virtual Border Router (VBR) page and click the ID of the target VBR instance.
On the VBR instance details page, click the BGP Peer tab.
Find the target BGP peer and click Edit in the Actions column.
In the Edit BGP Peer panel, select the Enable BFD check box, configure BFD Hops, and then click OK.
NoteBFD supports custom single-hop or multi-hop sessions. You can configure different hop counts for your connection.
When you use BFD in a multicloud environment or a direct optical fiber connection with no intermediate bridging devices, you must change the default BFD hop count from 255 to 1.
Check connectivity
Use a server located in the local data center to ping an ECS instance deployed in the cloud.
FAQ
Why can't my on-premises server reach the VPC?
To troubleshoot connection failure, see Troubleshooting.
How do I test circuit throughput?
To test the data transfer rate, see testing the circuit network performance.
Where can I find information about circuit installation?
For common issues that occur during circuit installation, see installation FAQs.
Why is my connection unstable or intermittent?
To troubleshoot common connection issues, see connection FAQs.
How do I find the location of a data center?
You can only check the locations of dedicated Express Connect circuits. For hosted connections, consult the respective partners.
From the LOA file: After LOA application is approved, get the location information in the downloaded LOA file.
From the console: After
ec_can_get_pconn_addressquota is approved, you can query the access point in the console:Access point: In Access Point column of the Express Connect circuit, hover over the
 icon to get the location.
Access device: Click the circuit ID and get Access Device Location in the details page.