Data restoration helps minimize data loss from operational errors. You can create a temporary instance to recover your SQL Server data. This method provides an isolated environment for data access without affecting your existing instance. You can restore data to the temporary instance, verify the data, and then migrate it back to the primary instance. This process reduces the impact of data restoration on your business.
For more information about how to choose a data restoration method, see Overview of restoration methods.
Prerequisites
This feature is available only for ApsaraDB RDS for SQL Server 2008 R2 high-availability series instances with Premium Local SSDs.
A data backup of the instance must exist. If you want to perform a point-in-time restore, log backups are also required. For more information, see Configure automatic backups or create a manual backup.
Notes
The temporary instance inherits the database account and password from the backup file.
The network type of the temporary instance is classic network.
You can create only one temporary instance at a time. To create a new temporary instance, you must first delete the existing one.
Temporary instances and high-version temporary instances are free of charge. However, a standard temporary instance is automatically released 2 days after it is created, and a high-version temporary instance is automatically released 7 days after it is created.
Limits
You cannot add, modify, or delete databases or accounts on a temporary instance.
You cannot apply for a public endpoint for a temporary instance. If you must use a public endpoint for a temporary instance, submit a ticket.
Procedure
Go to the Instances page. In the top navigation bar, select the region in which the RDS instance resides. Then, find the RDS instance and click the ID of the instance.
In the navigation pane on the left, choose Backup and Restoration.
On the Backup and Restoration page, click the Temporary Instance tab.
Select a point in time for restoration. The instance is restored from the last backup created before the selected point in time.
Select Time: The time points displayed on the page are the creation times of the valid backup sets on the Data Backup tab.
Other Times: Select a point in time from other valid backup sets.
Select a creation type for the temporary instance.
Click Create Temporary Instance and then click OK.
Click Create Temporary Instance of Higher Version. In the dialog box that appears, select a zone, a target upgrade version, a VPC, and a vSwitch, and then click OK.
NoteThe instance type and storage class of a high-version temporary instance use default configurations and cannot be modified.
The time required to create a temporary instance depends on factors such as the data volume. You can go to the Tasks page to view the task progress.
Only one temporary instance can exist at a time. To create a temporary instance from a different point in time, you must first delete the current one.
After the temporary instance is created, return to the RDS Instances page and click the primary instance ID.
At the top of the page, click Database Migration to open the DTS Data Migration Tasks page.
In the upper-left corner of the page, select the region where the migration instance is located.
Click Create Task and configure the source and destination databases.
WarningAfter you select the source and destination instances, we recommend that you carefully read the limits displayed at the top of the page. Otherwise, the task may fail or data inconsistency may occur.
Category
Configuration
Description
N/A
Task Name
DTS automatically generates a task name. We recommend that you specify a descriptive name for easy identification. The name does not need to be unique.
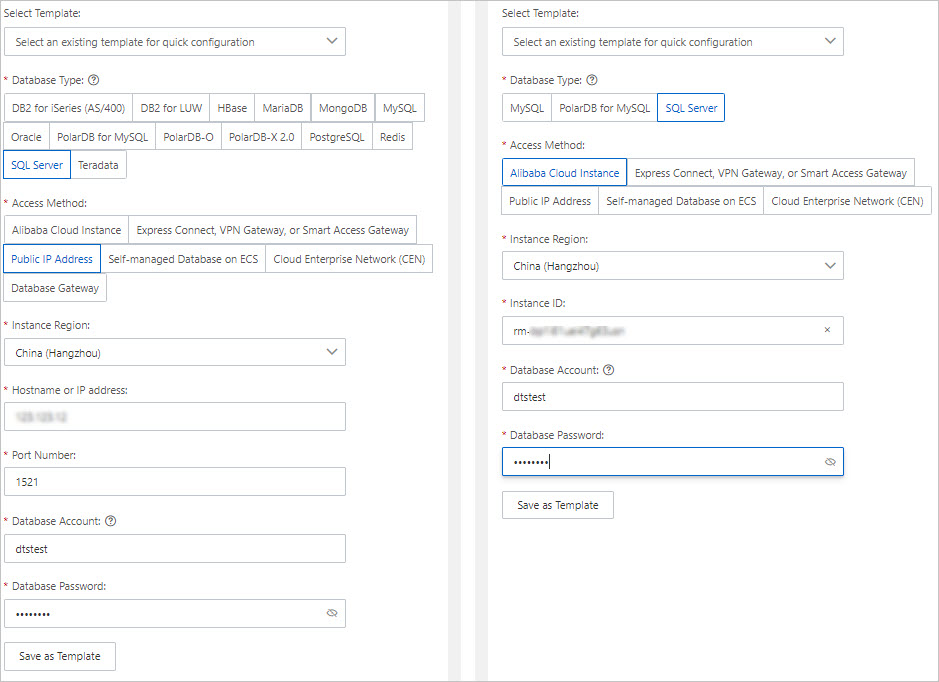
Source Database Information
Database Type
Select SQL Server.
Connection Type
Select Self-managed Database with Public IP.
NoteIf you select a self-managed database, you must also perform the required preparations. For more information, see Overview of preparations.
Instance Region
Select the region where the self-managed SQL Server database resides.
Hostname or IP Address
Enter the endpoint of the source self-managed SQL Server database. In this example, enter the public endpoint.
Port
Enter the service port of the self-managed SQL Server database. The default port is 1433.
Database Account
Enter the database account of the self-managed SQL Server database.
Database Password
Enter the password for the database account.
Destination Database Information
Database Type
Select SQL Server.
Connection Type
Select Alibaba Cloud Instance.
Instance Region
Select the region where the destination ApsaraDB RDS for SQL Server instance resides.
Instance ID
Select the ID of the destination ApsaraDB RDS for SQL Server instance.
Database Account
Enter the database account of the destination ApsaraDB RDS for SQL Server instance.
Database Password
Enter the password for the database account.
After you complete the configuration, click Test Connectivity and Proceed at the bottom of the page.
If the source or destination database is an Alibaba Cloud database instance, such as an ApsaraDB RDS for MySQL or ApsaraDB for MongoDB instance, DTS automatically adds the CIDR blocks of DTS servers to the IP address whitelist of the instance. If the source or destination database is a self-managed database hosted on an Elastic Compute Service (ECS) instance, DTS automatically adds the CIDR blocks of DTS servers to the security group rules of the ECS instance. You must also ensure that the ECS instance can access the database. If the self-managed database is hosted on multiple ECS instances, you must manually add the CIDR blocks of DTS servers to the security group rules of each ECS instance. If the source or destination database is a self-managed database that is deployed in an on-premises data center or provided by a third-party cloud service provider, you must manually add the CIDR blocks of DTS servers to the IP address whitelist of the database to allow access from DTS. For more information about the IP addresses of DTS servers, see CIDR blocks of DTS servers.
WarningAutomatically or manually adding the public IP address blocks of DTS servers may pose security risks. Using this product, you acknowledge and accept the potential security risks. You must implement basic security measures. These measures include, but are not limited to, using strong passwords, limiting open ports for each CIDR block, using authentication for internal API calls, and regularly checking and restricting unnecessary CIDR blocks. You can also connect using an internal network, such as a leased line, VPN Gateway, or Smart Access Gateway.
Configure the task objects and advanced settings. For more information, see Step 5.
After you complete the preceding configurations, click Next: Save Task Settings and Precheck at the bottom of the page.
You can move the pointer over the Next: Save Task Settings and Precheck button and click Preview OpenAPI parameters in the bubble to view the parameters for configuring this instance when you call the API operation.
NoteBefore the migration task starts, a precheck is performed. The task starts only after it passes the precheck.
If the precheck fails, click View Details next to the failed check item, fix the issue based on the prompt, and then run the precheck again.
If a warning is reported during the precheck:
For check items that cannot be ignored, click View Details next to the failed item, fix the issue based on the prompt, and then run the precheck again.
For check items that can be ignored and do not need to be fixed, you can click Confirm Alert Details, Ignore, OK, and Precheck Again to skip the alert item and run the precheck again. If you choose to shield an alert item, it may cause issues such as data inconsistency and pose risks to your business.
When the Success Rate is 100%, click Next: Purchase Instance.
On the Purchase page, select the link specification for the data migration instance. For more information, see the following table.
Category
Parameter
Description
New Instance Class
Resource Group Settings
Select the resource group to which the instance belongs. The default value is default resource group. For more information, see What is Resource Management?
Instance Class
DTS provides migration specifications with different performance levels. The link specification affects the migration speed. You can select a specification based on your business scenario. For more information, see Data migration link specifications.
After the configuration is complete, read and select Data Transmission Service (Pay-as-you-go) Service Terms.
Click Buy and Start, and in the OK dialog box that appears, click OK.
You can view the progress of the migration instance on the Data Migration Tasks list page.
NoteIf the migration instance does not include an incremental migration task, it stops automatically. After the instance stops, its Status is Completed.
If the migration instance includes an incremental migration task, it does not stop automatically, and the incremental migration task continues to run. While the incremental migration task is running normally, the Status of the instance is Running.
(Optional) After the data validation or migration is complete, if you no longer need the temporary instance, delete it as follows:
Go to the details page of the primary instance. In the navigation pane on the left, click Backup and Restoration.
On the Temporary Instance tab, click Delete Temporary Instance.
References
To create a temporary instance for an ApsaraDB RDS for SQL Server 2008 R2 instance with Premium Local SSDs by calling an API operation, see CreateTempDBInstance.
You can use DMS or a SQL Server Management Studio (SSMS) client on an ECS instance to access the temporary instance over the internal network. For more information, see Log on to a temporary instance.