Mount targets connect NAS file systems to ECS instances over a VPC network. Create, view, modify, and delete mount targets in the NAS console.
Prerequisites
A file system is created. For more information, see Create a file system.
Limits
If the number of mount targets does not meet your business requirements, submit a ticket.
General-purpose NAS file system
Each file system supports up to two mount targets.
NoteAs of November 21, 2022, you can no longer create classic network mount targets for General-purpose NAS file systems. Classic network mount targets that were created before November 21, 2022 can still be used to mount and access file systems.
Extreme NAS file system
For file systems that were created before January 19, 2024, only one mount target is supported.
For file systems that were created on or after January 19, 2024, up to two mount targets are supported.
Create a mount target
To mount a NAS file system on an ECS instance, create a mount target.
Log on to the NAS console.
In the left-side navigation pane, choose .
In the top navigation bar, select the resource group and region where your file system resides.

On the File System List page, find the target file system and click Add Mount Target in the Actions column.
In the Add Mount Target dialog box, set the following parameters.
NoteECS instances that are deployed on different vSwitches in the same VPC can use the same mount target of the VPC network type.
When you add a mount target, the file system occupies an IP address. Select a vSwitch with sufficient available private IP addresses.
The IPv6 feature is supported only for Extreme NAS file systems and is available in some regions. Before enabling IPv6, create a VPC with an IPv6 CIDR block for the file system. For more information, see Create a VPC with an IPv6 CIDR block.
Parameter
Description
VPC Network
Select an existing VPC. If no VPC is available, go to the VPC console to create one.
A NAS file system can be mounted by ECS instances in different VPCs under the same account and region. Two methods are available: Add separate mount targets: Within the quota (for example, General-purpose NAS supports 2), create separate mount targets for different VPCs. Network interconnection: If the mount target quota is reached, use Cloud Enterprise Network (CEN) to connect the VPCs for cross-VPC mounting. For more information, see Mount a NAS file system across VPCs in the same region using CEN.
vSwitch
Select a vSwitch that is created in the VPC.
Permission Group
Select a permission group as needed.
A default VPC permission group is automatically created for each account, allowing all IP addresses in the same VPC to access the file system. Create custom permission groups as needed. For more information, see Manage permission groups.
Enable IPv6
Enable the IPv6 feature.
The Enable IPv6 switch is available only when the Extreme NAS file system is in a region that supports IPv6 and the VPC and vSwitch meet the IPv6 requirements. For more information about how to create a VPC with an IPv6 CIDR block, see Create a VPC with an IPv6 CIDR block.
After completing the configuration, click OK.
Open ports
After creation, the following ports open for NFS and SMB access:
File system type | SMB service port | NFS service port | Protocol type |
General-purpose NAS file system | 445: used to access the SMB service |
| TCP |
Extreme NAS file system | Not supported |
View mount target information
View a list of mount targets
Log on to the NAS console.
In the left-side navigation pane, choose .
In the top navigation bar, select the resource group and region where your file system resides.
On the File System List page, find the target file system and click Manage in the Actions column.
On the file system details page, click the Mount Targets tab to view the list of mount targets in the Mount Target section.
View the domain name of a mount target
View the domain name of a mount target by using one of the following methods:
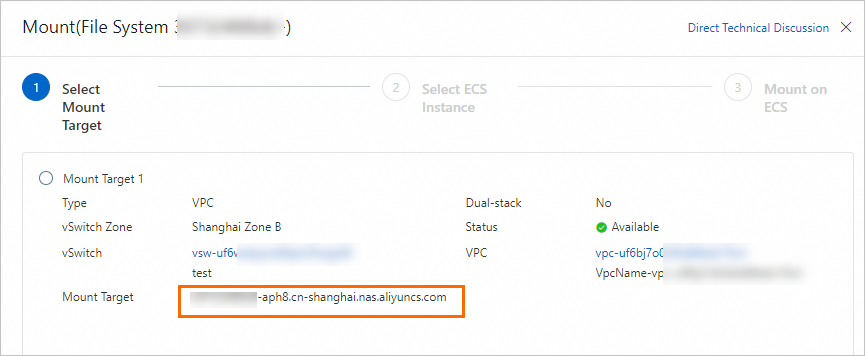
View the domain name on the File Systems page
On the File System List page, find the destination file system and click Mount in the Actions column. Then view the domain name of the file system's mount target.
View the domain name on the file system details page
On the File System List page, click Manage in the Actions column for the target file system. On the file system details page, click the Mount Targets tab. In the Mount Target section, move the pointer over the
 icon in the Mount Target column to view the mount target address.
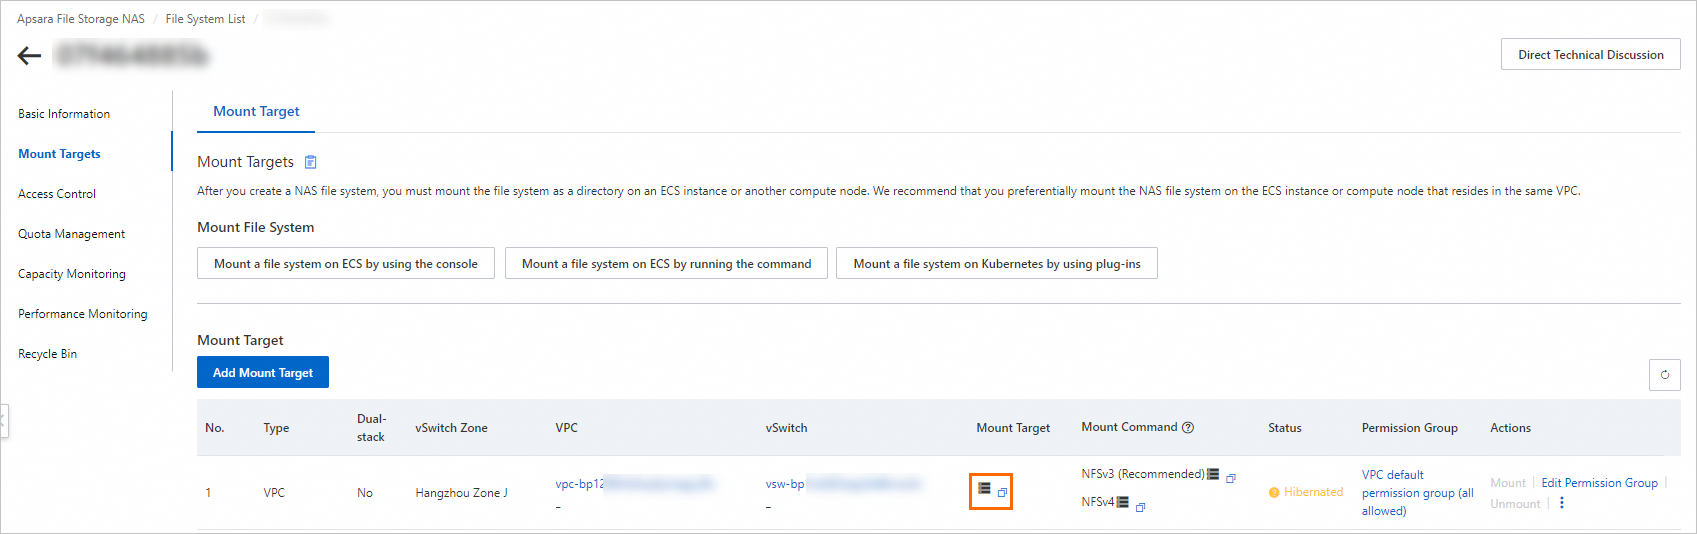
View the list of mounted clients
The NAS console displays the IP addresses of clients mounted to General-purpose NAS NFS file systems.
Log on to the NAS console.
In the left-side navigation pane, choose .
In the top navigation bar, select the resource group and region where your file system resides.
On the File System List page, click the destination file system.
On the file system details page, click the Mount Targets tab on the left. Then, in the Mount Target section, select
 > Client List in the Actions column of the mount target to view the IP addresses of clients that have mounted the file system.
You can also click Go to View to go to the Instances page in the ECS console and view the destination client's details.
ImportantOnly clients that used NAS within the last minute are displayed. Some mounted clients that are not in use may not be displayed in this list.
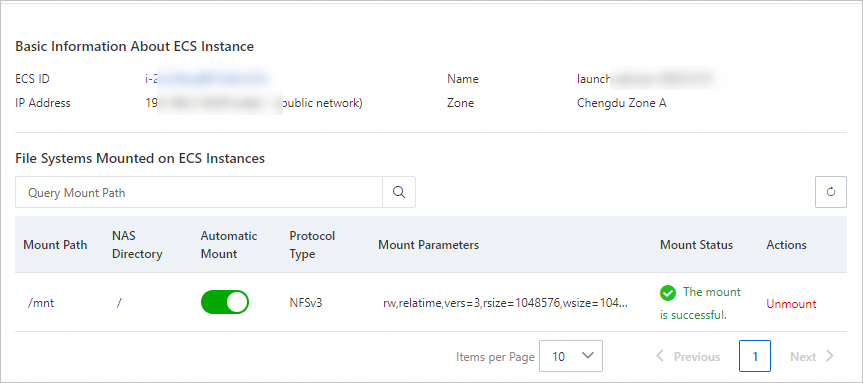
Query the mount details of an ECS instance
View mount details of an ECS instance with a NAS NFS file system mounted, including the ECS ID, IP address, mount path, NAS directory, and protocol type.
Log on to the NAS console.
In the left-side navigation pane, choose .
In the top navigation bar, select the resource group and region where your file system resides.
On the File System List page, click the target file system.
On the file system details page, click the Mount Targets tab. In the Mount Target section, find the desired mount target and click Mount in the Actions column.
In the Mount panel, find the destination ECS instance and click Query Mount Details in the Actions column to view its basic information, mount path, and NAS directory.
Modify mount target information
Modify the permission group of a mount target
Log on to the NAS console.
In the left-side navigation pane, choose .
In the top navigation bar, select the resource group and region where your file system resides.
On the File System List page, click the destination file system.
On the file system details page, click the Mount Targets tab. In the Mount Target section, find the mount target to modify and click Edit Permission Group in the Actions column.
In the Edit Permission Group dialog box, modify the permission group of the mount target and click OK.
For more information about permission groups, see Manage permission groups.
Disable and enable a mount target
Disable or enable mount targets of General-purpose NAS file systems to control client access.
Log on to the NAS console.
In the left-side navigation pane, choose .
In the top navigation bar, select the resource group and region where your file system resides.
On the File System List page, click the destination file system.
On the file system details page, click the Mount Targets tab. In the Mount Target section, click the
icon in the Actions column of the mount target, and then select Disable or Enable.Disable: Temporarily prevents any client from accessing the mount target.
Enable: Allows clients to access the mount target.
Hibernate a mount target
General-purpose NAS supports automatic hibernation for idle mount targets. A mount target enters hibernation and its resources are released if its storage usage is 0 and it has not been accessed in the last two months. Hibernated mount targets cannot be used for mounting or access. To reactivate a hibernated mount target:
This feature is not supported in the China (Shenzhen) Finance Cloud region. This feature is supported in all other regions.
Log on to the NAS console.
In the left-side navigation pane, choose .
In the top navigation bar, select the resource group and region where your file system resides.
On the File System List page, click the destination file system.
On the file system details page, click the Mount Targets tab. Then, in the Mount Target area, click
> Enable in the Actions column for the desired mount target to reactivate it.After reactivation, the mount target is available for mounting and access.
Delete a mount target
After a mount target is deleted, it cannot be restored. Proceed with caution.
Deleting a mount target before unmounting the file system may cause the client to become unresponsive. Unmount the file system before deleting the mount target.
Deleting a mount target added by an Alibaba Cloud service (Cloud Shell, Cloud Backup, or PAI) may affect those services.
Log on to the NAS console.
In the left-side navigation pane, choose .
In the top navigation bar, select the resource group and region where your file system resides.
On the File System List page, click the desired file system.
On the file system details page, click the Mount Targets tab. In the Mount Target section, find the mount target that you want to delete and click
> Delete in the Actions column.
Next steps
After adding a mount target, check network connectivity. See Check network connectivity.
Mount the NAS file system. See Mount scenarios.
To stop NAS billing after deleting a mount target, see How do I disable the NAS service or stop billing?
To unmount a file system, see Unmount a mount directory from the NAS console.
To switch a mount target from the classic network to a VPC, see Switch a mount target of a NAS file system from the classic network to a VPC.
FAQ
For an overview of mount targets, see What is a mount target and what are its functions?
To change the network type of a mount target, see FAQ about basic management features
To change the VPC of a mount target, see Can I switch the VPC for a NAS file system?
If you cannot create a classic network mount target, see Why am I unable to create a classic network mount target?
For mount failure troubleshooting, see Troubleshoot mount failures.
For more information about managing file systems, mount targets, and permission groups, see Basic management FAQ.