You can detach a data disk from an Elastic Compute Service (ECS) instance to attach it to another instance or to release it. Detaching a disk enables flexible data migration and efficient management of your storage resources.
How it works
Detaching a data disk involves two main steps:
Unmount the file system in the operating system: This is analogous to safely ejecting a USB drive before unplugging it. This action sends an unmount command to the operating system to prevent data corruption from interrupted read/write operations during detachment.
Detach the data disk from the instance: This is like physically unplugging the USB drive after it has been safely ejected. This action severs the connection between the cloud disk and the ECS instance.
Usage notes
You cannot directly detach a subscription-based cloud disk. First switch the billing method to pay-as-you-go before detaching the disk.
Detaching local disks is not supported.
Procedure
To prevent data loss, pause all read and write operations on the data disk and stop any processes that are using it before you begin.
Step 1: Unmount the file system in the operating system.
To ensure data integrity, you must first prevent the operating system from accessing the data disk. If the instance is Stopped, you can skip to Step 2: Detach the data disk.
Linux
The following instructions are standard Linux commands and apply to all major distributions, such as CentOS, Ubuntu, and Debian.
Log on to the ECS instance.
Go to ECS console - Instances. In the top navigation bar, select the target region and resource group.
Go to the instance details page. Click Connect and select Workbench. Follow the prompts to log on and open the terminal.
Run the
sudo df -hcommand to obtain the device name and mount directory from theFilesystemandMounted oncolumns.In this example, the target device
/dev/vdb1is mounted to/mnt.$ sudo df -h Filesystem Size Used Avail Use% Mounted on devtmpfs 868M 0 868M 0% /dev tmpfs 879M 0 879M 0% /dev/shm tmpfs 879M 508K 878M 1% /run tmpfs 879M 0 879M 0% /sys/fs/cgroup /dev/vda1 40G 2.4G 36G 7% / /dev/vdb1 40G 49M 38G 1% /mnt tmpfs 176M 0 176M 0% /run/user/0Unmount the file system.
Replace the
<device name>variable in the command with the device name you obtained in the previous step, and then run the command.sudo umount <device name>Check and remove the automatic mount configuration to prevent the instance from failing to restart because it cannot mount the partition correctly.
Run the
cat /etc/fstabcommand to check if the mount directory information from Step 2 exists.If it does not exist, proceed to Step 2: Detach the data disk.
If it exists, run the
sudo vi /etc/fstabcommand to edit the file. Add a#symbol at the beginning of the line that contains the mount directory to comment it out. Save the file, and then proceed to Step 2: Detach the data disk.In this example, you need to comment out
UUID=32532395-51a7-46f7-b83d-181158b009a0 /mnt ext4 defaults 0 0.# /etc/fstab # Created by anaconda on Fri Jun 28 04:16:23 2024 # # Accessible filesystems, by reference, are maintained under '/dev/disk' # See man pages fstab(5), findfs(8), mount(8) and/or blkid(8) for more info # UUID=c8b5b2da-5565-4dc1-b002-2a8b07573e22 / ext4 defaults 1 1 UUID=32532395-51a7-46f7-b83d-181158b009a0 /mnt ext4 defaults 0 0 ~
Windows
This topic uses Windows Server 2022 as an example.
Log on to the ECS instance.
Go to ECS console - Instances. In the top navigation bar, select the target region and resource group.
Go to the instance details page. Click Remote Connection and select Connect Via Workbench. Set the connection method to Terminal Connection, enter your username and password, and log on to the graphical terminal.
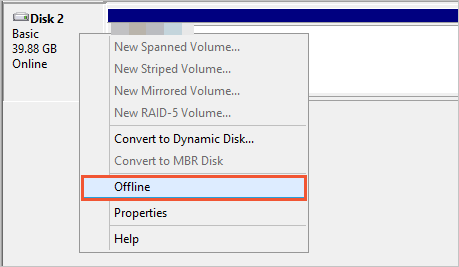
Take the disk offline.
Right-click the
 icon and select Disk Management.
In the Disk Management window, right-click the target disk and select Offline.
Step 2: Detach the data disk
Detach the data disk from the ECS instance to sever the connection between the disk and the instance.
Go to ECS console - Instances. In the top navigation bar, select the target region and resource group.
Click the target instance ID to go to the instance details page, and then click the Block Storage tab.
In the Actions column for the target disk, click Detach.
In the dialog box that appears, click OK.
Verify that the disk is detached.
After the detachment is complete, go to the ECS console - Block Storage - Cloud Disk page to check the disk status. If the disk Status changes to Unattached, the disk is successfully detached.
FAQ
What should I do if my Linux instance fails to start after I detach a data disk?
This is usually caused by leftover automatic mount entries for the detached data disk in the
/etc/fstabfile. For a solution, see What do I do if system startup exceptions occur due to configuration errors in the /etc/fstab file on a Linux instance?
What should I do if a cloud disk's status remains Detaching on a Windows instance?
Cause: This usually happens when a process prevents the disk from being unmounted. The solution is to log on to the instance and manually stop the process.
Solution:
The following steps use Windows Server 2022 as an example.
Log on to the ECS instance.
Go to ECS console - Instances. In the top navigation bar, select the target region and resource group.
Go to the instance details page. Click Connect and select Workbench. Set the connection method to Terminal. Enter your username and password to log on to the graphical terminal.
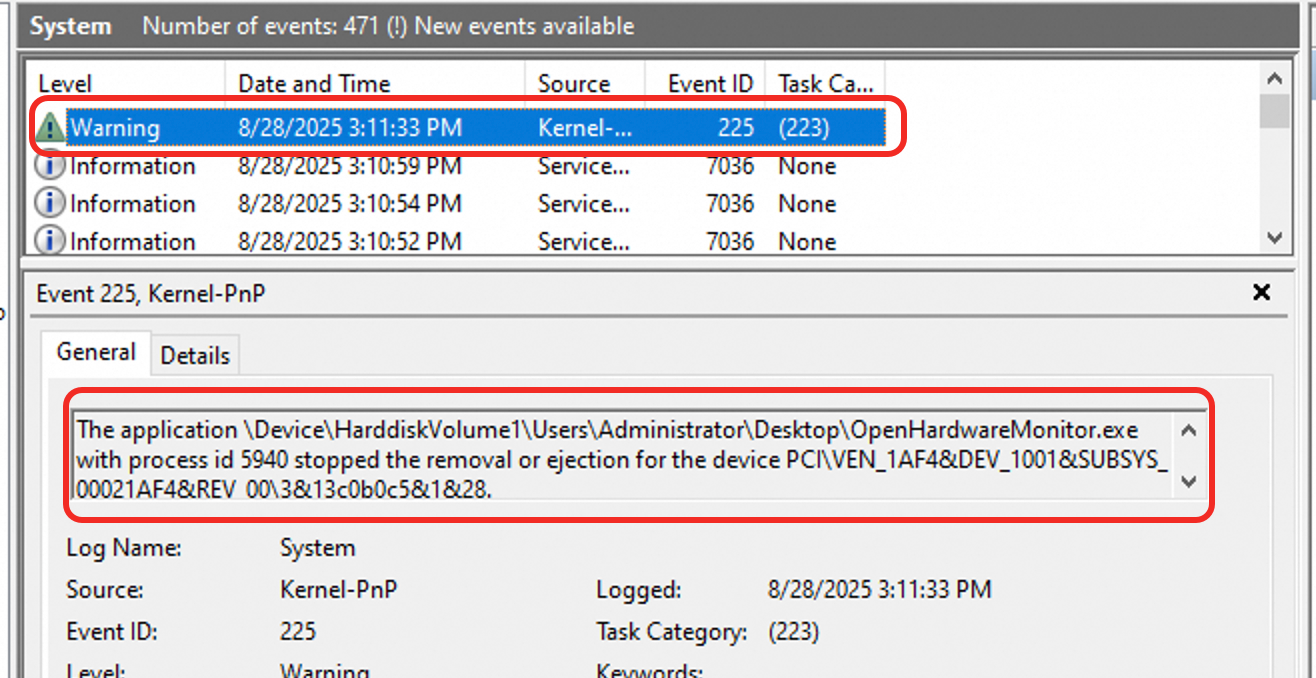
Identify the process that is using the disk.
Right-click the
 icon and select Event Viewer.
In the Event Viewer window, choose .
In the system logs, look for warning events to identify the name and PID of the process that is using the disk.
In this example, the process name is OpenHardwareMonitor.exe and the PID is 3980.
Terminate the process.
ImportantTerminating a process carries a risk of data loss or service interruption. Evaluate the impact carefully and ensure the process is not critical and has no pending write operations.
Right-click the
 icon and select Task Manager.
Click More Details. Find the process to be ended by its name or ID.
Right-click the target process and click End Task. Then try to detach the data disk again.
References
Detach a data disk using the DetachDisk API operation.
You can attach a detached disk to another ECS instance in the same availability zone.
If you no longer need the cloud disk, you can first manually create a single snapshot to back up its data and then release the disk.