Global Accelerator (GA) can interact with Web Application Firewall (WAF) and Global Traffic Manager (GTM) to accelerate enterprise resource planning (ERP) applications. Based on high-bandwidth BGP lines, and the global transmission network of Alibaba, GA allows you to deploy your workloads across regions. Users can connect to the nearest access point over the global network for content delivery acceleration. WAF, a security service empowered by big data technologies of Alibaba Cloud Security, allows you to ensure the security of content delivery. This is a highly secure solution for cross-region acceleration of ERP systems.
Prerequisites
An Alibaba Cloud account is created. If you do not have an Alibaba Cloud account, click Create an Alibaba Cloud account.Background information
A company deploys an ERP system on Alibaba Cloud in the Germany (Frankfurt) region. The backend servers provide external services through two Elastic IP addresses (EIPs). The forwarding port is port 9000. Most of the end users are in the China (Hong Kong) and Singapore regions. Several issues such as data transmission latency or logon timeout may occur when users connect to the ERP system across regions. The existing ERP service architecture cannot be dynamically modified and is vulnerable to various web application attacks. These issues severely affect the security and availability of the ERP system. To solve these issues, you can use GA to interact with WAF and GTM. When the access point nearest to the users receives requests delivered across regions, GA uses WAF to filter out malicious network traffic and uses GTM to implement intelligent traffic distribution. This improves the security, availability, and communication efficiency between the users and the ERP system in different regions.
As shown in the preceding figure, you can create a GA instance, specify China (Hong Kong) and Singapore as the acceleration regions, and deploy WAF and GTM. WAF can detect and filter out malicious requests based on the specified protection policies, and allow only valid requests to reach the origin server. GTM can forward network traffic destined for the ERP system based on the specified access policy, perform real-time health checks on the origin server of the ERP system, and implement fault isolation or failover based on the health check results. When users in China (Hong Kong) and Singapore send requests to the ERP system, the access point nearest to the users receives the requests and distributes them to the GA network. WAF filters network traffic. GTM then forwards the network traffic to the origin server and performs fault isolation or traffic redirection based on the health check results. This solution ensures high security and availability of the ERP system and reduces the network latency.
Procedure

Step 1: Create a GTM instance
GTM allows you to balance a large number of concurrent workloads, perform health checks on application services, and implement fault isolation and failovers based on the health check results.
- Log on to the Alibaba Cloud DNS console.
- In the left-side navigation pane, click Global Traffic Manager.
- On the Global Traffic Manager page, click Create Instance.
- On the buy page, set the following parameters.
- Click Buy Now and complete the payment.
Step 2: Configure an access policy
An access policy defines address pools for which requests from different networks or regions are resolved. With the access policy, users can connect to the nearest access point and your workloads can be automatically switched between the primary and secondary servers for fast failover.
To configure an access policy for the GTM instance, perform the following steps:
- Log on to the Alibaba Cloud DNS console.
- In the left-side navigation pane, click Global Traffic Manager.
- On the Global Traffic Manager page, find the GTM instance that you want to manage, click Settings in the Actions column.
- In the Select Configuration Method dialog box, select Quick Start.
- In the Configure Access Policy step, set the following parameters:
- Click Next.
Step 3: Configure basic settings
After you configure the access policy, you must specify the basic information of the GTM instance, including the primary domain name, type of the Canonical Name (CNAME) of your application, load balancing policies, global time-to-live (TTL), and alert groups.
- In the Basic Information step, set the following parameters.
- Click Complete.

Step 4: Activate WAF
WAF is empowered by big data technologies of Alibaba Cloud Security. WAF allows you to defend against common web attacks such as SQL injections, cross-site scripting (XSS), web shells, Trojans, and unauthorized downloads, and HTTP flood attacks. WAF protects your web resources from exposure and ensures the security and availability of your website.
- Enter the WAF product overview page on the Alibaba Cloud official website, and log on with your Alibaba Cloud account.
- Click Buy Now.
- On the buy page, set the following parameters.
- Click Buy Now and complete the payment.
Step 5: Add website configurations
After you activate the WAF service, you must configure the forwarding rule for the website protected by WAF.
Perform the following steps to redirect network traffic of the protected domain name to WAF in DNS proxy mode:
- Log on to the WAF console.
- On the top of the page, select the region of the WAF instance that you want to manage. Outside Chinese Mainland is selected in this example.
- In the left-side navigation pane, choose .
- On the Website Access page, click Website Access.
- On the Enter Your Website Information wizard page, set the following parameters:
- Click Next. On the Change DNS Settings wizard page, click Copy CNAME to record the CNAME allocated by WAF. This enables the WAF to receive inbound traffic.
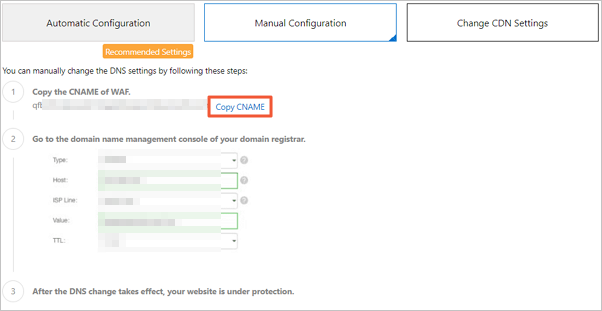
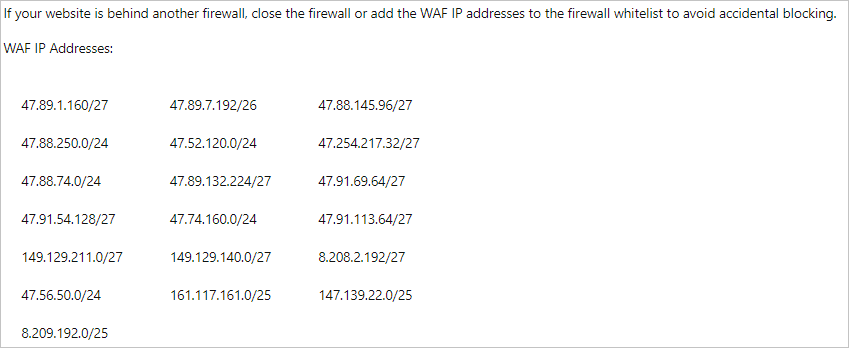
- Click Next. Click Complete. Return to the website list.. Note If you have enabled a third-party firewall for your server, disable the firewall or add the WAF IP address in the following figure to the whitelist of the enabled firewall so that the firewall will not block requests forwarded from WAF. If you are not using a third-party firewall, ignore the information in the following figure.
Step 6: Create a GA instance
GA is a high-availability and high-performance network acceleration service for global users. Based on the high-quality BGP bandwidth and global network infrastructure of Alibaba, GA allows service providers to deploy their applications across regions and users to connect to the nearest endpoints for content delivery acceleration. This can reduce network issues, such as network latency, network jitter, and packet loss.
Perform the following steps to create a GA instance.
- Log on to the GA console.
- On the Instances page, click Create Instance.
- On the buy page, set the required parameters, and click Buy Now.
- Select a specification for the GA instance. Select Small Ⅱ in this topic. For more information, see Specifications of standard GA instances.
- Select a subscription duration for the GA instance.
After you create the instance, the system automatically allocates a CNAME. User requests destined for the CNAME are resolved to the IP address of the origin server. Record the CNAME for DNS resolution.
Step 7: Purchase and associate with a basic bandwidth plan
A basic bandwidth plan provides bandwidth for data transfer over the Internet and within Alibaba Cloud. To achieve global acceleration, you must purchase a basic bandwidth plan and associate the basic bandwidth plan with the GA instance.
To purchase and associate a basic bandwidth plan to a GA instance, perform the following steps:
- On the Instances page, click Purchase Basic Bandwidth Plan.
- On the buy page, set the following parameters, click Buy Now, and then pay for the order.
- Return to the Instances page and click the ID of the GA instance that you created.
- Click the Bandwidth Manage tab.
- In the Basic Bandwidth Plan section, find the plan that you want to manage, and click Bind in the Actions column. The basic bandwidth plan is now in the In Use state.

Step 8: Add an acceleration area
After you purchase a basic bandwidth plan, you can add an acceleration area, specify the acceleration regions where end users are located, and allocate bandwidth to these regions.
To add an acceleration area, perform the following steps:
- On the Instances page, click the ID of the GA instance that you have created.
- On the instance details page, click the Acceleration Areas tab and select an acceleration area. In this example, Asia Pacific is selected.
- On the Acceleration Areas tab, click Add Acceleration Area.
- In the Add Acceleration Area dialog box, configure the regions and click OK.
- Region: Select the region where users are located. Select Singapore.
- Bandwidth: Select a bandwidth value for the acceleration region. 10 Mbit/s is selected in this topic.
- Select China (Hong Kong) as the acceleration region and allocate 10 Mbit/s of bandwidth to the China (Hong Kong) region.
After the acceleration area is added, GA assigns an accelerated IP address to each region in the acceleration area for network acceleration.
Step 9: Create a listener
Listeners are used to monitor connection requests from clients. GA monitors connection requests received on the specified listener ports and forwards the requests to endpoints through the specified protocol.
To add a listener to a GA instance, perform the following steps:
- On the Instances page, click Instance ID.
- On the instance details page, click the Listeners tab and then click Add Listener.
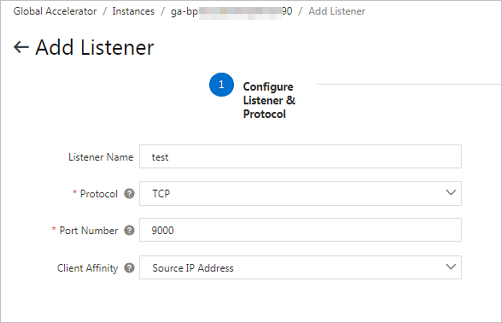
- On the Configure Listener & Protocol wizard page, configure the listener:
- Listener Name: Enter a name for the listener. The name must be 2 to 128 characters in length, and can contain letters, digits, underscores (_), and hyphens (-). The name must start with a letter.
- Protocol: Select a protocol for the listener. In this example, TCP is selected.
- Port Number: Enter the number of the listener port that is used to receive requests and forward requests to endpoints. Valid values: 1 to 65499. In this example, 9000 is used.
- Client Affinity: Select whether to enable client affinity. If client affinity is enabled, requests from the same client IP address are forwarded to the same endpoint when clients access stateful applications. Select Source IP Address in this topic.
- Click Next to configure an endpoint group.
Step 10: Configure an endpoint group
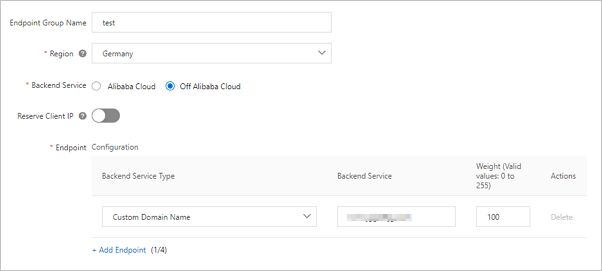
Each listener is associated with an endpoint group. You can associate an endpoint group with a listener by specifying the region to which you want to distribute network traffic. After you associate an endpoint group with a listener, network traffic is distributed to the optimal endpoints in the endpoint group.
To create an endpoint group, perform the following steps:
- Enter a name for the endpoint group in the Endpoint Group Name parameter.
- Select the region where you want to create the endpoint group. The servers that the clients want to access must be deployed in the specified region. Select Germany (Frankfurt) in this topic.
- Specify whether the backend service is deployed on Alibaba Cloud or outside Alibaba Cloud. Off Alibaba Cloud is selected in this example.
- Specify whether to preserve client IP addresses. After you enable this feature, backend servers can retrieve client IP addresses. In this example, this feature is disabled.
- Configure endpoints.
- Click Next, confirm the configurations, and then click Next.
Step 11: Connect workloads to GA
To connect your workloads to GA, perform the following steps:
- Log on to the Alibaba Cloud DNS console.
- On the Domain Name Resolution page, find the domain name that you want to manage, and click DNS Settings in the Actions column.
- On the DNS Settings page, find the DNS record that you want to modify, and click Modify in the Actions column.
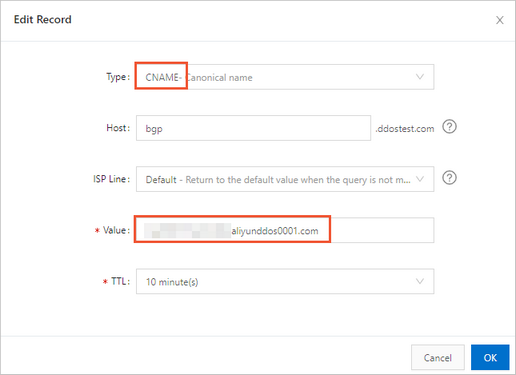
- In the Modify DNS Record dialog box, modify the DNS record.
- Type: Select CNAME.
- Record Value: Change the value to the CNAME allocated by GA. For more information, see Step 6: Create a GA instance.
- Keep the remaining settings unchanged.
- Click OK.
Step 12: Verify the settings
To check the acceleration and protection performance after GA interacts with WAF and GTM, perform the following steps:
- Open a web browser on a client located in the region of an access point, such as China (Hong Kong) or Singapore.
- Enter the domain name of the ERP system to access the ERP system services deployed in Germany (Frankfurt).
- Open the CLI on your computer in the China (Hong Kong) or Singapore region in this topic.
- Run the following command to test the network latency:
curl -o /dev/null -s -w "time_connect: %{time_connect}\ntime_starttransfer: %{time_starttransfer}\ntime_total: %{time_total}\n" "http[s]://<ERP system domain name>[:<port>]"where:- time_connect: the period of time to establish a TCP connection.
- time_starttransfer: the period of time for the backend server to send the first byte after the client sends a request.
- time_total: the period of time for the backend server to respond to the session after the client sends a request.




Was this helpful?