Containerization has become a popular option for deploying applications efficiently and consistently. Containers package software code and all its dependencies, ensuring that applications run seamlessly across various computing environments. Alibaba Cloud Container Registry (ACR) is a secure and reliable platform for hosting and managing Docker container images and other OCI resources. It offers features like image scanning, automated builds, and seamless integration with Alibaba Cloud services, making it an essential tool for DevOps workflows.
If your company has more than one development team, then you are probably using more than one Alibaba Cloud account to separate different systems, enhance security boundaries and have a better cost control. Given a multi-account setup, many customers have asked me, how to share an Alibaba Cloud Container Registry (ACR) across multiple Alibaba Cloud accounts in a streamlined and easy to manage way. By leveraging Virtual Private Cloud (VPC) and Cloud Enterprise Network (CEN), you can enable secure and seamless access to your container images and Helm charts, improving collaboration and accelerating development cycles. Extending ACR beyond single accounts allows organizations to maintain a uniform development environment, ensuring consistency and reducing duplication of efforts. This capability is particularly valuable for enterprises managing multiple projects or teams distributed across different Alibaba Cloud accounts. If you would like to learn more about multi-account setups, particularly through Alibaba Cloud's Resource Directory, I can highly recommend the MNC Landing Zone Whitepaper.
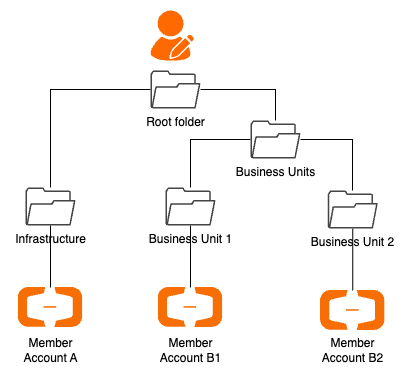
We are assuming that you are using Alibaba Cloud Resource Directory to manage your Alibaba Cloud accounts. Resource Directory is a centralized management service that enables customers to organize multiple accounts into a hierarchical structure, providing unified resource management and easy administration. By aligning resources in a Resource Directory Organization and grouping them into folders, customers can enhance their security, compliance and operational efficiency.
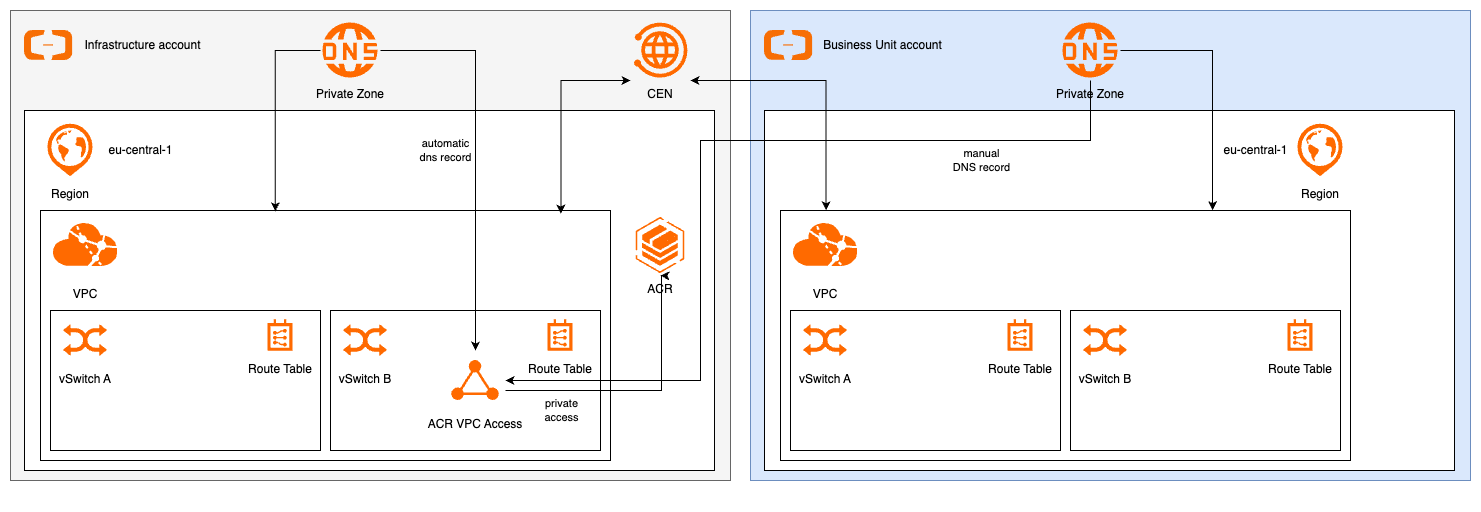
In the assumed setup, we have a central infrastructure account that will host shared services and the Cloud Enterprise Network (CEN). CEN is a high-available network service that implements a hub-and-spoke architecture using transit routers to establish private connections between Virtual Private Clouds (VPCs) or data centers across different regions. This design allows customers to build flexible, stable and scalable global networks, using Alibaba Cloud's private backbone network.
Furthermore, we assume that you have multiple Alibaba Cloud accounts that are used by different business units (BUs). Our architecture involves three core components:
This setup maintains a secure environment while enabling efficient cross-account access:

I suggest you implement this solution in your account while reading along. To do so, the following prerequisites are expected:
Basic knowledge

Let's walk through the implementation steps:


An ACR namespace is a collection of repositories and can be used to e.g. group all repositories of a team or project. It also comes handy when creating access policies. Let's create a namespace which we will use later for testing. Remember the name of the namespace, as we will need it in step 7.
As the ACR part is set up, we can continue with the network. Cloud Enterprise Network (CEN) offers a flexible, high-speed network backbone for inter-account communication. Create a CEN instance as described here. It will provide the central routing backbone between all VPCs.
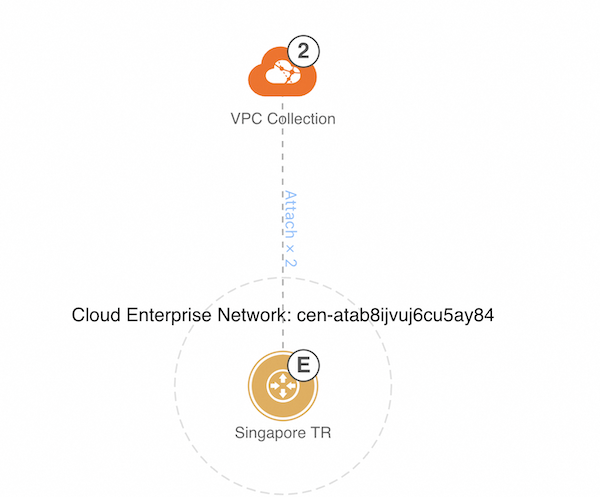
Next, you need to connect the VPC with the attached ACR to CEN by following "Attach a network instance". This will connect the VPC with CEN using a Transit router.
For each BU account ("Account B") requiring ACR access, establish VPC attachments via CEN. Login into the BU account, navigate to VPC and allow cross account attach to CEN, so that the link between the infrastructure account and the BU account can be established. After authorization, you need to repeat the step 3 attachment for the newly authorized VPC. After setting up the VPCs and CEN, your network topology should look similar to this:

Now, we need to manually create a PrivateZone DNS entry for the container registry in Account B. For this, navigate to PrivateZone in Account B and create a new Private zone. During the creation, select the VPC in Account B as effective zone. Once the zone is created, you can add a record set. Use the same host name for the container registry as in Account A. The value should be the IP address in the VPC of account A you've created in step 1.
<NAMESPACE>. Create a custom policy as described here using the following JSON in account A. Please replace the placeholders:| Placeholder | Value |
|---|---|
| INSTANCE_ID | The id of your ACR container registry you've created in step 1. |
| NAMESPACE | The name of your ACR namespace, which you have set in step 2. |
| ORGANIZATION_ID | The id of your Alibaba Cloud Resource Directory |
| FOLDER_ID | The path in the resource directory to which the Alibaba Cloud account "B" belongs. |
{
 "Statement": [
   {
     "Effect": "Allow",
     "Action": [
       "cr:GetAuthorizationToken",
       "cr:ListInstance",
       "cr:GetInstance",
       "cr:ListNamespace",
       "cr:GetNamespace",
       "cr:ListRepository",
       "cr:GetRepository",
       "cr:ListTag",
       "cr:GetTag",
       "cr:ListArtifact",
       "cr:GetArtifact",
       "cr:ListChart",
       "cr:GetChart",
       "cr:PullRepository",
       "cr:CreateRepository",
       "cr:PushRepository"
     ],
     "Resource": [
       "acs:cr:*:*:instance/<INSTANCE_ID>",
       "acs:cr:*:*:repository/<INSTANCE_ID>/<NAMESPACE>/*"
     ]
   }
 ],
 "Version": "1"
}
Now create a RAM role for cross account access as described here. It's crucial to configure the Resource Access Management (RAM) role's trust policy accurately, as it defines which entities are permitted to assume the role. For example, specifying ecs.aliyuncs.com as the principal allows Elastic Compute Service (ECS) instances to assume the role. If you intend for Function Compute to assume this role, you should modify the principal to fc.aliyuncs.com. In our example, we use ECS as principal, as we are going to test the ACR access from an ECS instance in the next step. We also add conditions to limit access to our Resource Directory and also specify a path within our Resource Directory which contains our Alibaba Cloud accounts. This could e.g. be a business unit.
{
 "Statement": [
   {
     "Action": "sts:AssumeRole",
     "Effect": "Allow",
     "Principal": {
       "Service": [
         "ecs.aliyuncs.com"
       ]
     },
     "Condition": {
       "StringEquals": {
         "acs:PrincipalRDId": "<ORGANIZATION_ID>",
         "acs:PrincipalRDPath": ["/<FOLDER_ID>"]
       }
     }
   }
 ],
 "Version": "1"
}
With this setup, we've created a role in Account A which can be assumed by other accounts in our Resource Directory. In the next steps, we'll use this policy from an ECS instance.
To test the access, we will use an ECS instance. To give it permission for ACR access, we will allow it to assume the role created in step 7. Using the same process to create a RAM role as in step 7, create a new RAM role in Account B using the following JSON policy and trust policy. Replace ACCOUNT_A with the id of our infrastructure account and ROLE_NAME with the role created in step 7:
{
  "Version": "1",
  "Statement": [
{
  "Effect": "Allow",
  "Action": "sts:AssumeRole",
  "Resource": "acs:ram:*:<ACCOUNT_A>:role/<ROLE_NAME>"
}
  ]
}
{
"Statement": [
{
"Action": "sts:AssumeRole",
"Effect": "Allow",
"Principal": {
"Service": [
"ecs.aliyuncs.com"
]
}
}
],
"Version": "1"
} Now create an ECS instance in the VPC of Account B and use the RAM role we've just created. This way, we'll be able to access the ACR registry from the instance without the need for an Access Key. Configure ACR credentials as described here. Now you can pull and push using an ACR located in another Alibaba cloud account.
In this blog post, we demonstrated how to create and assume RAM roles from ECS instances, eliminating the need for long-lived Access Keys and Secret Keys. This approach enhances security by avoiding the overhead of regular key rotation and documentation of usage locations. It also reduces the attack surface for malicious actors and reduces operational efforts.
Another security benefit of our setup is the usage of private networking to access our container registry. By attaching it to a VPC and accessing it via a private network, the communication stays secure.
To further strengthen your security posture, consider implementing an Alibaba Cloud Firewall to manage ingress and egress of your VPCs.
By using a central ACR, you can reduce efforts for managing multiple docker registries, such as adapting the host part of your docker image names. Furthermore, you have a central place where you can manage access to your images using RAM. If you plan to deploy workloads across multiple Alibaba Cloud regions, you should consider using one ACR instance per region with cross-region replication, to reduce network latency and cross-region data transfer and thus, cost.
In this blog post, we've shared an Alibaba Cloud Container Registry (ACR) across different accounts, enabling easy access and resource sharing within your Alibaba Cloud organization. During the walkthrough, you have:
By sharing the ACR across accounts, development and operations teams can work more closely, sharing resources and updates in real-time without the overhead of duplicating repositories. This approach could also be used for consolidating container registries to reduce infrastructure costs and administrative overhead, as you avoid maintaining multiple registries with identical content.
If you don't plan to continue using the created setup, don't forget to release the created resources to reduce cost and unnecessary resource usage:

1 posts | 0 followers
FollowAlibaba Cloud Community - December 13, 2024
Rupal_Click2Cloud - June 9, 2021
Alibaba Clouder - July 9, 2018
Alibaba Developer - October 15, 2018
Alibaba Clouder - December 20, 2018
Alibaba Clouder - March 21, 2019

1 posts | 0 followers
Follow DevOps Solution
Accelerate software development and delivery by integrating DevOps with the cloud
Learn More Alibaba Cloud Flow
An enterprise-level continuous delivery tool.
Learn More Architecture and Structure Design
Customized infrastructure to ensure high availability, scalability and high-performance
Learn More SOFAStack™
A one-stop, cloud-native platform that allows financial enterprises to develop and maintain highly available applications that use a distributed architecture.
Learn More