ROS CDK provides the Asset class to convert local files into cloud resources and automatically upload them to specified OSS buckets when they are deployed by using ROS CDK. ROS CDK simplifies the process of infrastructure as code and replaces JSON or YAML templates with programming languages such as TypeScript and JavaScript, improving efficiency and security. In practical applications, ROS CDK and OSS can be used to package and deploy local blog projects to Alibaba Cloud OSS to achieve cloud hosting of static websites. The entire process includes initializing a project, configuring credentials, packaging blog content, deploying content to OSS buckets through CDK, and configuring static website hosting and custom domain names.
In the digital world, information and data are like the protagonists in the drama, occupying the leading role in the information age. As a technology explorer, your mission is to use coding to create and protect the digital world. However, faced with the surging data flow, you may wonder how can the value of these digital assets be safely and effectively stored, managed, and even maximized.
Don't worry. Now you have the Cloud Development Kit (CDK) provided by Alibaba Cloud Resource Orchestration Service (ROS), and the Asset module within it will become your most trusted assistant. Without struggling with complicated SDK and manual console operation, you will learn how to use ROS CDK to upload your local files to Object Storage Service (OSS) in the simplest way.
In this article, we will explore the Asset module by walking through a case study of deploying website content to the cloud. I will guide you to move local files to OSS skillfully through simple coding and ROS CDK. You do not need to grab the data by yourself or worry about the security and integrity of files.
Imagine you are an architect with a blank patch of land in front of you and your task is to construct a building consisting of multiple floors and rooms. Traditionally, you may need to build bricks by hand and tighten screws one by one, which is not only time-consuming but also labor-intensive. Now, suppose you have a tool. Just entering a few lines of code, the building can be built automatically and can be modified and expanded at any time according to your design intent. This tool is the Cloud Development Kit (CDK) provided by Alibaba Cloud Resource Orchestration Service (ROS).
ROS CDK is a framework for developing software that allows developers to define, build, and deploy cloud resources with familiar programming languages. With ROS CDK, you can define your cloud infrastructure as code (IaC) and write the layout and configuration of cloud resources just as you write application logic.
To design your ideal cloud architecture, you do not have to tighten every screw and memorize the configuration details of every resource every time. Instead, you can write clean and intuitive codes that describe the structure of these buildings. These codes are then converted into specific resource configurations through the CDK framework, such as Elastic Compute Service (ECS), Object Storage Service (OSS) buckets, or Server Load Balancer, and are quickly deployed on the cloud. This makes the entire deployment process more automated and repeatable, and can be easily shared across teams or projects.
Infrastructure as code greatly reduces human error and makes complex cloud service management as simple as building blocks. ROS CDK provides great convenience for rapid deployment, upgrade, and expansion of cloud applications, allowing developers to focus more on innovation and development rather than duplication of labor. In short, ROS CDK gives developers the ability to create castles on the cloud.
As a developer navigating the vast landscape of data, you have acquired extensive knowledge and created numerous datasets throughout your journey. To safely preserve these precious data in such a vast world, you need a powerful and reliable storage solution, that is, OSS.
OSS is a large cloud storage system composed of numerous scalable buckets. Each bucket can expand infinitely based on your needs, allowing you to store a vast amount of data, whether it is a small text file or a large audio or video file.
Storing the data in OSS is like applying permanent protection, ensuring that every piece of knowledge and memory is safeguarded against the erosion of time and other potential threats. OSS enables resources to be accessed anytime and anywhere, allowing you to retrieve what you need with just a thought.
Like a navigator guiding the stars, OSS allows you to easily organize and retrieve these data. Its capabilities such as intelligent sorting, marking, and automatic deletion of unused and outdated data keep your storage space always in order. The encryption and permission control guard the security of your precious data, allowing only those with the correct key and permissions to access data.
In Alibaba Cloud, OSS is the best place for every developer to protect and share their wisdom and achievements. It is not limited by physical space and can easily accumulate and inherit endless data. So, as you prepare to build your knowledge empire on the cloud, let OSS be your most reliable guardian.
Before entering the IaC world, we still need some preparations. To install ROS CDK, Node.js and TypeScript of the following versions are used:
• Node.js: 14.17.0 or later
• TypeScript: 3.8 or later
First, install ROS CDK.
Note: Please make sure that the version of ros-cdk-cli you install is 1.0.50 or later. You can confirm it by running npm list -g.
In your practice, whenever you plan to start a new project, you need to make some preparations in your programming environment. You need to ensure you have a project framework, configurations, and access credentials for the cloud platform.
Initializing the project is like laying out a blueprint in your programming environment with the basic outline of the project to be completed. On your computer, this means creating a new directory containing the necessary file structure, giving the developers a place to code.
Configuring credential information is to obtain an AccessKey, which grants you the authority to control resources and manage data on the cloud. In the Alibaba Cloud world, this means that you need to configure the AccessKey ID and Secret AccessKey for authentication in the local environment. In this way, when you use ROS CDK, it ensures that you are an authorized developer with the rights to manage these cloud resources, rather than an unintentional intruder.
Before we proceed with more advanced tasks, let's first set up the environment.
1. Run the following command to create a project directory and initialize the project:
mkdir demo
cd demo
ros-cdk init --language=javascript --generate-only=true
2. Run the following command to configure an Alibaba Cloud credential:
ros-cdk config3. Set the credential parameters:
endpoint(optional, default:https://ros.aliyuncs.com):
defaultRegionId(optional, default:cn-hangzhou):

[1] AK
[2] StsToken
[3] RamRoleArn
[4] EcsRamRole
[0] CANCEL

Authenticate mode [1...4 / 0]: 1
accessKeyId:************************
accessKeySecret:******************************

✅ Your cdk configuration has been saved successfully!
Parameter description:
• endpoint: the endpoint of ROS. Default value: https://ros.aliyuncs.com
• defaultRegionId: the ID of the region where you want to deploy the ROS stack. Default value: cn-hangzhou.
• Authenticate mode: the authentication method. In this example, an AccessKey pair is used for authentication. In this case, you must specify the AccessKey ID and the AccessKey Secret. For more information about how to obtain an AccessKey pair, see Configure a credential in interactive mode (fast).
With everything ready, let us begin our journey with ROS CDK.
To access a static web page deployed on an OSS bucket, you need to prepare a domain name. As the domain name will be used in the last step of this tutorial, you can also register it after the CDK is deployed.
We recommend you use the Alibaba Cloud Domain service to quickly register a domain name that belongs to you. For more information, see How to register a domain name on Alibaba Cloud.
In your journey as a developer to create things on the cloud, the Asset module in ROS CDK is a key component that allows you to easily transfer valuable resources from on-premises to the cloud. Imagine that you have some precious files on your local machine, and you want to store them safely in an OSS bucket on the cloud. Without automated tools, you may have to manually upload each file to the OSS Bucket. However, with the help of the Asset module, this process becomes much simpler.
The Asset module is like a unique bridge built by skilled artisans. This bridge does not directly transfer the resources but converts real-world assets into metadata-tagged objects. These objects, with their metadata, are ready to be recognized and accurately transferred to the correct location in the cloud by other deployment tools.
Let us describe this process more specifically:
When an engineer or developer uses the Asset module, they are actually starting a preparation process where local files or directories are encapsulated into resources that can be understood by the cloud. The Asset module generates all the necessary metadata and configuration files to tell the cloud how to receive and store the incoming files. However, the Asset module itself does not actually upload files.
In other words, the Asset module enables your local resources to be represented in the cloud. It converts files into asset descriptions, essentially tagging them with a cloud storage address. Then, it waits for a process (such as a CDK build and deployment workflow) to collect these prepared packages (files with metadata) and deliver them accurately to the specified cloud storage service (such as OSS).
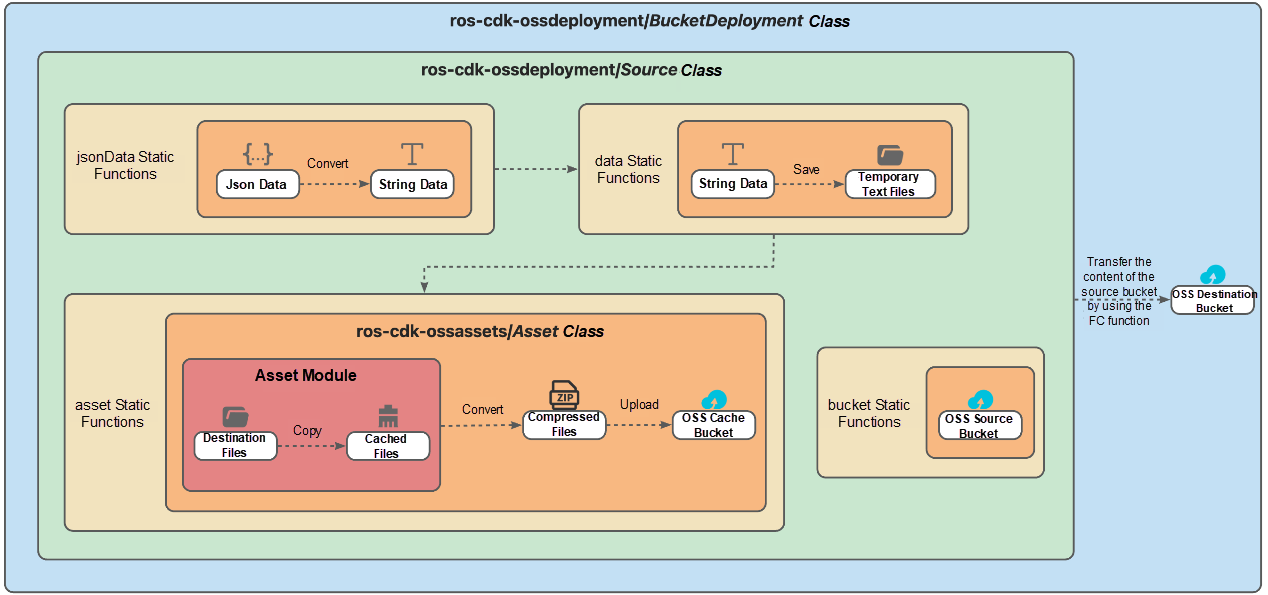
As a skilled developer, you are always looking for more efficient ways to manage and transfer your files and data. In the ROS CDK, there are two specific tools: ros-cdk-ossassets and ros-cdk-ossdeployment.
ros-cdk-ossassets acts as a temporary storage solution. The Asset class within this tool can cache local files in a temporary OSS Bucket. This is the first step in caching and transferring files, preparing them for the following ones.
ros-cdk-ossdeployment is designed to accurately execute file transfer commands. The Source class within this module supports uploading files from various sources. It includes four static functions that handle different types of file sources:
• bucket: objects in buckets in the same region are used as deployment sources.
• asset: local files are used as deployment sources.
• data: specified strings are used as deployment sources.
• jsonData: JSON objects are used as deployment sources.
Finally, when you need to send these source files to a specific OSS bucket, you only need to pass the Source to the BucketDeployment class and specify the destination bucket.
This way, with ros-cdk-ossassets and ros-cdk-ossdeployment, any required data and assets can be stored, transferred, and precisely deployed to the cloud storage. In this manner, you will have created another digital domain within the vast ecosystem of Alibaba Cloud.
In this part, we will use a best practice case to demonstrate how to upload local files to Alibaba Cloud OSS buckets. We will start by creating a new blog (or you can use an existing local blog), and then show you how to deploy its content to an OSS bucket. After that, we can directly use the public endpoint provided by the OSS bucket to access the blog website.
Before performing the following steps, make sure that you have completed all necessary preparations, including environment configuration and project initialization.
Sample runtime environment for this step:
• Chip: Apple M1
• System environment: macOS Ventura 13.2.1
• Next.js 14.2.3
We will use the React-based Next.js framework to build a simple blog website. You just need to follow these steps in order:
1. Run the following command to create a project:
npx create-next-app nextjs-blog --use-npm --example https://github.com/vercel/examples/tree/main/solutions/blog The project is generated using the create-next-app tool, which automatically builds a Next.js application for you and references this specific template with the --example parameter.
If you are interested in different web designs, you can browse Vercel's other template options.
If you are using create-next-app for the first time, the command-line terminal will return the following prompt:
Need to install the following packages:
create-next-app@14.2.3
Ok to proceed? (y)
At the Ok to proceed? (y) prompt, enter y and press the Enter key.
After several minutes, the project is created, and all project dependencies are installed together.
Once the project is created, you will see the corresponding confirmation message on the command line:
Success! Created nextjs-blog at ***/nextjs-blog
Inside that directory, you can run several commands:

  npm run dev
    Starts the development server.

  npm run build
    Builds the app for production.

  npm start
    Runs the built app in production mode.

We suggest that you begin by typing:

  cd nextjs-blog
npm run dev
2. Enter the development mode
cd nextjs-blog
npm run dev
Wait until the command-line terminal returns the following information:
> dev
> next dev

  ▲ Next.js 14.2.3
  - Local:        http://localhost:3000

 ✓ Starting...
Corepack is about to download https://registry.npmjs.org/pnpm/-/pnpm-9.3.0.tgz.
 ✓ Ready in 5.6s
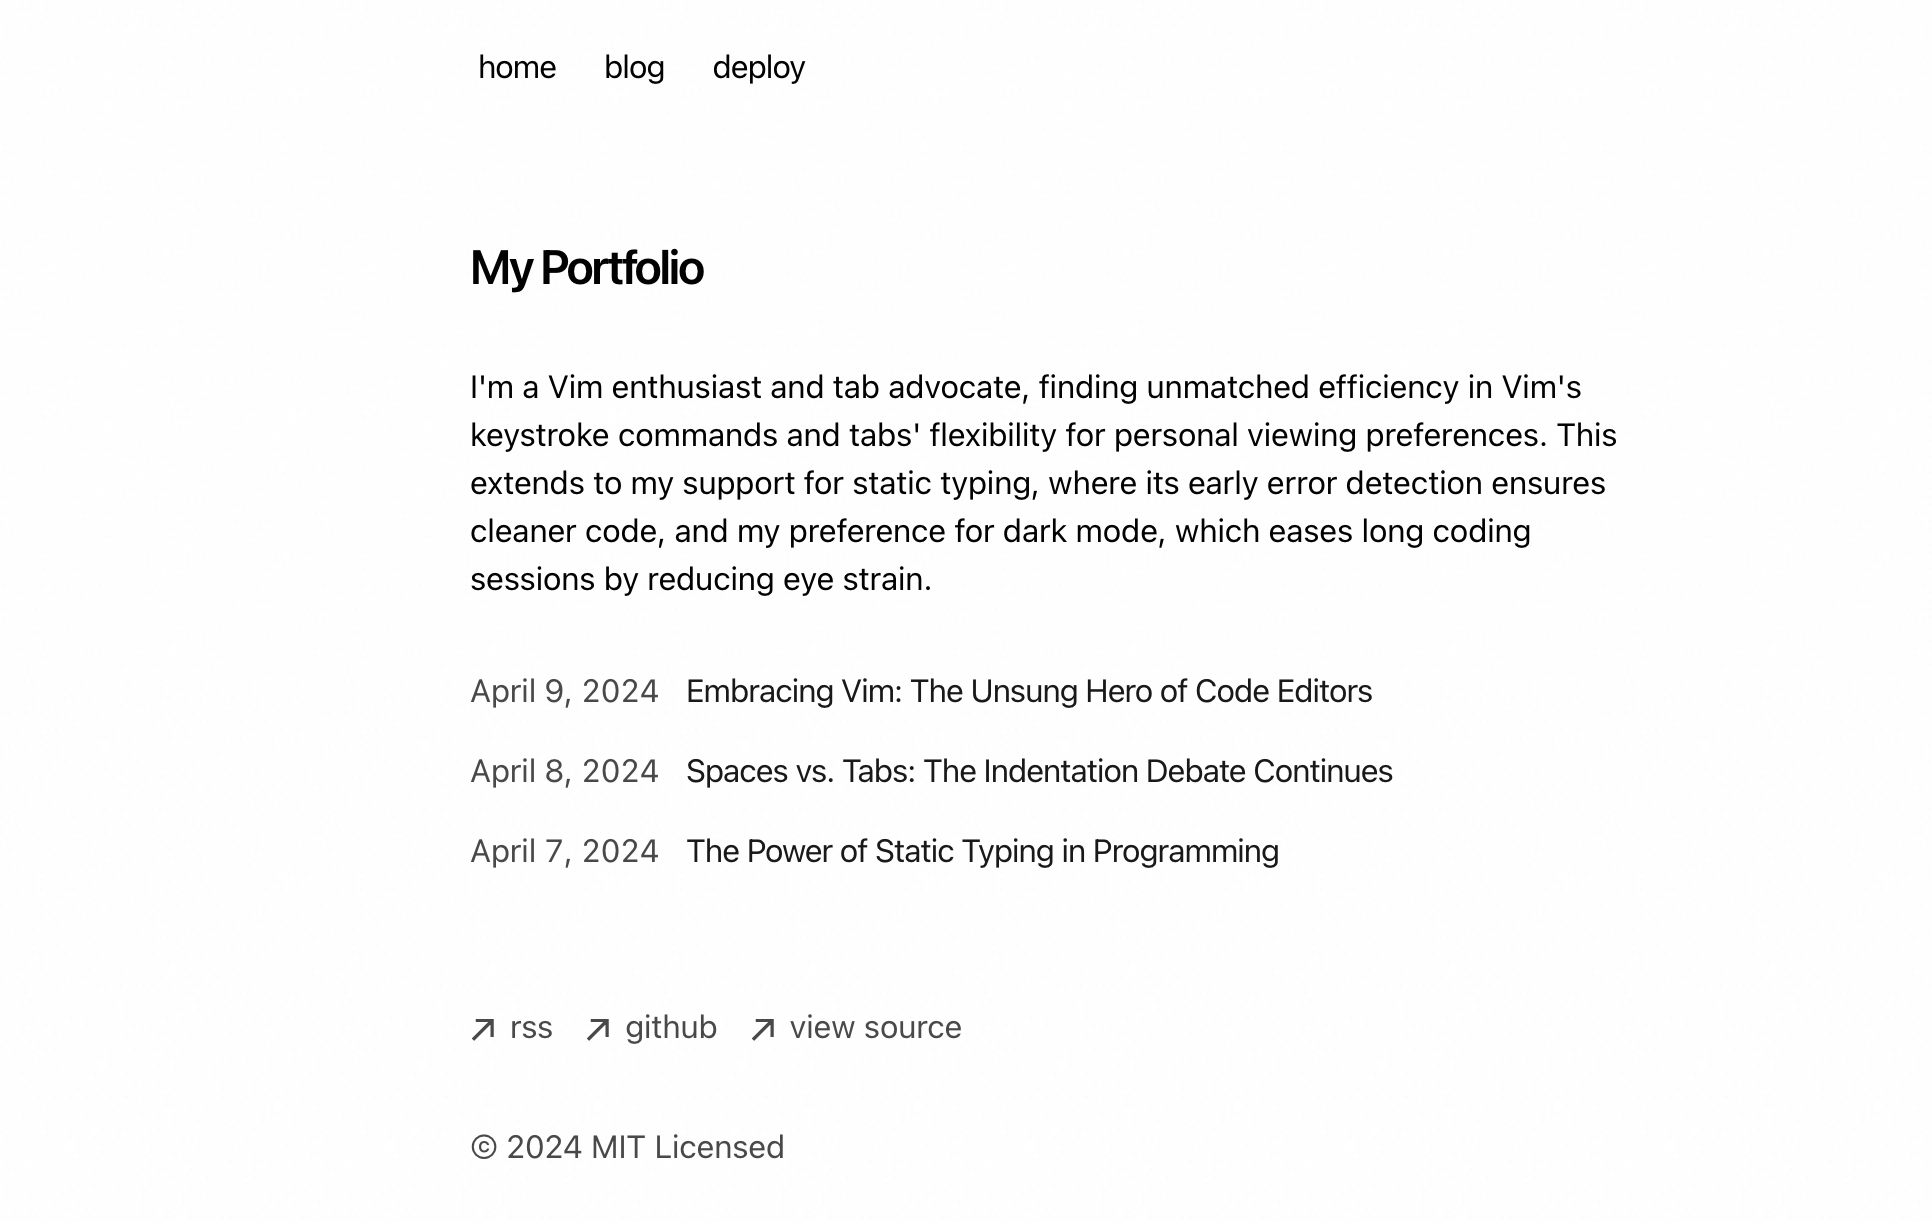
Click http://localhost:3000 to see the following content:
3. Create a page
Next.js has a hot refresh feature in development mode, which means that when you modify a file, the system will automatically update and reflect changes to the browser.
Now, let us add a new blog post. In this template, all blog posts are located in the app/blog/posts directory and saved in MDX format. Run the following command to create your first blog post:
touch app/blog/posts/what-is-ros-cdk.mdxOpen the what-is-ros-cdk.mdx file in the app/blog/posts directory using your familiar editor or in vim mode and add the following content:
---
title: '什么是ROS CDK?'
publishedAt: '2024-06-11'
summary: '本文将介绍如何ROS CDK的基本概念与适用场景'
---

ROS CDK(Cloud Development Toolkit)是阿里云资源编排服务ROS提供的一套开源软件开发工具包,用于在代码中定义云资源并通过ROS进行部署。使用该工具,你无需再依赖繁琐的JSON或YAML模板语法,而是可以通过熟悉的编程语言完成资源的创建和配置,实现自动化部署及运维。

## 使用须知

ROS CDK已经支持在TypeScript、JavaScript、Python、Java和C#中使用,你可以选择任意已支持的编程语言来定义云资源。更多信息,请参见[入门应用示例](https://www.alibabacloud.com/help/en/ros/developer-reference/getting-started-with-applications)。

ROS CDK由构造库和命令行工具两部分组成:

- **构造库**:预先编写的模块化和可重用代码片段的集合,可供你组合、修改和集成,用于快速部署云资源以构建你的应用程序。构造库中配备了多种简化操作的函数,旨在降低在构建应用程序时定义和集成阿里云服务的复杂性。
- **命令行工具**:在完成应用程序构建后,需要使用ROS CDK提供的命令行工具与其交互,以实现生成模板、线上部署、查询和删除资源栈等功能。

##  适用场景

ROS CDK利用面向对象的高级抽象模式对云资源进行标准定义,从而实现快速构建云资源,适用于需要快速、安全且可重复部署云资源的开发团队。其适用场景主要包括:

- 基础设施即代码(Infrastructure as Code,IaC):在需要以可编程和可重复的方式预置、管理和更新阿里云上的云基础设施时,CDK提供了一种强大的解决方案。通过编写代码定义你的资源栈(包含例如VPC、ECS实例、RDS数据库实例、ACK集群等资源),可以确保环境的一致性,并且能够轻松地在不同环境中部署相同的基础设施配置。
- 复杂架构管理:若你的项目涉及复杂的阿里云资源架构设计,包含多个服务之间的相互依赖关系,CDK可以协助你组织这些服务组件,创建模块化的构造块(Constructs),并允许复用和组合这些组件以构建大型应用架构。
- 多团队协作与分层设计:针对多团队共同开发的项目,CDK可以通过版本控制工具促进协同工作,并支持基础设施的分层设计,使得不同的团队可以专注于各自负责的服务或组件。
- 自动化部署与持续集成/持续部署(CI/CD)流水线:CDK可以无缝集成到持续集成和持续部署(Continuous Integration/Continuous Deployment,CI/CD)流程中,便利开发者进行应用和相关基础设施资源的自动部署和更新。
- 安全性与权限管理:使用CDK,你可以精确控制RAM角色、策略和其他安全相关设置,以确保基础设施的安全合规性。
- 测试驱动开发:CDK支持单元测试和合成测试,你可以在实际部署之前对基础设施模型进行验证,从而提高代码质量并减少生产环境中的错误。

## 工具优势

ROS CDK是一种基础设施即代码(IaC)的框架,它提供了将基础设施定义为代码的能力。借助编程语言的强大功能,使得基础设施的创建和管理更加高效、灵活和可靠。以下是CDK的一些主要优势:

- 通用编程语言开发:CDK允许开发者使用他们已经熟悉的编程语言(如JavaScript、TypeScript、Python、Java、C#等),来定义基础设施,无需学习专有的配置语言。
- 高级抽象层次:CDK提供了构建块(称为Constructs),用于封装较低层次的细节,使开发者能够专注于业务逻辑。
- 模块化和可重用性:开发者可以利用构造库中预先定义的构建块,也可以创建自定义的构建块,然后在不同的基础设施项目中反复利用它们,从而促进了模块化和代码的重用。
- 类型安全:对于支持静态类型的语言(如TypeScript和Java),CDK提供了类型安全性,减少了因类型错误而导致的运行时问题。
- 智能编辑器支持:由于CDK使用通用编程语言开发,开发者可以充分利用现代集成开发环境(IDE)提供的代码补全、语法高亮、格式化和Linting等功能。
- 版本控制和团队协作:CDK代码以源码形式存在,因此可以轻松地纳入版本控制系统,从而便于团队成员协同工作。
- ROS集成支持:ROS CDK与ROS集成,可以在阿里云上部署和预置你的基础设施。借助ROS,你可以可预测地重复执行基础设施部署,并在出现错误时进行回滚。如果你已经熟悉ROS,则在开始使用ROS CDK时无需学习新的IaC管理服务。
- 其他软件开发工具集成:CDK可以无缝集成到现有的软件工程工具和流程中,例如源代码管理、单元测试、集成测试以及持续集成/持续交付。
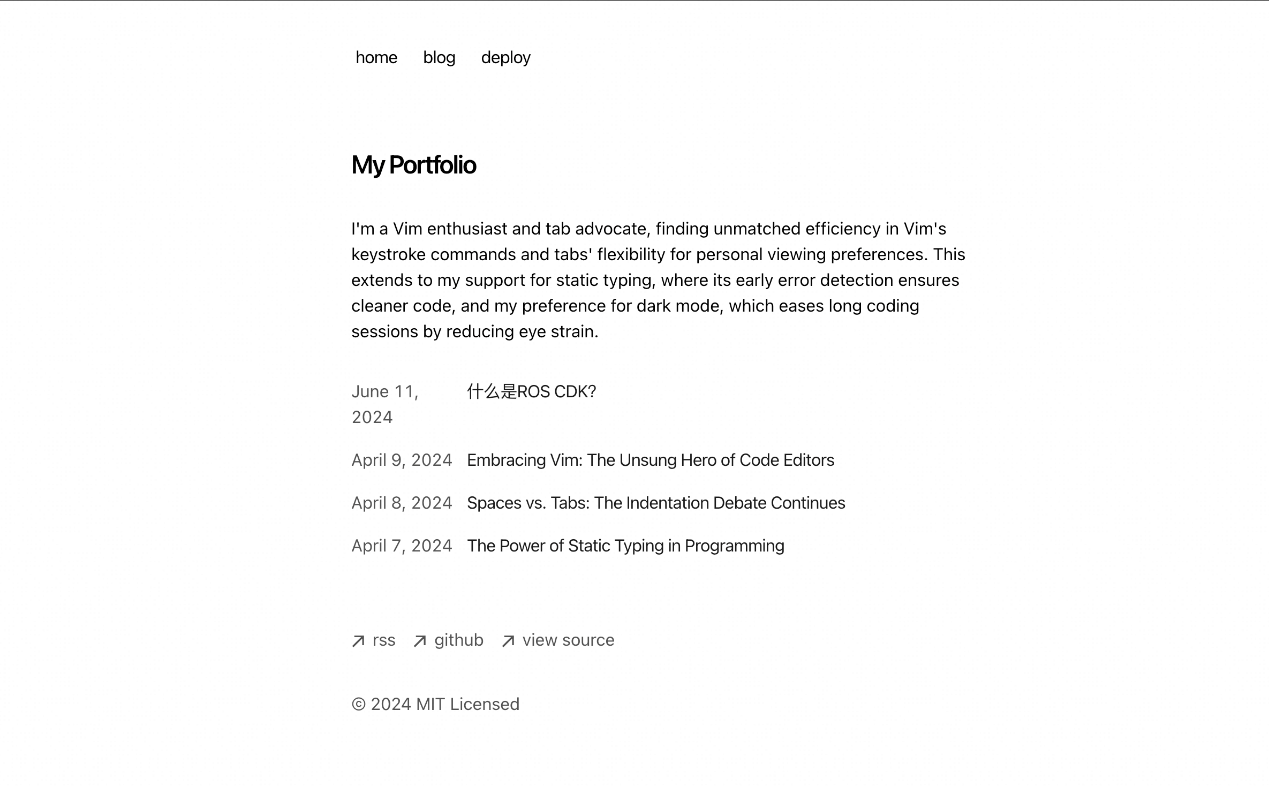
At this point, you will find that the blog homepage has one more article:
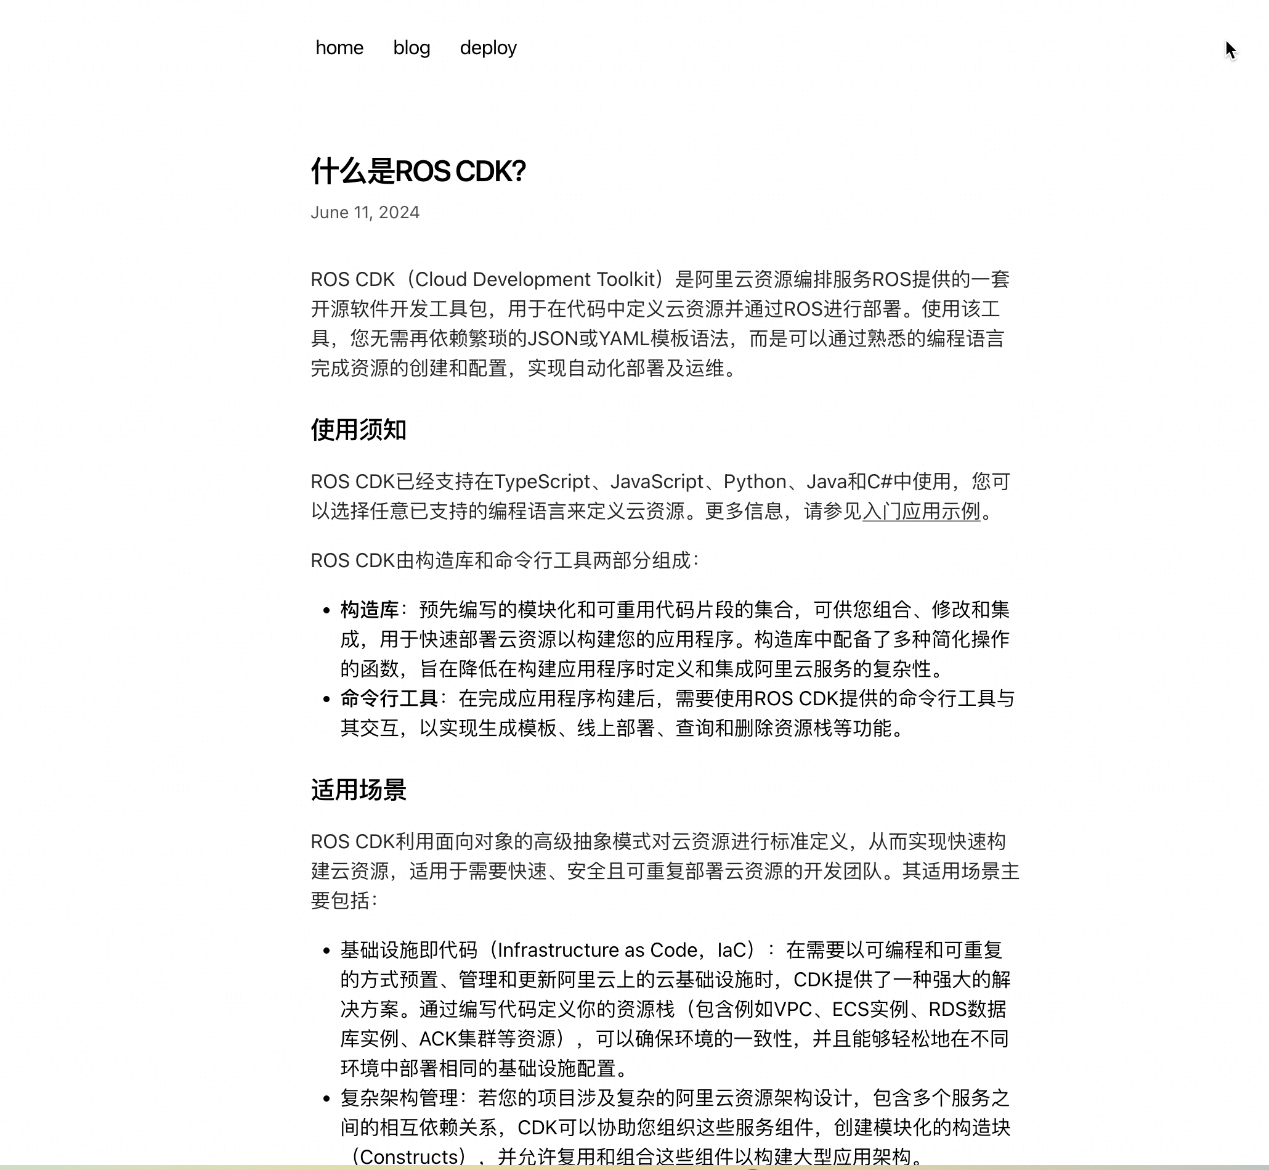
Clicking on the title of the article, you can see the specific content:
4. Related operations
To maintain the simplicity and topic relevance of the article, we will only cover the most basic operations on how to add a blog post. If you are eager to learn further, you can visit the Next.js official documentation to get more advanced customization and basic knowledge to further optimize and personalize your website.
5. Package code in the production environment
Press crtl + C to exit development mode.
To generate static web page files that can be directly deployed in OSS, we make some changes to the existing configuration. Firstly, we need to remove the request.url parameter passed in when generating OG images. Specifically, modify the content of the app/og/route.tsx file as follows:
import { ImageResponse } from 'next/og';

export function GET() {
    let title = 'Next.js Portfolio Starter';

    return new ImageResponse(
        (
            <div tw="flex flex-col w-full h-full items-center justify-center bg-white">
                <div tw="flex flex-col md:flex-row w-full py-12 px-4 md:items-center justify-between p-8">
                    <h2 tw="flex flex-col text-4xl font-bold tracking-tight text-left">
                        {title}
                    </h2>
                </div>
            </div>
        ),
        {
            width: 1200,
            height: 630,
        }
    );
}
Secondly, to enable the static export of Next.js, we need to modify the next.config.js file in the root directory of the project. If there is no such configuration file, you can run the following command to create and save the configuration:
echo "const nextConfig = { output: 'export' }\nmodule.exports = nextConfig" > next.config.jsFinally, run the following command to package code in the production environment:
npm run buildThe following information displayed shows that the packaging is successful:
> build
> next build

  ▲ Next.js 14.2.3

   Creating an optimized production build ...
 ✓ Compiled successfully
 ✓ Linting and checking validity of types
 ✓ Collecting page data
 ✓ Generating static pages (13/13)
 ✓ Collecting build traces
 ✓ Finalizing page optimization

Route (app)                              Size     First Load JS
┌ ○ /                                    175 B            94 kB
├ ○ /_not-found                          141 B          87.2 kB
├ ○ /blog                                175 B            94 kB
├ ● /blog/[slug]                         5.29 kB        99.1 kB
├   ├ /blog/how-to-use-cdk
├   ├ /blog/spaces-vs-tabs
├   ├ /blog/static-typing
├   └ /blog/vim
├ ○ /og                                  0 B                0 B
├ ○ /robots.txt                          0 B                0 B
├ ○ /rss                                 0 B                0 B
└ ○ /sitemap.xml                         0 B                0 B
+ First Load JS shared by all            87.1 kB
  ├ chunks/23-a6fd6170b6cfa730.js        31.6 kB
  ├ chunks/fd9d1056-6184565b3c21c232.js  53.6 kB
  └ other shared chunks (total)          1.86 kB


○  (Static)  prerendered as static content
●  (SSG)     prerendered as static HTML (uses getStaticProps)
Next.js will generate an out folder that contains the HTML/CSS/JS resources for the application.
First, we need to install the dependencies required for developing the CDK project in your chosen language.
Enter the project initialized in the Preparations step and modify the contents of the package.json file as follows:
{
  "name": "demo",
  "version": "0.1.0",
  "bin": {
    "demo": "bin/demo.js"
  },
  "scripts": {
    "build": "echo \"The build step is not required when using JavaScript!\" && exit 0",
    "cdk": "cdk",
    "test": "jest"
  },
  "devDependencies": {
    "@types/jest": "^25.2.1",
    "@types/node": "10.17.5",
    "typescript": "^3.9.7",
    "jest": "^25.5.0",
    "ts-jest": "^25.3.1",
    "ts-node": "^8.1.0",
    "babel-jest": "^26.6.3",
    "@babel/core": "^7.12.9",
    "@babel/preset-env": "7.12.7",
    "@babel/preset-typescript": "^7.12.7",
    "@alicloud/ros-cdk-assert": "^1.0.25"
  },
  "dependencies": {
    "@alicloud/ros-cdk-core": "^1.0.29",
    "@alicloud/ros-cdk-oss": "^1.0.27",
    "@alicloud/ros-cdk-ossdeployment": "^1.0.27"
  }
}
After the modification is complete, run the following command to install dependencies:
npm installIn this section, we will add resources to the project, that is, to realize the function of transmitting the local blog to the cloud. The resources involved in this example include:
The billable items involved in this project include:
• Billing of Simple Log Service (optional)
Go to the project directory and modify the contents of lib/demo-stack.js as follows:
const ros = require('@alicloud/ros-cdk-core');
const oss_deployment = require('@alicloud/ros-cdk-ossdeployment');
const oss = require('@alicloud/ros-cdk-oss');
const fs = require("fs");
const path = require("path");

/**
 * Recursively reads all files in a directory including subdirectories.
 * @param dirPath The directory path to read.
 * @returns An array containing paths of all files.
 */
function getAllFiles(dirPath) {
  dirPath = dirPath.endsWith('/') ? dirPath : dirPath + '/';
  const result = [];
  const files = fs.readdirSync(dirPath);
  for (const file of files) {
    const curPath = path.join(dirPath, file);
    if (fs.lstatSync(curPath).isDirectory()) {
      result.push(...getAllFiles(curPath));
    } else {
      const objectPrefix = path.dirname(curPath).substring(
          path.dirname(curPath).indexOf('/out') + '/out'.length) + '/';
      result.push(oss_deployment.Source.asset(curPath, {}, objectPrefix.substring(1)));
    }
  }
  return result;
}

class DemoStack extends ros.Stack {
  constructor(scope, id, props) {
    super(scope, id, props);
    const blogPath = "your-blog-project-path/out";  // the path of the local directory
    const ossBucketName = "my-blog";  // the name of the OSS bucket
    const filePaths = getAllFiles(blogPath);
    new ros.RosInfo(this, ros.RosInfo.description, "Deploy the blog to OSS.");
    const destBucket = new oss.Bucket(this, 'SampleDestBucket', {
      bucketName: ossBucketName
    });
    new oss_deployment.BucketDeployment(this, 'SampleFileDeployment', {
      sources: filePaths,
      destinationBucket: destBucket,
      timeout: 300,
      logMonitoring: true,  // specifies whether to enable log monitoring. If this parameter is set to false, log monitoring is disabled.
    });
  }
}

module.exports = { DemoStack };
Set the blogPath variable to the path of code in the production environment generated by packaging your local blog project, such as the out directory obtained after completing the Create a New Blog section. In addition, set the ossBucketName variable to the name of the OSS bucket that you plan to create to store blog files. The name of the bucket must be globally unique.
If you want to use an existing OSS bucket to store your blog project files, modify the preceding code as follows:
const ros = require('@alicloud/ros-cdk-core');
const oss_deployment = require('@alicloud/ros-cdk-ossdeployment');
const oss = require('@alicloud/ros-cdk-oss');
const fs = require("fs");
const path = require("path");

/**
 * Recursively reads all files in a directory including subdirectories.
 * @param dirPath The directory path to read.
 * @returns An array containing paths of all files.
 */
function getAllFiles(dirPath) {
  dirPath = dirPath.endsWith('/') ? dirPath : dirPath + '/';
  const result = [];
  const files = fs.readdirSync(dirPath);
  for (const file of files) {
    const curPath = path.join(dirPath, file);
    if (fs.lstatSync(curPath).isDirectory()) {
      result.push(...getAllFiles(curPath));
    } else {
      const objectPrefix = path.dirname(curPath).substring(
          path.dirname(curPath).indexOf('/out') + '/out'.length) + '/';
      result.push(oss_deployment.Source.asset(curPath, {}, objectPrefix.substring(1)));
    }
  }
  return result;
}

class DemoStack extends ros.Stack {
  constructor(scope, id, props) {
    super(scope, id, props);
    const blogPath = "your-blog-project-path/out";  // the path of the local directory
    const ossBucketName = "my-blog";  // the name of the OSS bucket

    const filePaths = getAllFiles(blogPath);
    new ros.RosInfo(this, ros.RosInfo.description, "Deploy the blog to OSS.");
    new oss_deployment.BucketDeployment(this, 'SampleFileDeployment', {
      sources: filePaths,
      destinationBucket: ossBucketName,
      timeout: 300,
      logMonitoring: true,  // specifies whether to enable log monitoring. If this parameter is set to false, log monitoring is disabled.
    });
  }
}

module.exports = { DemoStack };
Assign the ossBucketName variable to the name of the OSS bucket where you want to store the blog project files. Make sure that the bucket already exists.
Run the following command:
ros-cdk deploy --sync=true--sync=true synchronizes the stack information and displays it in the terminal. Upon success, the command-line terminal returns the following information:
DemoStack: deploying...
|DemoStack               |2024-06-20T03:46:09 | CREATE_COMPLETE      | ALIYUN::SLS::Logstore   | ros-cdk-oss-deploy...gxxxx/funct
ion-log | SLSLogStoregxxxx

|DemoStack               |2024-06-20T03:46:09 | CREATE_COMPLETE      | ALIYUN::SLS::Project    | ros-cdk-oss-deployment-gxxxx | S
LSProjectgxxxx

|DemoStack               |2024-06-20T03:46:09 | CREATE_COMPLETE      | ALIYUN::RAM::Role       | ros-cdk-oss-deployment-gxxxx | F
CRolegxxxx

|DemoStack               |2024-06-20T03:46:09 | CREATE_COMPLETE      | ALIYUN::OSS::Bucket     | yingzhao-blog-0001 | SampleDestB
ucket

|DemoStack               |2024-06-20T03:46:09 | CREATE_COMPLETE      | ALIYUN::FC::Service     | 6ba8771f-a499-433d-a7ac-5e7axxxx
eb4b | FCServicegxxxx

|DemoStack               |2024-06-20T03:46:09 | CREATE_COMPLETE      | ALIYUN::FC::Function    | 436f5ba6-7ce2-4627-be63-c67dxxxx
907a | FCFunctiongxxxx

|DemoStack               |2024-06-20T03:46:09 | CREATE_COMPLETE      | ALIYUN::SLS::Index      | ros-cdk-oss-deploy...function-lo
g/index | SLSIndexgxxxx

|DemoStack               |2024-06-20T03:46:09 | CREATE_COMPLETE      | ALIYUN::ROS::CustomResource | - | SampleFileDeployment


 ✅ The deployment(sync create stack) has completed!
Status: CREATE_COMPLETE
StatusReason: Stack CREATE completed successfully
StackId: 070932bb-d6d3-4f08-8e6a-2a0740bxxxxFinally, you need to perform two simple configuration steps on the OSS console. Follow these simplified steps:
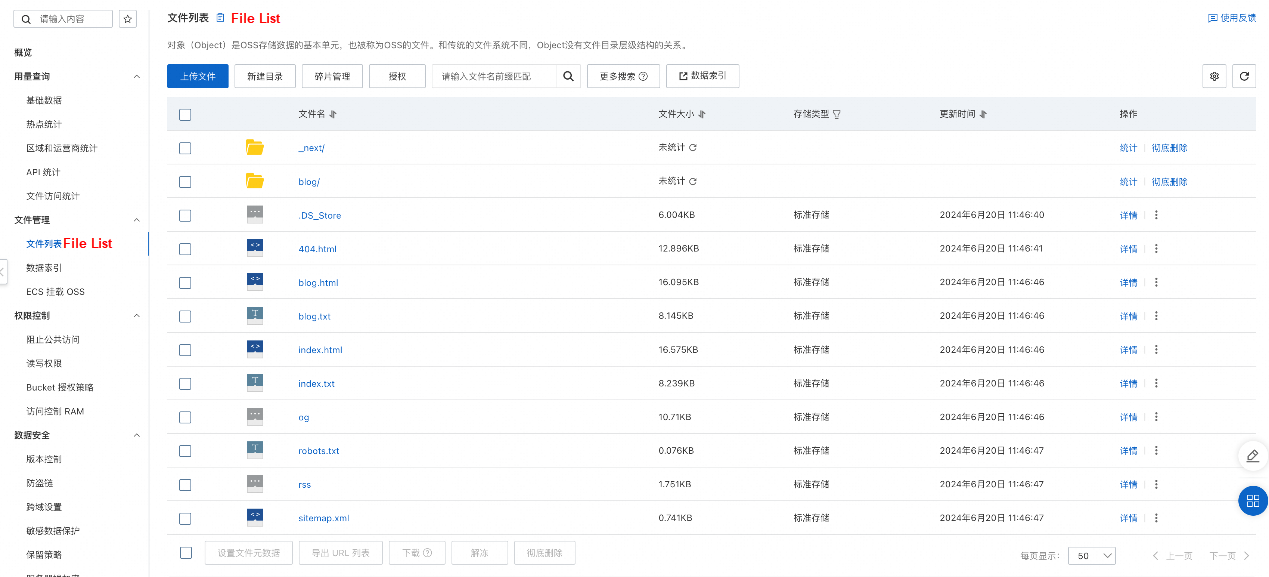
index.html and Default 404 Error Page to error.html. Example:
Congratulations! With careful preparation and a series of configuration work, you have successfully migrated your local blog to the cloud. Now, you can easily access your exclusive blog by entering the domain name you prepared in the browser!
This means that your creative content can be discovered and appreciated by more readers around the world in a brand-new form. Moreover, with the stability and scalability of the cloud platform, your blog site will be able to provide a better access experience and easily cope with page view growth.
The command for updating the stack is the same as that for creating it. When your local blog is updated or added, run the following command to push it to the cloud:
ros-cdk deploy --sync=true If the update is successful, the following information is displayed:
✅ The deployment(sync update stack) has completed!
Status: UPDATE_COMPLETE
StatusReason: Stack successfully updated
StackId: 070932bb-d6d3-4f08-8e6a-2a0740bxxxxROS CDK does not delete the content in the destination bucket. Therefore, you need to log on to the OSS console to manually select and delete all files in the bucket.
After you manually clear the bucket, run the following command to delete the stack:
ros-cdk destroy --sync=true CDK reconfirms the stack to be deleted:
The following stack(s) will be destroyed(Only deployed stacks will be displayed).

DemoStack

Please confirm.(Y/N)
Enter y and press the Enter key. After deletion, the following information is displayed:
✅ The task(sync destroy stack) has finished!
status: DELETE_COMPLETE
StatusReason: Stack DELETE completed successfully
StackId: 070932bb-d6d3-4f08-8e6a-2a0740bxxxx
Disclaimer: The views expressed herein are for reference only and don't necessarily represent the official views of Alibaba Cloud.
ROS CDK Guide: New Skills for Migrating the Blog to the Cloud (C#)
ROS CDK Guide: New Skills for Migrating the Blog to the Cloud (Java)

1,084 posts | 278 followers
FollowAlibaba Cloud Community - December 4, 2024
Alibaba Cloud Community - December 3, 2024
Alibaba Cloud Community - December 4, 2024
Alibaba Cloud Community - December 4, 2024
Alibaba Cloud Community - December 12, 2024
Alibaba Cloud Community - December 16, 2024

1,084 posts | 278 followers
Follow Hybrid Cloud Distributed Storage
Provides scalable, distributed, and high-performance block storage and object storage services in a software-defined manner.
Learn More OSS(Object Storage Service)
An encrypted and secure cloud storage service which stores, processes and accesses massive amounts of data from anywhere in the world
Learn More Storage Capacity Unit
Plan and optimize your storage budget with flexible storage services
Learn More Resource Management
Organize and manage your resources in a hierarchical manner by using resource directories, folders, accounts, and resource groups.
Learn MoreMore Posts by Alibaba Cloud Community