By Juan Patrick, Solution Architect Intern
ZOLOZ is a technology solution from Ant Group, a platform to serves real identity verification and authentication based on biometrics. Users connect effortlessly across devices with reliable security. Recently, ZOLOZ has two products among them:
1) Real ID is a digital online solution for KYC (Know Your Customer).
2) Connect is a digital online solution for authentication biometric.
One of the challenges of biometrics is spoof attacks. A spoofing attack is an attempt to gain access using a fake biometric representation of the user. The attacker might be able to collect their photos or videos from social media or search engines to be used for hack access identity. ZOLOZ can prevent this attack with approaches to passive liveness and a liveness decision engine to check whether is a real user or not.
ZOLOZ provides SDK (Software Development Kit) and API. ZOLOZ SDK is a library to provide the user interface for client-side integration on your web or mobile in the display screen to capture required user data such as facial images, and identity document images. ZOLOZ API is for server-side integration to interact gateway with the ZOLOZ system and check the results of the authentication process.
You can do integration ZOLOZ with any language programming. This documentation shows how to build a server to interact with ZOLOZ API and integrate ZOLOZ SDK on the web and application using Nodejs. These parts of this documentation are:
You can try to clone the sample project Web + API server at: https://github.com/Patrix2001/Web-eKYC-Zoloz and the sample project app at: https://github.com/Patrix2001/Mobile-eKYC-Zoloz These projects will be discussed later.
1) Determine BASE API URL for access endpoint ZOLOZ based on your account access to portal ZOLOZ. This is an edition of ZOLOZ, you can check it at: https://docs.zoloz.com/zoloz/saas/integration/gkxbrc
In this scenario, we choose https://sg-sandbox-api.zoloz.com
2) Access the ZOLOZ portal. After that, on the tab “Integration”, save the Client ID and ZOLOZ transaction public key for use later. Click “Auto-generate” and choose your location directory. Then, click “Submit” to save your credential access merchant.
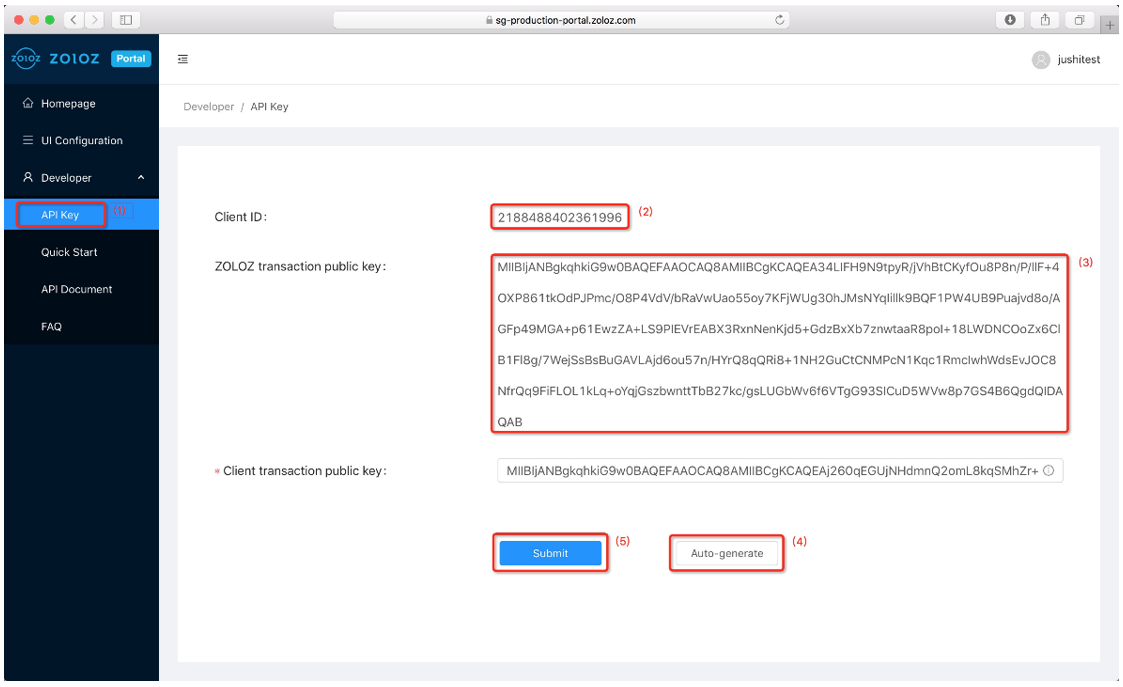
Source: https://docs.zoloz.com/zoloz/saas/integration/xxs8fe#Cb1Lh
This part shows the basic steps to integrate ZOLOZ on the server using Node.js. We build our server to interact with the ZOLOZ gateway and try to test endpoint ZOLOZ at /api/v1/zoloz/authentication/test to see the response code of ZOLOZ before using the ZOLOZ product. For the requirement of the server, we are using Node.js version v16.17.0.
1) Create a new project folder and start running NPM in your project folder:
npm init
Keep press Enter until the file package.json created.
2) We use the web framework Express.js. Install packages needed for the server
npm install cors express moment node-fetch@2.6.1
3) Edit part scripts for the command to run the server on the package.json
…
  "scripts": {
    "start": "node index.js"
  },
…
4) Create the file index.js in the root project directory and import packages to build the server
const cors = require("cors");
const express = require("express");
const fetch = require("node-fetch");
const moment = require("moment");
const crypto = require("node:crypto");
const fs = require("fs");
const path = require("path");
5) Add the code as below and for CLIENT_ID, change with your Client ID on ZOLOZ Portal. Put the file merchant_private_key.pem into your root directory project.
….
const path = require("path");

const CLIENT_ID = "<your-client-id>"
const key = fs.readFileSync(
    path.join(__dirname, "./merchant_private_key.pem"),
    "utf8"
);
Project Structure: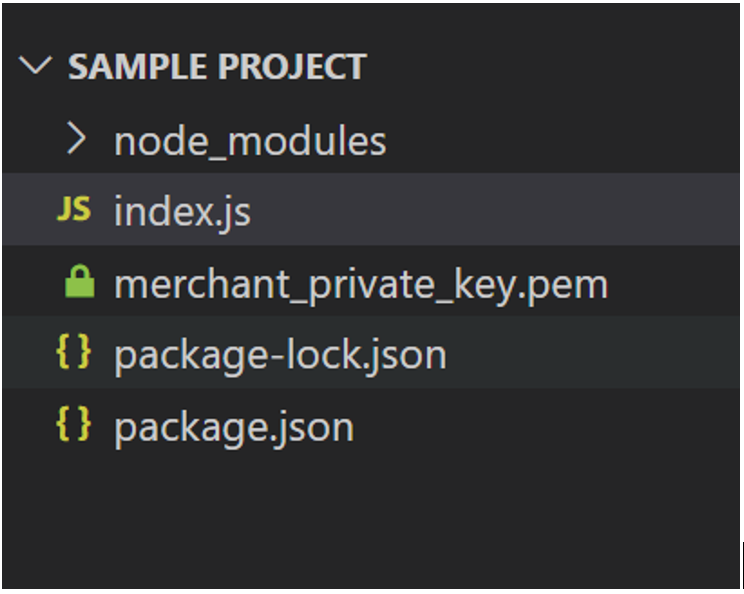
6) Initialize variable PORT and set up the server
…..
    "utf8"
);

const PORT = 4000;

const app = express();
app.use(cors());

app.listen(PORT, function () {
    console.log(`App running on http://localhost:${PORT}`);
});
7) Define a route for “/” with method GET and create call API for authentication test ZOLOZ.
….
app.use(cors());

app.get("/", async (req, res) => {
    try {
        const BASE_URL = "https://sg-sandbox-api.zoloz.com";
        const api = "/api/v1/zoloz/authentication/test";
        const text = {
            message: "Connected!",
        };

        const timestamp = moment(new Date().getTime()).format(
            "YYYY-MM-DDTHH:mm:ssZZ"
        );
        const content = `POST ${api}\n${CLIENT_ID}.${timestamp}.${JSON.stringify(text)}`;

        // SIGNATURE=base64urlsafe_encode(sha256withrsa_sign($CONTENT_TO_BE_SIGNED, $PRIVATE_KEY))
        const signature = crypto.sign("SHA256", content, key).toString("base64");

        const response = await fetch(BASE_URL + api, {
            method: "POST",
            body: JSON.stringify(text),
            headers: {
                "Content-Type": "application/json; charset=UTF-8",
                "Client-Id": CLIENT_ID,
                "Request-Time": timestamp,
                Signature: `algorithm=RSA256, signature=${encodeURIComponent(signature)}`,
            },
        });
        const data = await response.json();
        // case: success test endpoint
        if (data.message) {
            return res.status(200).send(data.message);
        }
        //case: failure test endpoint
        return res
            .status(401)
            .send({
                status: data.result.resultCode,
                message: data.result.resultMessage,
            });
    } catch (error) {
        return res.status(500).send(error);
    }
});

app.listen(PORT, function () {
….
8) The full code of index.js:
const cors = require("cors");
const express = require("express");
const fetch = require("node-fetch");
const moment = require("moment");
const crypto = require("node:crypto");
const fs = require("fs");
const path = require("path");


const CLIENT_ID = "<your-client-id>"
const key = fs.readFileSync(
    path.join(__dirname, "./merchant_private_key.pem"),
    "utf8"
);
const PORT = 4000;

const app = express();
app.use(cors());


app.get("/", async (req, res) => {
    try {
        const BASE_URL = "https://sg-sandbox-api.zoloz.com";
        const api = "/api/v1/zoloz/authentication/test";
        const text = {
            message: "Connected!",
        };

        const timestamp = moment(new Date().getTime()).format(
            "YYYY-MM-DDTHH:mm:ssZZ"
        );
        const content = `POST ${api}\n${CLIENT_ID}.${timestamp}.${JSON.stringify(text)}`;

        const signature = crypto.sign("SHA256", content, key).toString("base64");

        const response = await fetch(BASE_URL + api, {
            method: "POST",
            body: JSON.stringify(text),
            headers: {
                "Content-Type": "application/json; charset=UTF-8",
                "Client-Id": CLIENT_ID,
                "Request-Time": timestamp,
                Signature: `algorithm=RSA256, signature=${encodeURIComponent(signature)}`,
            },
        });
        const data = await response.json();
        console.log(data)
        // case: success to test endpoint
        if (data.message) {
            return res.status(200).send(data.message);
        }
        return res
            .status(401)
            .send({
                status: data.result.resultCode,
                message: data.result.resultMessage,
            });
    } catch (error) {
        return res.status(500).send(error);
    }
});

app.listen(PORT, function () {
    console.log(`App running on http://localhost:${PORT}`);
});
In the sample code above, we create the request for API ZOLOZ with a signature. For the Request header, we set up Content-Type, Client-Id, Request-Time, and Signature. The request Body is based on an API call to ZOLOZ System. To get more understanding of message structure, you can see here: https://docs.zoloz.com/zoloz/saas/apireference/msgstructure
9) Now, you can run the server. Run npm on the terminal:
npm start10) Open the browser and access at 'http://localhost:4000' You can see the result and it will be looks like this:
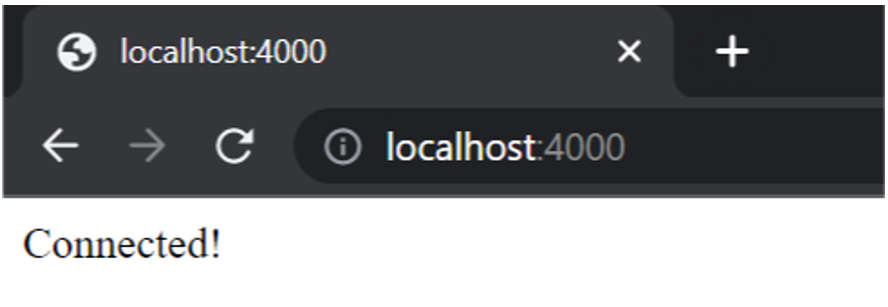
Browser screen shows “Connected!” that means you success to interact with ZOLOZ gateway.
If the response fails because of signature is invalid or the merchant is not found, you need to check the private key and client ID. If you get access denied, try to contact admin ZOLOZ to get permission access.
Another response status code, you find more at: https://docs.zoloz.com/zoloz/saas/apireference/errorhandling#f49hB
Architecture System
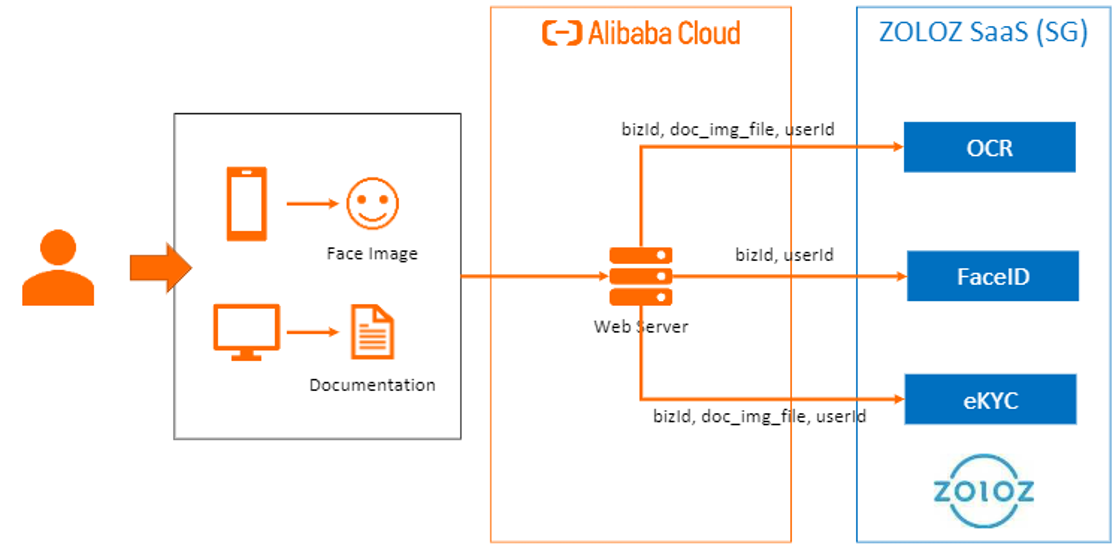
The web architecture diagram represents the relationship between the user, web server, and ZOLOZ SaaS (Software as a Service). Users access the web server by using their devices, like phones and desktops on the web browser. Here’s an example, when users try face recognition (FaceID), the web server will handle the input face image and sends it to ZOLOZ, then it will return the result verification of the face image. Put simply, we use ZOLOZ as a third-party service for working biometrics. In web mode, ZOLOZ provides OCR, FaceID, and eKYC.
Run Sample Project
1) Clone the sample project:
git clone https://github.com/Patrix2001/Web-eKYC-Zoloz.gitThis sample project build with Next.js and you can look details:
https://nextjs.org/learn/basics/create-nextjs-app
2) Go to directory Web-eKYC-Zoloz and install the packages:
npm install3) Create .env.local on the root directory sample project and copy from .env.example to .env.local. Fill in the parameters, as follows:

If you have difficulty setting up the WEB URL, try to set the domain on your local computer from here:
-https://www.webnots.com/how-to-edit-hosts-file-in-windows-7-8-and-10/ (Windows)
-https://www.geeksforgeeks.org/creating-custom-domain-name-instead-of-localhost-in-ubuntu/ (Ubuntu)
4) Locate your merchant_private_key.pem to the root directory of Web-eKYC-Zoloz.
5) Edit variable WEB_URL on file src -> index.js from the sample project directory.
6) Run the sample project by command npm run dev and access 'http://localhost' on your web browser. The display screen looks like this: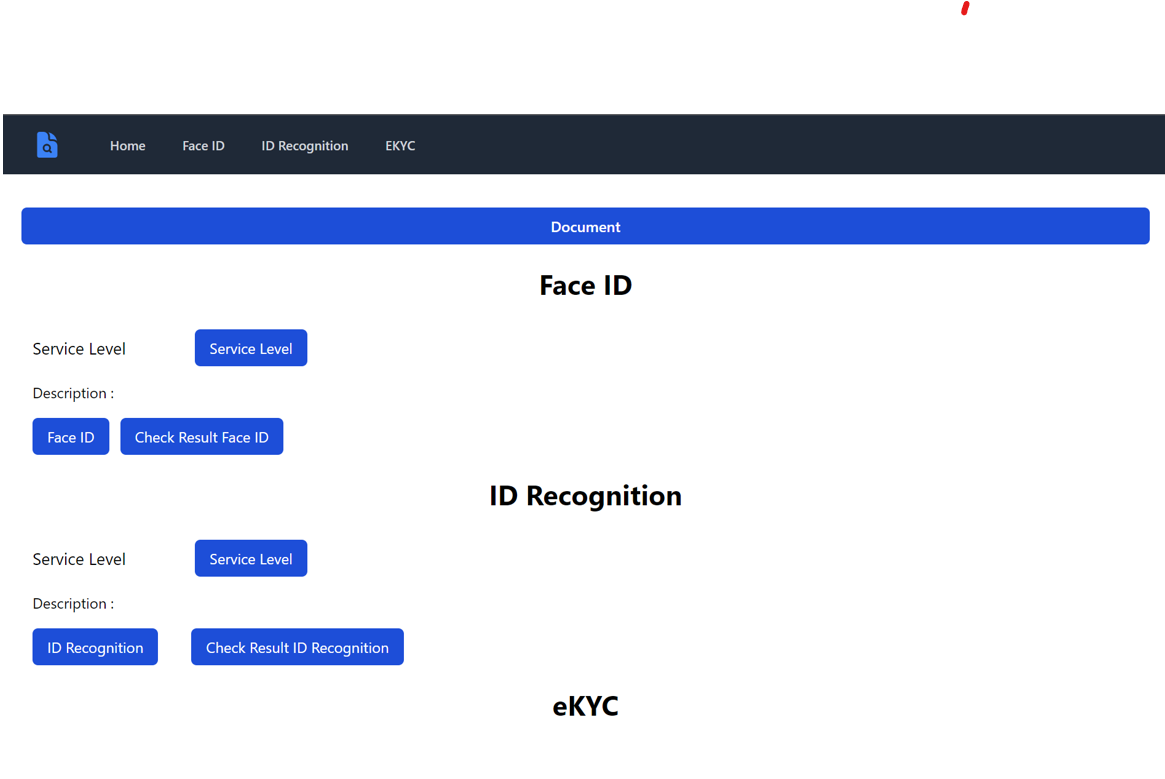
OCR Document
The request body for /api/v1/zoloz/idrecognition/initialize looks like this:
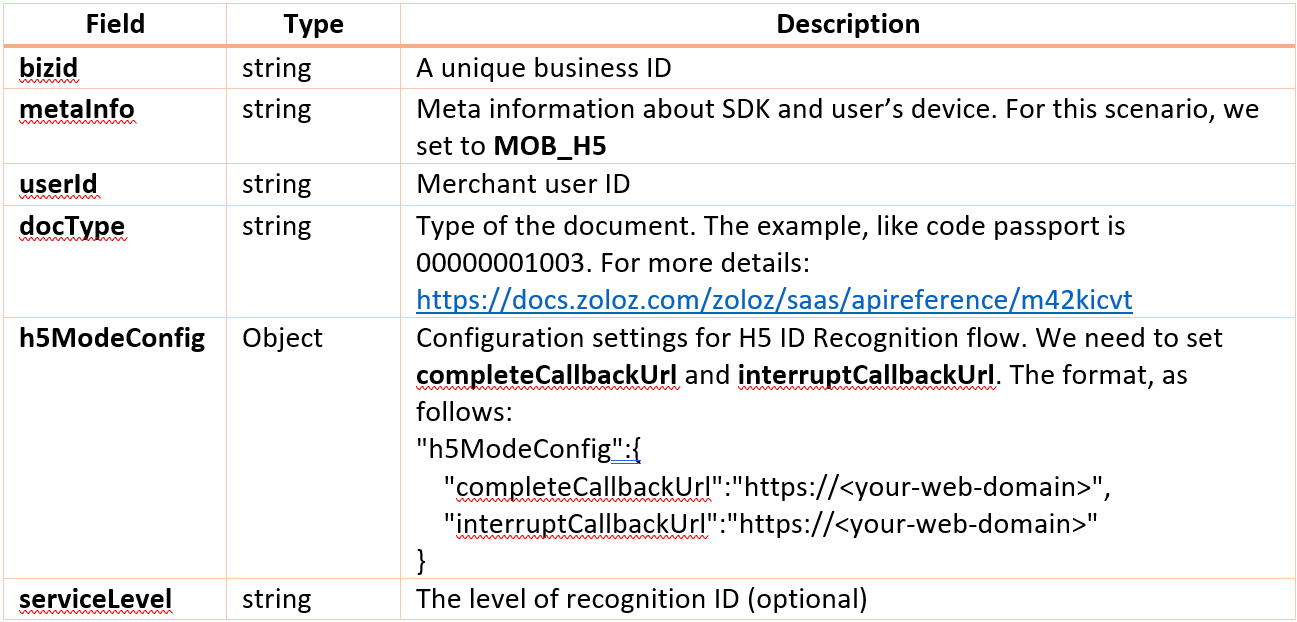
Sample Request:
POST /api/v1/zoloz/idrecognition/initialize HTTP/1.1
Host: sg-sandbox-api.zoloz.com
Signature: algorithm=RSA256, signature=SIGNATURE
Request-Time: YYYY-MM-DDTHH:mm:ssZZ
Client-Id: CLIENT_ID
Content-Type: application/json; charset=UTF-8
Content-Length: 314

{
    "bizId": "bizid_1666955309525",
    "metaInfo": "MOB_H5",
    "userId": "userid_1666955309525",
    "docType": "00620000001",
    "h5ModeConfig": {
        "completeCallbackUrl": "https://<domain>",
        "interruptCallbackUrl": "https://<domain>"
    },
    "serviceLevel": "IDRECOGNITION0002"
}
If success, the response looks like this:
{
  clientCfg: '…..',
  result: {
    resultCode: 'SUCCESS',
    resultMessage: 'success',
    resultStatus: 'S'
  },
  transactionId: '…..'
}
After that, use clientCfg and transactionId from the response of initialize for the redirect page:
https://sg-production-cdn.zoloz.com/page/zoloz-doc-fe/index.html?state=${transactionId}&clientcfg=${encodeURIComponent(clientCfg)}&langPack=${encodeURIComponent(customLangPackUrl)}Note: customLangPackUrl is an address for custom UI Web SDK. Leave it blank if you don't need it.
The request body for /api/v1/zoloz/idrecognition/checkresult looks like this:
Sample Request:
POST /api/v1/zoloz/idrecognition/checkresult HTTP/1.1
Host: sg-sandbox-api.zoloz.com
Signature: algorithm=RSA256, signature=SIGNATURE
Request-Time: YYYY-MM-DDTHH:mm:ssZZ
Client-Id: CLIENT_ID
Content-Type: application/json; charset=UTF-8
Content-Length: 69

{
    "bizId": "bizid_1666955309525",
    "transactionId": "..."
}
If success, the response looks like this:
{
  extInfo: {….},
  result: {
    resultCode: 'SUCCESS',
    resultMessage: 'Success',
    resultStatus: 'S'
  }
}
Now, you get the result of ID recognition and this can be used on your business logic application.
Face ID
The request body for /api/v1/zoloz/facecapture/initialize looks like this:
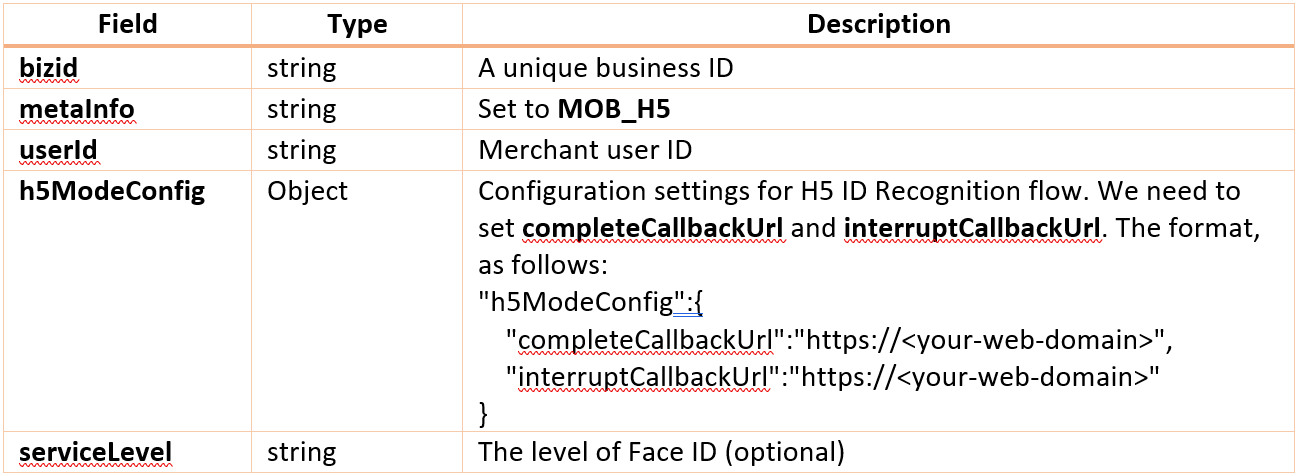
Sample Request:
POST /api/v1/zoloz/facecapture/initialize HTTP/1.1
Host: sg-sandbox-api.zoloz.com
Signature: algorithm=RSA256, signature=<SIGNATURE>
Request-Time: YYYY-MM-DDTHH:mm:ssZZ
Client-Id: <CLIENT_ID>
Content-Type: application/json; charset=UTF-8
Content-Length: 291

{
    "bizId": "bizid_1666955309525",
    "metaInfo": "MOB_H5",
    "userId": "userid_1666955309525",
    "h5ModeConfig": {
        "completeCallbackUrl": "https://<domain>",
        "interruptCallbackUrl": "https://<domain>"
    },
    "serviceLevel": "FACECAPTURE0002"
}
If success, the response looks like this:
{
  clientCfg: '…..',
  result: {
    resultCode: 'SUCCESS',
    resultMessage: 'success',
    resultStatus: 'S'
  },
  transactionId: '…..'
}
After that, use clientCfg and transactionId from the response of initialize for the redirect page:
https://sg-production-cdn.zoloz.com/page/zoloz-face-fe/index.html?state=${transactionId}&clientcfg=${encodeURIComponent(clientCfg)}&langPack=${encodeURIComponent(customLangPackUrl)}
Note: customLangPackUrl is an address for custom UI Web SDK. Leave in blank if not ready.
The request body for /api/v1/zoloz/facecapture/checkresult looks like
this:
Sample Request:
POST /api/v1/zoloz/facecapture/checkresult HTTP/1.1
Host: sg-sandbox-api.zoloz.com
Signature: algorithm=RSA256, signature=SIGNATURE
Request-Time: YYYY-MM-DDTHH:mm:ssZZ
Client-Id: CLIENT_ID
Content-Type: application/json; charset=UTF-8
Content-Length: 69

{
    "bizId": "bizid_1666955309525",
    "transactionId": "..."
}
If success, the response looks like this:
{
  extInfo: {
    faceAttack: false,
    imageContent: '….'
    quality: 71.0830481437422,
    rect: { top: 131, left: 188, bottom: 444, right: 501 },
    retryCount: 0
  },
  result: {
    resultCode: 'SUCCESS',
    resultMessage: 'Success',
    resultStatus: 'S'
  }
}
Now, you get the result of face ID and this can be used on your business logic application.
Real ID
The request body for /api/v1/zoloz/realid/initialize looks like this:
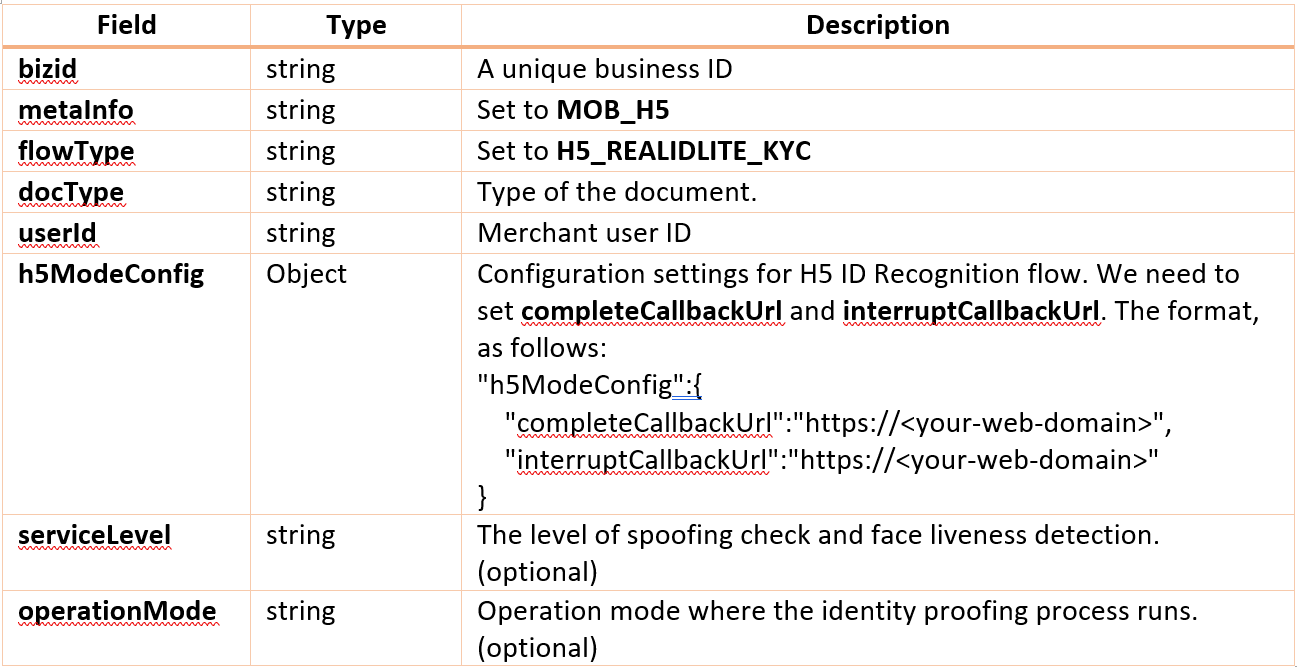
Sample Request:
POST /api/v1/zoloz/realid/initialize HTTP/1.1
Host: sg-sandbox-api.zoloz.com
Signature: algorithm=RSA256, signature=SIGNATURE
Request-Time: YYYY-MM-DDTHH:mm:ssZZ
Client-Id: CLIENT_ID
Content-Type: application/json; charset=UTF-8
Content-Length: 379

{
    "bizId": "bizid_1666955309525",
    "metaInfo": "MOB_H5",
    "flowType": "H5_REALIDLITE_KYC",
    "userId": "userid_1666955309525",
    "docType": "00620000001",
    "h5ModeConfig": {
        "completeCallbackUrl": "https://<domain>",
        "interruptCallbackUrl": "https://<domain>"
    },
    "serviceLevel": "REALID0001",
    "operationMode": "STANDARD"
}
If success, the response looks like this:
{
  clientCfg: '…..',
  result: {
    resultCode: 'SUCCESS',
    resultMessage: 'success',
    resultStatus: 'S'
  },
  transactionId: '…..'
}
After that, use clientCfg and transactionId from the response of initialize for the redirect page:
https://sg-production-cdn.zoloz.com/page/zoloz-realid-fe/index.html?state=${transactionId}&clientcfg=${encodeURIComponent(clientCfg)}&langPack=${encodeURIComponent(customLangPackUrl)}
Note: customLangPackUrl is an address for custom UI Web SDK. Leave in blank if not ready.
The request body for /api/v1/zoloz/realid/checkresult looks like this:

Sample Request:
POST /api/v1/zoloz/realid/checkresult HTTP/1.1
Host: sg-sandbox-api.zoloz.com
Signature: algorithm=RSA256, signature=SIGNATURE
Request-Time: YYYY-MM-DDTHH:mm:ssZZ
Client-Id: CLIENT_ID
Content-Type: application/json; charset=UTF-8
Content-Length: 69

{
    "bizId": "bizid_1666955309525",
    " isReturnImage ": "Y",
    "transactionId": "..."
}
If success, the response looks like this:
{
  extInfo: {
    …
  },
  result: {
    resultCode: 'SUCCESS',
    resultMessage: 'Success',
    resultStatus: 'S'
  }
}
Now, you get the result of real ID and this can be used on your business logic application.
Customize UI for WebSDK
1) Make sure to have set up HTTPS and you can use the SSL certificate on https://letsencrypt.org
2) Create the files facecapture.json, idrecognize.json, and realid.json. Fill all of the configurations from: https://docs.zoloz.com/zoloz/saas/integration/vu_dydz1#pNE7h
3) Create the endpoint API to serve each file configuration ZOLOZ.
4) In the final step, you can call your API that serves to file config on request param langPack:
`${pageSDKZolozUrl}?clientcfg=${encodeURIComponent(clientCfg)}&langPack=${encodeURIComponent(customLangPackUrl)}`Troubleshoot:
When trying to access page ZOLOZ, if customize is not working, you can check the console:
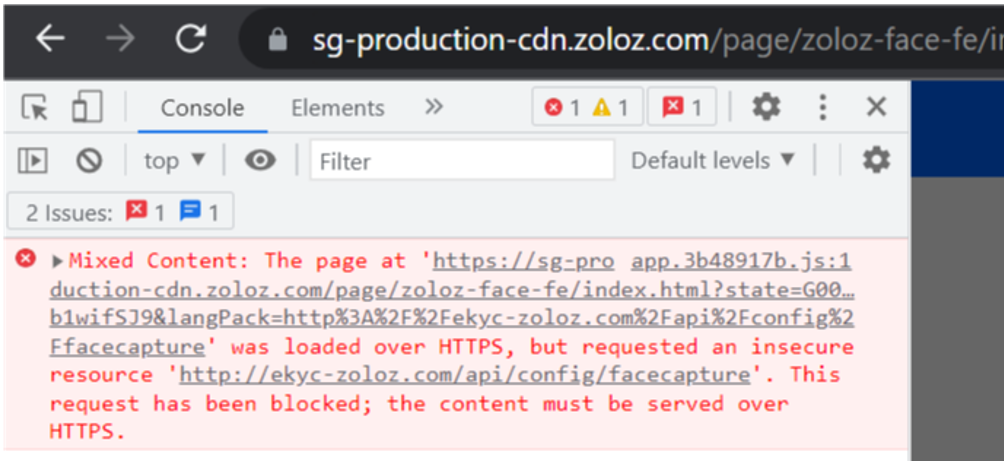
This means the configuration can be accessed only protocol HTTPS.
Architecture System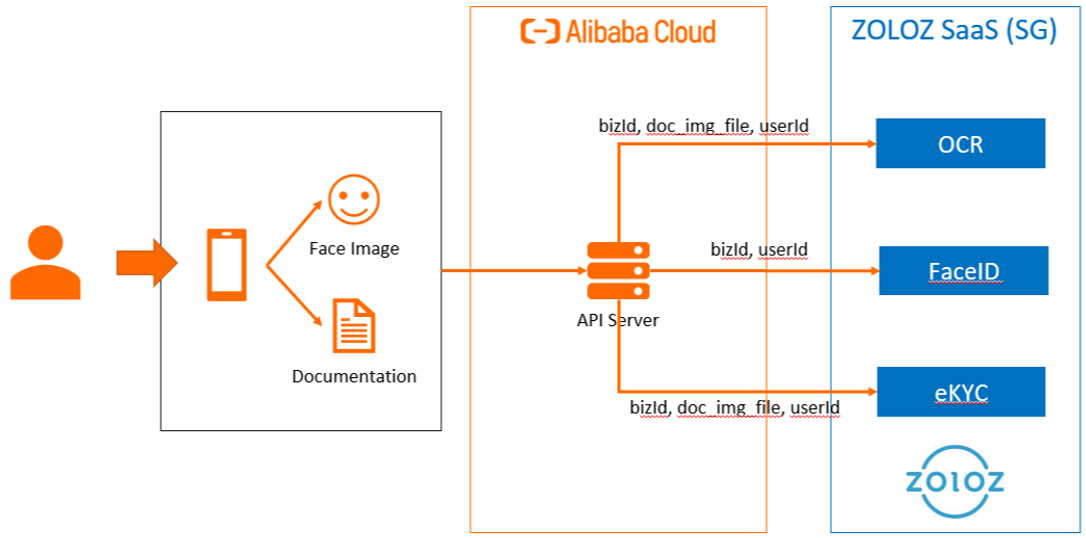
Similar to the architecture web system, users use the app on the mobile phone to interact API server and ZOLOZ will handle the biometrics. It’s a bit different only how the steps of integration ZOLOZ SDK on the application have created a page directly on it, not a redirect page. In the app mode, ZOLOZ provides FaceID, OCR, eKYC, and Connect.
If you already set up Android Studio, ADB and SDK manager can skip this part. In these steps, I will show how to develop React Native for Android without running Android Studio to reduce the memory on the computer OS Windows.
We need ADB to communicate with your phone. You can set up ADB at https://www.xda-developers.com/install-adb-windows-macos-linux/ and try to connect with your phone. I recommend using a real device for this project because must get App ID Token from our device to set up the configuration for ZOLOZ SDK. After you reach the final step from the link provided, we move forward.
Install Java
You need also to install JDK 11 as a requirement React Native on your computer.
1) Access https://jdk.java.net/archive/ and install Java version 11.0.2.
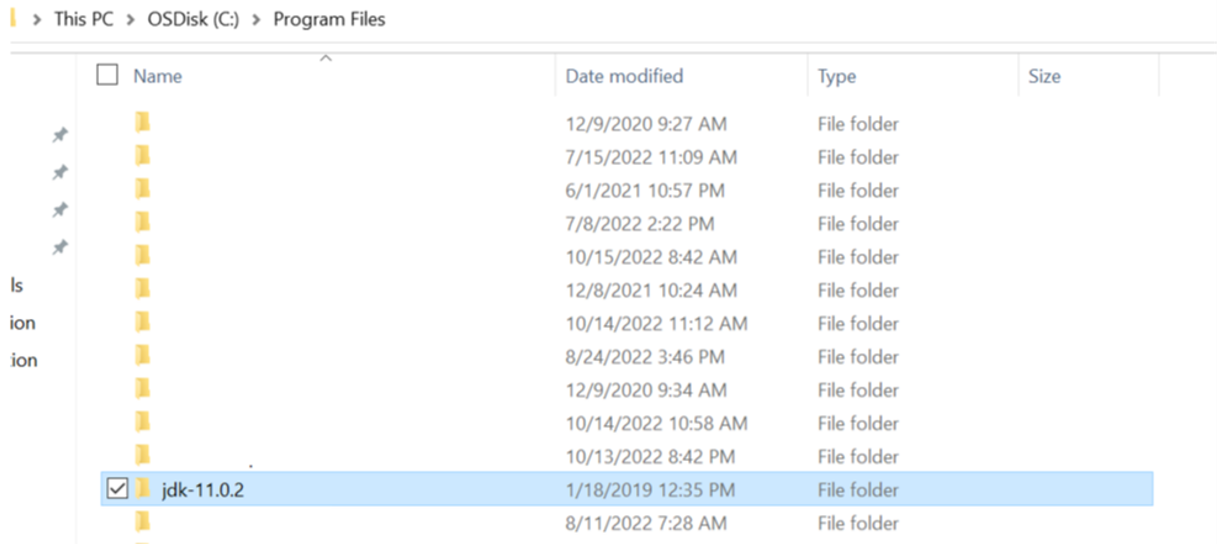
2) After that, extract the file openjdk-11.0.2_windows-x64_bin.zip and put the jdk-11.0.2 folder on the Program Files. It should be looks like this:
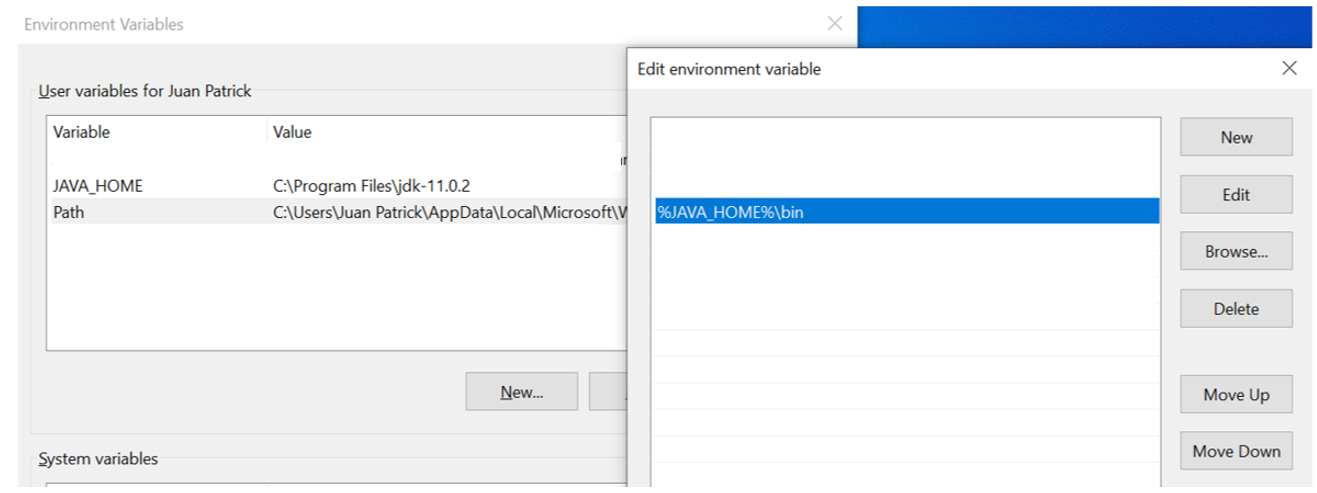
3) Open System properties and edit environment variables. On user variables, create JAVA_HOME and set it to %PROGRAMFILES%jdk-11.0.2. After that, open Path and add %JAVA_HOME%bin.
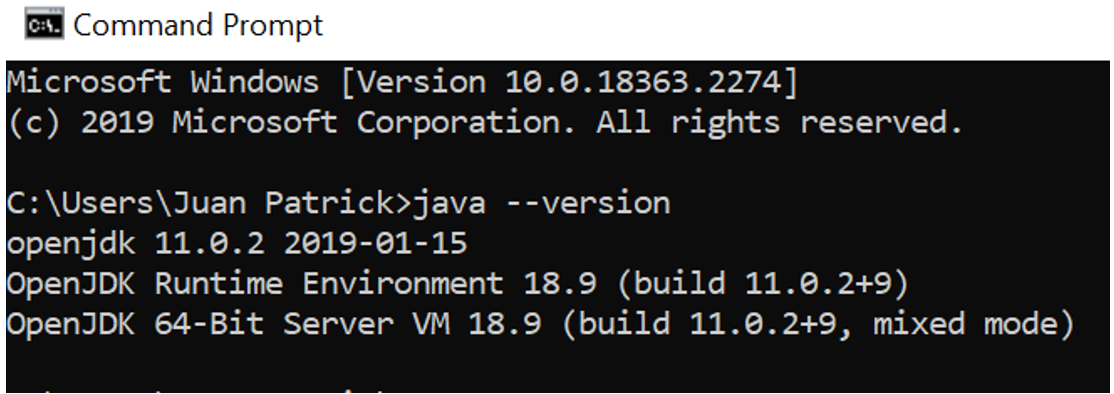
4) Open Command Prompt and type java --version. You can see your Java was already installed.
SDK Android Set Up
1) Access https://developer.android.com/studio#command-line-tools-only and install command line tools.
2) Extract the file commandlinetools-…..zip
3) On User Profiles, we create a folder Android and put in the folder cmdline-tools that is extracted to Android.

In the cmdline-tools directory, the tree project directory looks like this:
cmdline-tools
├───bin
└───lib
    ├───….
4) Create the folder latest in cmdline-tools and move all folders and files in cmdline-tools to latest. Tree directory now:
cmdline-tools
└───latest
    ├───bin
    └───lib
        ├───….
5) Move folder platform-tools that you get from ADB to User Profiles/Android on the same level with cmdline-tools. Now, you have two folders in the Android folder.
6) Edit Environment Variables for user variables, we set the name for ANDROID_HOME and the value with %USERPROFILE%Android. Add this list of variables to your Path:
%ANDROID_HOME%\cmdline-tools\latest
%ANDROID_HOME%\cmdline-tools\latest\bin
%ANDROID_HOME%\platform-tools
7) Open Command Prompt and type sdkmanager --version. You can see the version of SDK Manager.
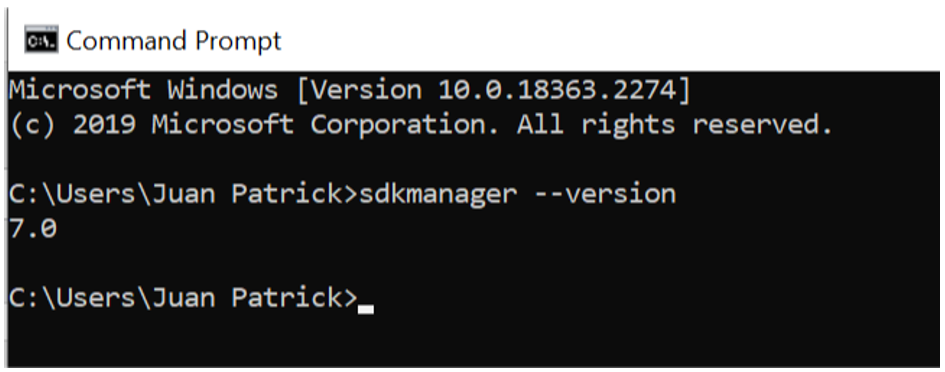
8) Run sdkmanager –licenses and keep pressing "y" to accept all licenses.
Run Sample Project
1) Clone the sample project:
git clone https://github.com/Patrix2001/Mobile-eKYC-Zoloz.git
This application built with React Native.
2) Go to the directory Mobile-eKYC-Zoloz and install the packages:
npm install3) Open file endpoint.js in the src/constants from the sample project, and fill the value BASE_URL_API with your domain API Server. Run the sample project Web-eKYC-Zoloz and share the public access network using ngrok ngrok
4) Run the project
npx react-native run-androidIt will pop up the screen server which is Metro for the development of React Native. It takes 15-20 minutes, so you can drink coffee or take a break
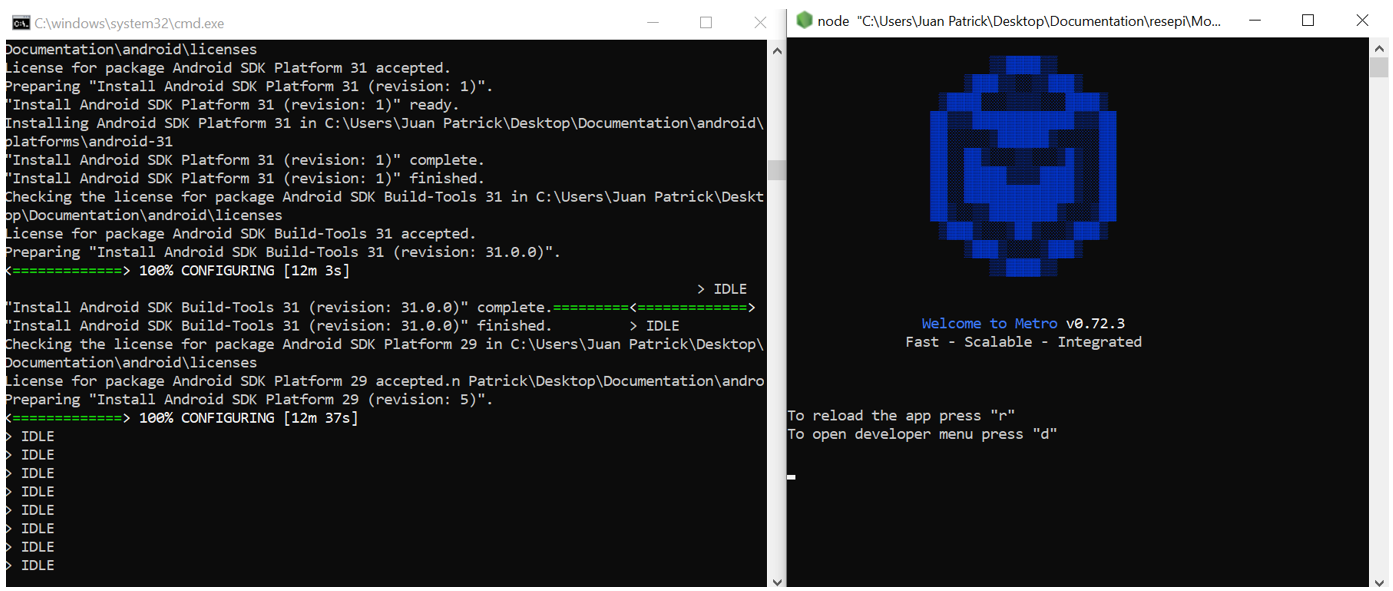
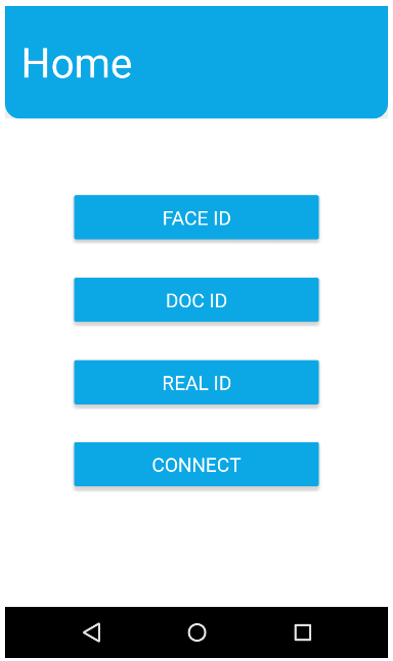
The Final result looks like this, you can see the Metro server is loaded page index.js to your devices.
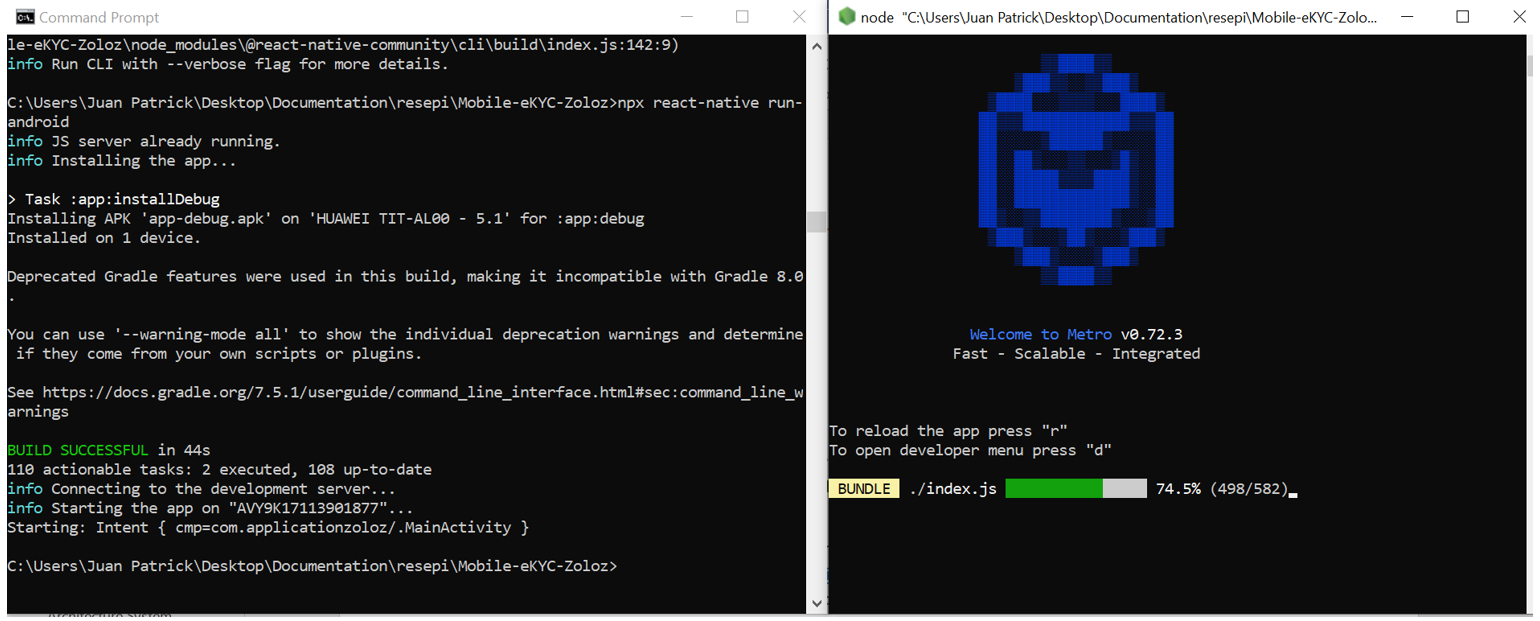
Phone Screen:
OCR Document
The request body for /api/v1/zoloz/idrecognition/initialize looks like this:
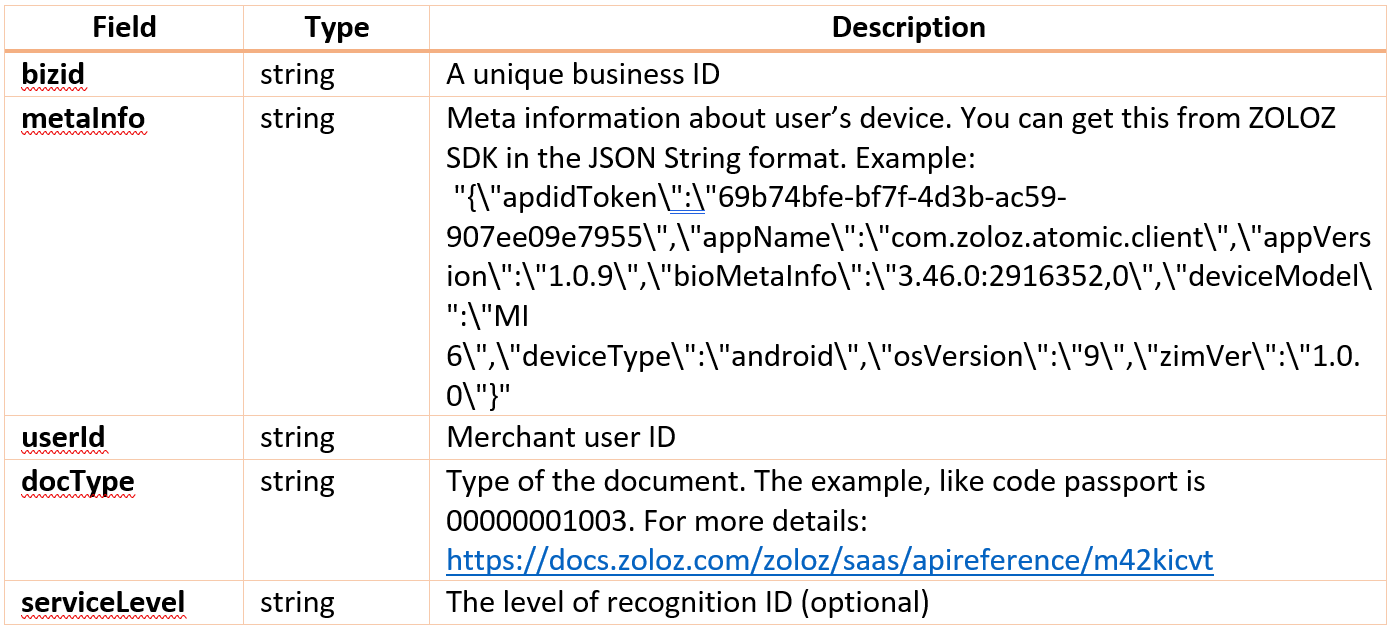
Sample Request:
POST /api/v1/zoloz/idrecognition/initialize HTTP/1.1
Host: sg-sandbox-api.zoloz.com
Signature: algorithm=RSA256, signature=SIGNATURE
Request-Time: YYYY-MM-DDTHH:mm:ssZZ
Client-Id: CLIENT_ID
Content-Type: application/json; charset=UTF-8
Content-Length: 314

{
    "bizId": "bizid_1666955309525",
    "metaInfo": "{\"apdidToken\":\"69b74bfe-bf7f-4d3b-ac59-907ee09e7955\",\"appName\":\"com.zoloz.atomic.client\",\"appVersion\":\"1.0.9\",\"bioMetaInfo\":\"3.46.0:2916352,0\",\"deviceModel\":\"MI 6\",\"deviceType\":\"android\",\"osVersion\":\"9\",\"zimVer\":\"1.0.0\"}",
    "userId": "userid_1666955309525",
    "docType": "00620000001",
    "serviceLevel": "IDRECOGNITION0002"
}
If success, the response looks like this:
{
  clientCfg: '…..',
  result: {
    resultCode: 'SUCCESS',
    resultMessage: 'success',
    resultStatus: 'S'
  },
  transactionId: '…..'
}
After that, use clientCfg for create page ZOLOZ SDK:
ZolozKit.start(clientCfg, {}, result => {
                  if (result) {
                    ….
                  }
                });
The request body for /api/v1/zoloz/idrecognition/checkresult looks like this:

Sample Request:
POST /api/v1/zoloz/idrecognition/checkresult HTTP/1.1
Host: sg-sandbox-api.zoloz.com
Signature: algorithm=RSA256, signature=SIGNATURE
Request-Time: YYYY-MM-DDTHH:mm:ssZZ
Client-Id: CLIENT_ID
Content-Type: application/json; charset=UTF-8
Content-Length: 69

{
    "bizId": "bizid_1666955309525",
    "transactionId": "..."
}
If success, the response looks like this:
{
  extInfo: {….},
  result: {
    resultCode: 'SUCCESS',
    resultMessage: 'Success',
    resultStatus: 'S'
  }
}
Now, you get the result of ID recognition and this can be used on your business logic application
Face ID
The request body for /api/v1/zoloz/facecapture/initialize looks like this:
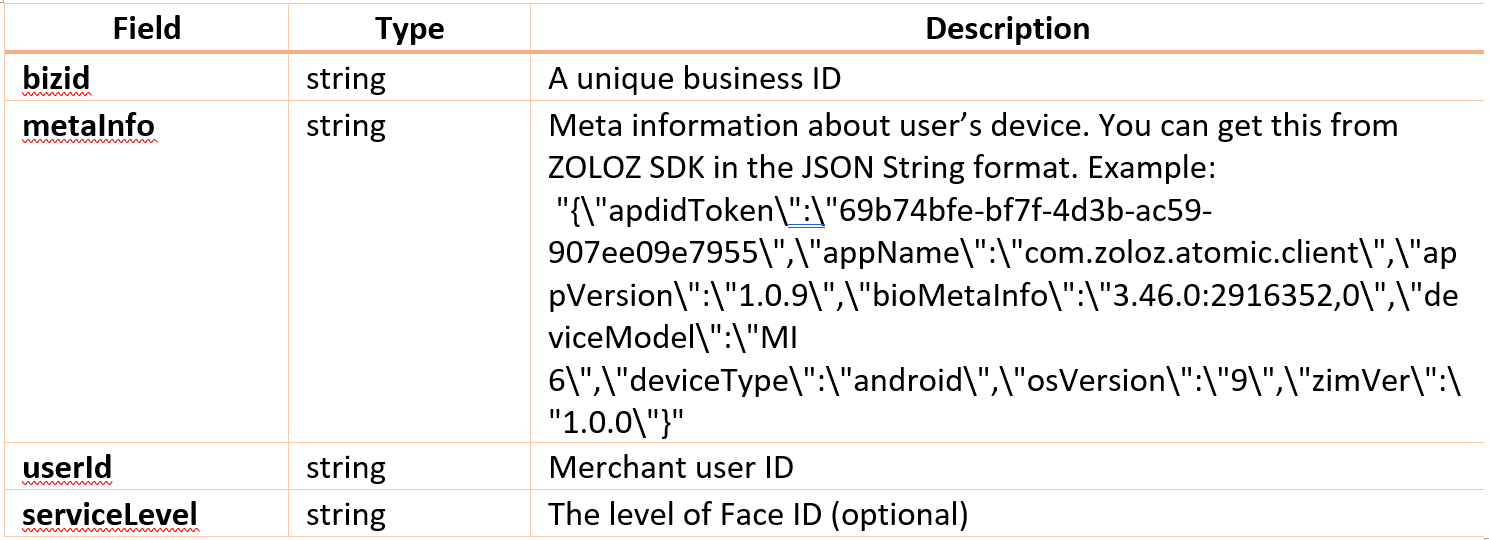
Sample Request:
POST /api/v1/zoloz/facecapture/initialize HTTP/1.1
Host: sg-sandbox-api.zoloz.com
Signature: algorithm=RSA256, signature=<SIGNATURE>
Request-Time: YYYY-MM-DDTHH:mm:ssZZ
Client-Id: <CLIENT_ID>
Content-Type: application/json; charset=UTF-8
Content-Length: 291

{
    "bizId": "bizid_1666955309525",
    "metaInfo": "{\"apdidToken\":\"69b74bfe-bf7f-4d3b-ac59-907ee09e7955\",\"appName\":\"com.zoloz.atomic.client\",\"appVersion\":\"1.0.9\",\"bioMetaInfo\":\"3.46.0:2916352,0\",\"deviceModel\":\"MI 6\",\"deviceType\":\"android\",\"osVersion\":\"9\",\"zimVer\":\"1.0.0\"}",
    "userId": "userid_1666955309525",
    "serviceLevel": "FACECAPTURE0002"
}
If success, the response looks like this:
{
  clientCfg: '…..',
  result: {
    resultCode: 'SUCCESS',
    resultMessage: 'success',
    resultStatus: 'S'
  },
  transactionId: '…..'
}
After that, use clientCfg for create page ZOLOZ SDK:
ZolozKit.start(clientCfg, {}, result => {
                 if (result) {
                   ….
                 }
               });
The request body for /api/v1/zoloz/facecapture/checkresult looks like this:

Sample Request:
POST /api/v1/zoloz/facecapture/checkresult HTTP/1.1
Host: sg-sandbox-api.zoloz.com
Signature: algorithm=RSA256, signature=SIGNATURE
Request-Time: YYYY-MM-DDTHH:mm:ssZZ
Client-Id: CLIENT_ID
Content-Type: application/json; charset=UTF-8
Content-Length: 69

{
    "bizId": "bizid_1666955309525",
    "transactionId": "..."
}
1) If success, the response looks like this:
{
  extInfo: {
    faceAttack: false,
    imageContent: '….'
    quality: 71.0830481437422,
    rect: { top: 131, left: 188, bottom: 444, right: 501 },
    retryCount: 0
  },
  result: {
    resultCode: 'SUCCESS',
    resultMessage: 'Success',
    resultStatus: 'S'
  }
}
Now, you get the result of face ID and this can be used on your business logic application.
Real ID
The request body for /api/v1/zoloz/realid/initialize looks like this:
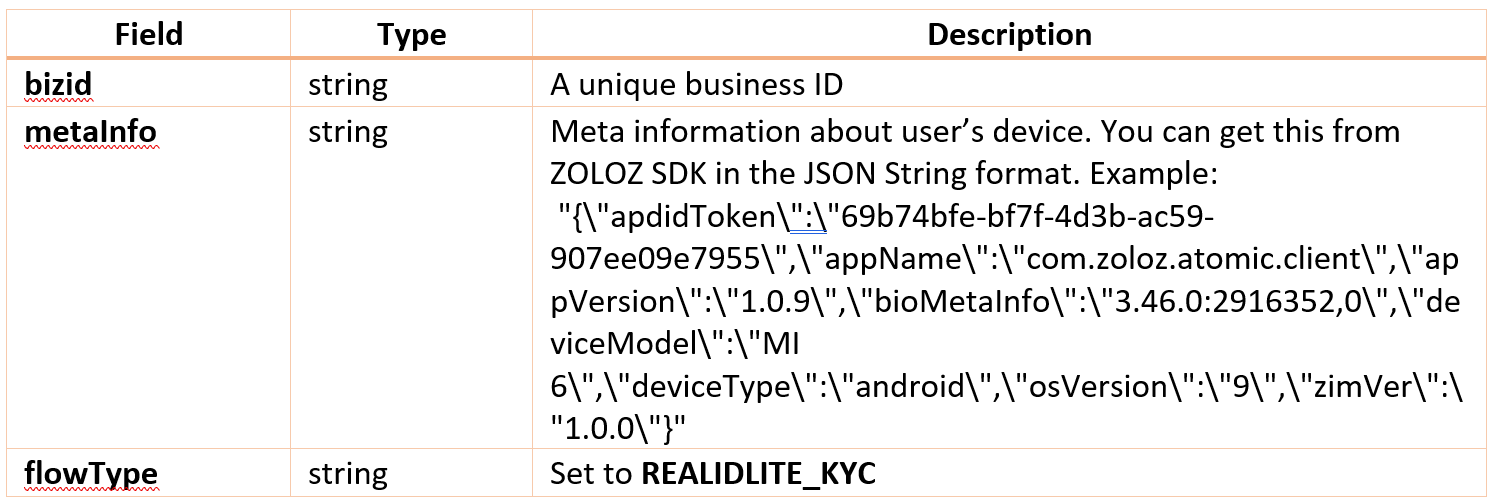

Sample Request:
POST /api/v1/zoloz/realid/initialize HTTP/1.1
Host: sg-sandbox-api.zoloz.com
Signature: algorithm=RSA256, signature=SIGNATURE
Request-Time: YYYY-MM-DDTHH:mm:ssZZ
Client-Id: CLIENT_ID
Content-Type: application/json; charset=UTF-8
Content-Length: 379

{
    "bizId": "bizid_1666955309525",
    "metaInfo": "{\"apdidToken\":\"69b74bfe-bf7f-4d3b-ac59-907ee09e7955\",\"appName\":\"com.zoloz.atomic.client\",\"appVersion\":\"1.0.9\",\"bioMetaInfo\":\"3.46.0:2916352,0\",\"deviceModel\":\"MI 6\",\"deviceType\":\"android\",\"osVersion\":\"9\",\"zimVer\":\"1.0.0\"}",
    "flowType": "REALIDLITE_KYC",
    "userId": "userid_1666955309525",
    "docType": "00620000001",
    "serviceLevel": "REALID0001",
    "operationMode": "STANDARD"
}
If success, the response looks like this:
{
  clientCfg: '…..',
  result: {
    resultCode: 'SUCCESS',
    resultMessage: 'success',
    resultStatus: 'S'
  },
  transactionId: '…..'
}
After that, use clientCfg for redirect page ZOLOZ SDK:
ZolozKit.start(clientCfg, {}, result => {
                  if (result) {
                    ….
                  }
                });
The request body for /api/v1/zoloz/realid/checkresult looks like this:

Sample Request:
POST /api/v1/zoloz/realid/checkresult HTTP/1.1
Host: sg-sandbox-api.zoloz.com
Signature: algorithm=RSA256, signature=SIGNATURE
Request-Time: YYYY-MM-DDTHH:mm:ssZZ
Client-Id: CLIENT_ID
Content-Type: application/json; charset=UTF-8
Content-Length: 69

{
    "bizId": "bizid_1666955309525",
    " isReturnImage ": "Y",
    "transactionId": "..."
}
If success, the response looks like this:
{
  extInfo: {
    …
  },
  result: {
    resultCode: 'SUCCESS',
    resultMessage: 'Success',
    resultStatus: 'S'
  }
}
Now, you get the result of real ID and this can be used on your business logic application.
Connect
This feature is currently on maintenance during a problem with content generated by base64ImageContent on Enroll face (https://docs.zoloz.com/zoloz/saas/apireference/connect-enroll). Connect is an authentication biometric combination of face liveness check (face ID) and face comparison (https://docs.zoloz.com/zoloz/saas/apireference/compare). You can create it yourself by using ZOLOZ API Face ID to get a real face user and store it in your database. Then, you call ZOLOZ API Face Compare to create a similarity comparison between the user's face and the face stored in the database. It makes an iteration for comparison per face to get a match result. Here’s the flow logic system to describe the custom Connect of ZOLOZ:
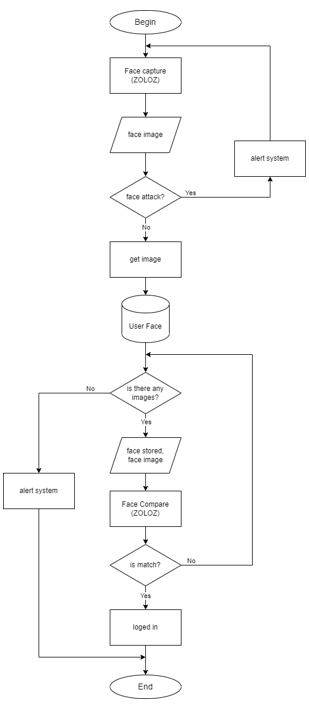
We’ve integrated ZOLOZ on the web and mobile applications. You can get familiar with pattern integration ZOLOZ by running the sample project. The main steps of integration are to initialize the transaction to get the configuration, insert it into ZOLOZ SDK, and finally check the result score of taking biometrics by transaction ID. ZOLOZ SDK provides the page for doing their services and customizes UI based on needs. You just only need to focus on business logic based on the result of ZOLOZ.
104 posts | 18 followers
FollowAlibaba Cloud Indonesia - April 3, 2023
JDP - February 25, 2022
Alibaba Cloud Community - April 7, 2023
Iain Ferguson - April 4, 2022
Alibaba Cloud Community - March 23, 2022
Alibaba Cloud Community - August 4, 2022
104 posts | 18 followers
Follow Offline Visual Intelligence Software Packages
Offline SDKs for visual production, such as image segmentation, video segmentation, and character recognition, based on deep learning technologies developed by Alibaba Cloud.
Learn More ZOLOZ Real ID
A Digital and Remote Online Solution for eKYC
Learn More YiDA Low-code Development Platform
A low-code development platform to make work easier
Learn More OpenAPI Explorer
OpenAPI Explorer allows you to call an API through its web interface or WebCLI, and view the entire process.
Learn MoreMore Posts by Alibaba Cloud Indonesia