In this article, we will show you how you can easily emulate Android devices with Genymotion Cloud on Alibaba Cloud.
By Genymotion Cloud
Genymotion Cloud is a Platform-as-a-Service (PaaS) Android Operating System. Based on industry-leading Genymotion Emulator, it offers Android Virtual Machines with high quality display in your web browser as well as SSH and ADB access. You can simulate scenarios with Genymotion's set of sensors (GPS, Accelerometer, Battery, Disk Throttling, Network, Calls & Texts emulation) using widgets or Java API for automation.
You can easily integrate Genymotion with your existing infrastructure to automate your operations:
- Continuous Integration for Android applications testing
- Functional and Performance Monitoring
- Security Testing
- Mobile Threat Detection
- Competitive Analysis
- Advertising
In this article, we will show you how you can easily deploy Genymotion Cloud on Alibaba Cloud through the Marketplace.
- Select the version of Genymotion Cloud corresponding to the Android version of virtual devices you wish to run. You can run Genymotion virtual devices based on a Lollipop image (Android 5.1), a Marshmallow image (Android 6.0), a Nougat image (Android 7.0) or a Oreo image (Android 8.0).
- Click Choose your plan.
- Configure your virtual device:
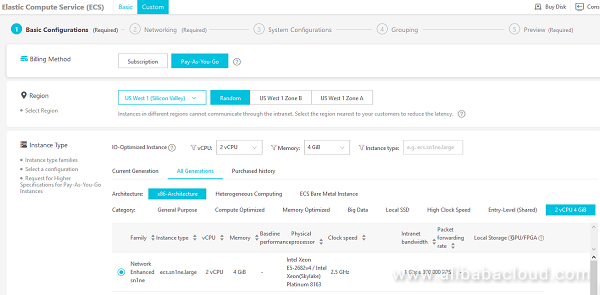
- In Elastic Compute Service (ECS) keep the Custom selection.
- In Billing Method, select Pay-As-You-Go.
- In Region, select your geographical area. The zone determines what computing resources are available and where your data is stored and used.
- In Instance type, select the specifications of your machine. You can set the number of vCPU and Memory size to shorten the following available configurations. You can also set Architecture and Category preferences. Then select the desired instance type.
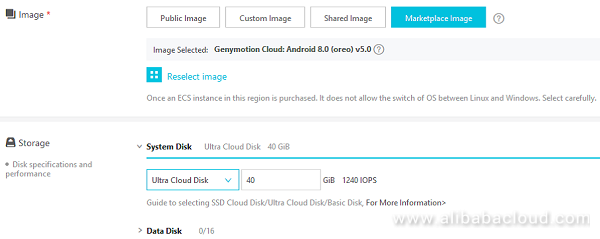
- From the Image section, select Marketplace Image.
- From the Storage section, select the System Disk type and size. Minimum is 40GiB. Storage space is less expensive with Ultra Cloud Disk. SSD Cloud Disk is better for random IOPS or streaming throughput with low latency. It is unnecessary to add a Data Disk, because it won't be used in the instance. Then click Next: Networking.
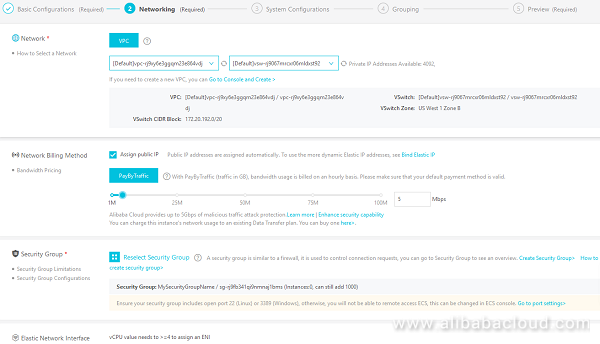
- From the Networking section, select the VPC linked to your Custom Security Group (see Part 9) and refresh with the double arrow circle icon to make sure it is selected.
- In Network Billing Method, check Assign public IP. You don't have to change the PayByTraffic value.
- In Security Group, select the custom Security Group you want to use. The default Security Group is incomplete and won't work. If you don't already have a custom Security Group, click on Create a Security Group. In the new tab, click on Create Security Group. In the new window, select Web Server Linux, enter a name in Security Group Name and enter a description in Description. In Network type select VPC, then in VPC select the available VPC and click OK. When prompted, click on Set the rules immediately, then click Add Security Group Rules. Create 3 rules containing the following information:
a. Rule 1
Protocol Type: Custom TCP
Port Range: 51000/51100
Authorization Type: 0.0.0.0/0
Description: webrtc
b. Rule 2
Protocol Type: Custom UDP
Port Range: 51000/51100
Authorization Type: 0.0.0.0/0
Description: webrtc
c. Rule 3
Protocol Type: Custom TCP
Port Range: 5555/5555
Authorization Type: 0.0.0.0/0
Description: adb
- Then click Next: System Configurations. In System Configurations, section Log on Credentials, select Key Pair and select one if available. If you don't have a Key Pair, click Create Key Pair and follow the instructions. Then enter an Instance Name and a Description.
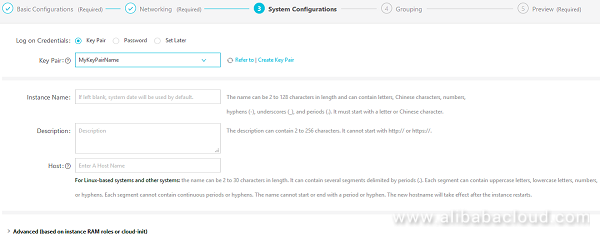
- Then click Next: Grouping. In Grouping, you may add Tags at your convenience.

- Then click Next: Preview.
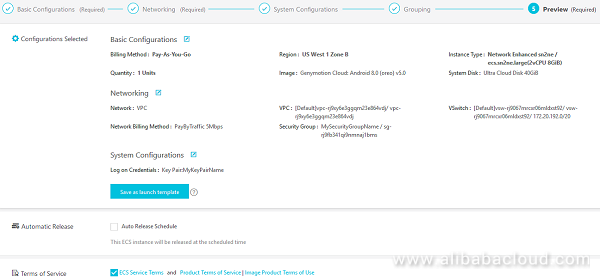
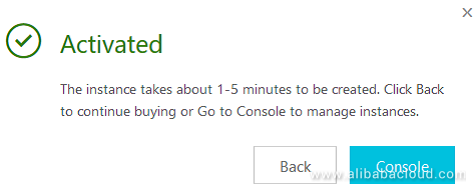
- In Configurations Selected you may save the selected configuration as launch template : click Save as launch template, then add a name and a description. Click Save. In Terms of Service check the ECS Service Terms, then click Create Instance. In the Activated pop-up click Console.
- Once the initial setup is done, the instance automatically starts. It can take up to two minutes before the instance can be accessed through the web browser.
- From the management console, in Instances, select the instance you want to access.
- From the IP address column copy the Internet IP address and paste it to your web browser. A connection warning pops up. This happens because the certificate is auto-signed. Proceed and authenticate. By default, the username is "genymotion" and the password is the Instance ID of the instance you can retrieve from column Instance ID/Name.


 Mobile Testing
 mPaaS
mPaaS
 Marketplace
 DBStack