Jeremy Pedersen
As usual, welcome back! Hope your Friday is turning out all right.
This week, I'm going to show you how you can use Function Compute to create ECS disk snapshots.
Of course, the right way to make disk snapshots is with Automatic Snapshot Policies, but this blog will show you - in general - how you can use Function Compute to automate actions within your Alibaba Cloud account. Disk snapshotting is just an example.
Let's dive in!
Before we get started, we need to download and install some tools to help us deploy our Function Compute code.
Sure, we could do most of the setup manually from the Alibaba Cloud web console, but it's a lot easier to automate the deployment from the command line. This means we need to install Alibaba Cloud's fun command line tool. It is also a good idea to install Docker, which will allow you to build and run Function Compute functions locally, which makes testing a lot easier.
Note: To install fun, you'll need to have npm (the Node Package Manager) installed as well. If you are on Linux or macOS, you may already have it installed. If you find that you don't have the npm command available, take a look at these installation instructions.
fun
Let's start by installing fun. There are full instructions here, but really it's as simple as opening a terminal and typing:
npm install @alicloud/fun -gDone? Great! Running fun from a terminal should now return a list of commands like this one:
Usage: fun [options] [command]

The fun command line provides a complete set of commands to define, develop,
test serverless applications locally, and deploy them to the Alibaba Cloud.

Options:
  --version       output the version number
  -v, --verbose   verbose output
  -h, --help      display help for command

Commands:
  config          Configure the fun
  init            Initialize a new fun project
  install         Install dependencies which are described in fun.yml
  build           Build the dependencies
  local           Run your serverless application locally
  edge            Run your serverless application at edge
  validate        Validate a fun template
  deploy          Deploy a fun application
  nas             Operate NAS file system
  package         Package a Function Compute application
  invoke          Remote invoke function
  help [command]  display help for command
Ok, let's move on to the next step!
fun
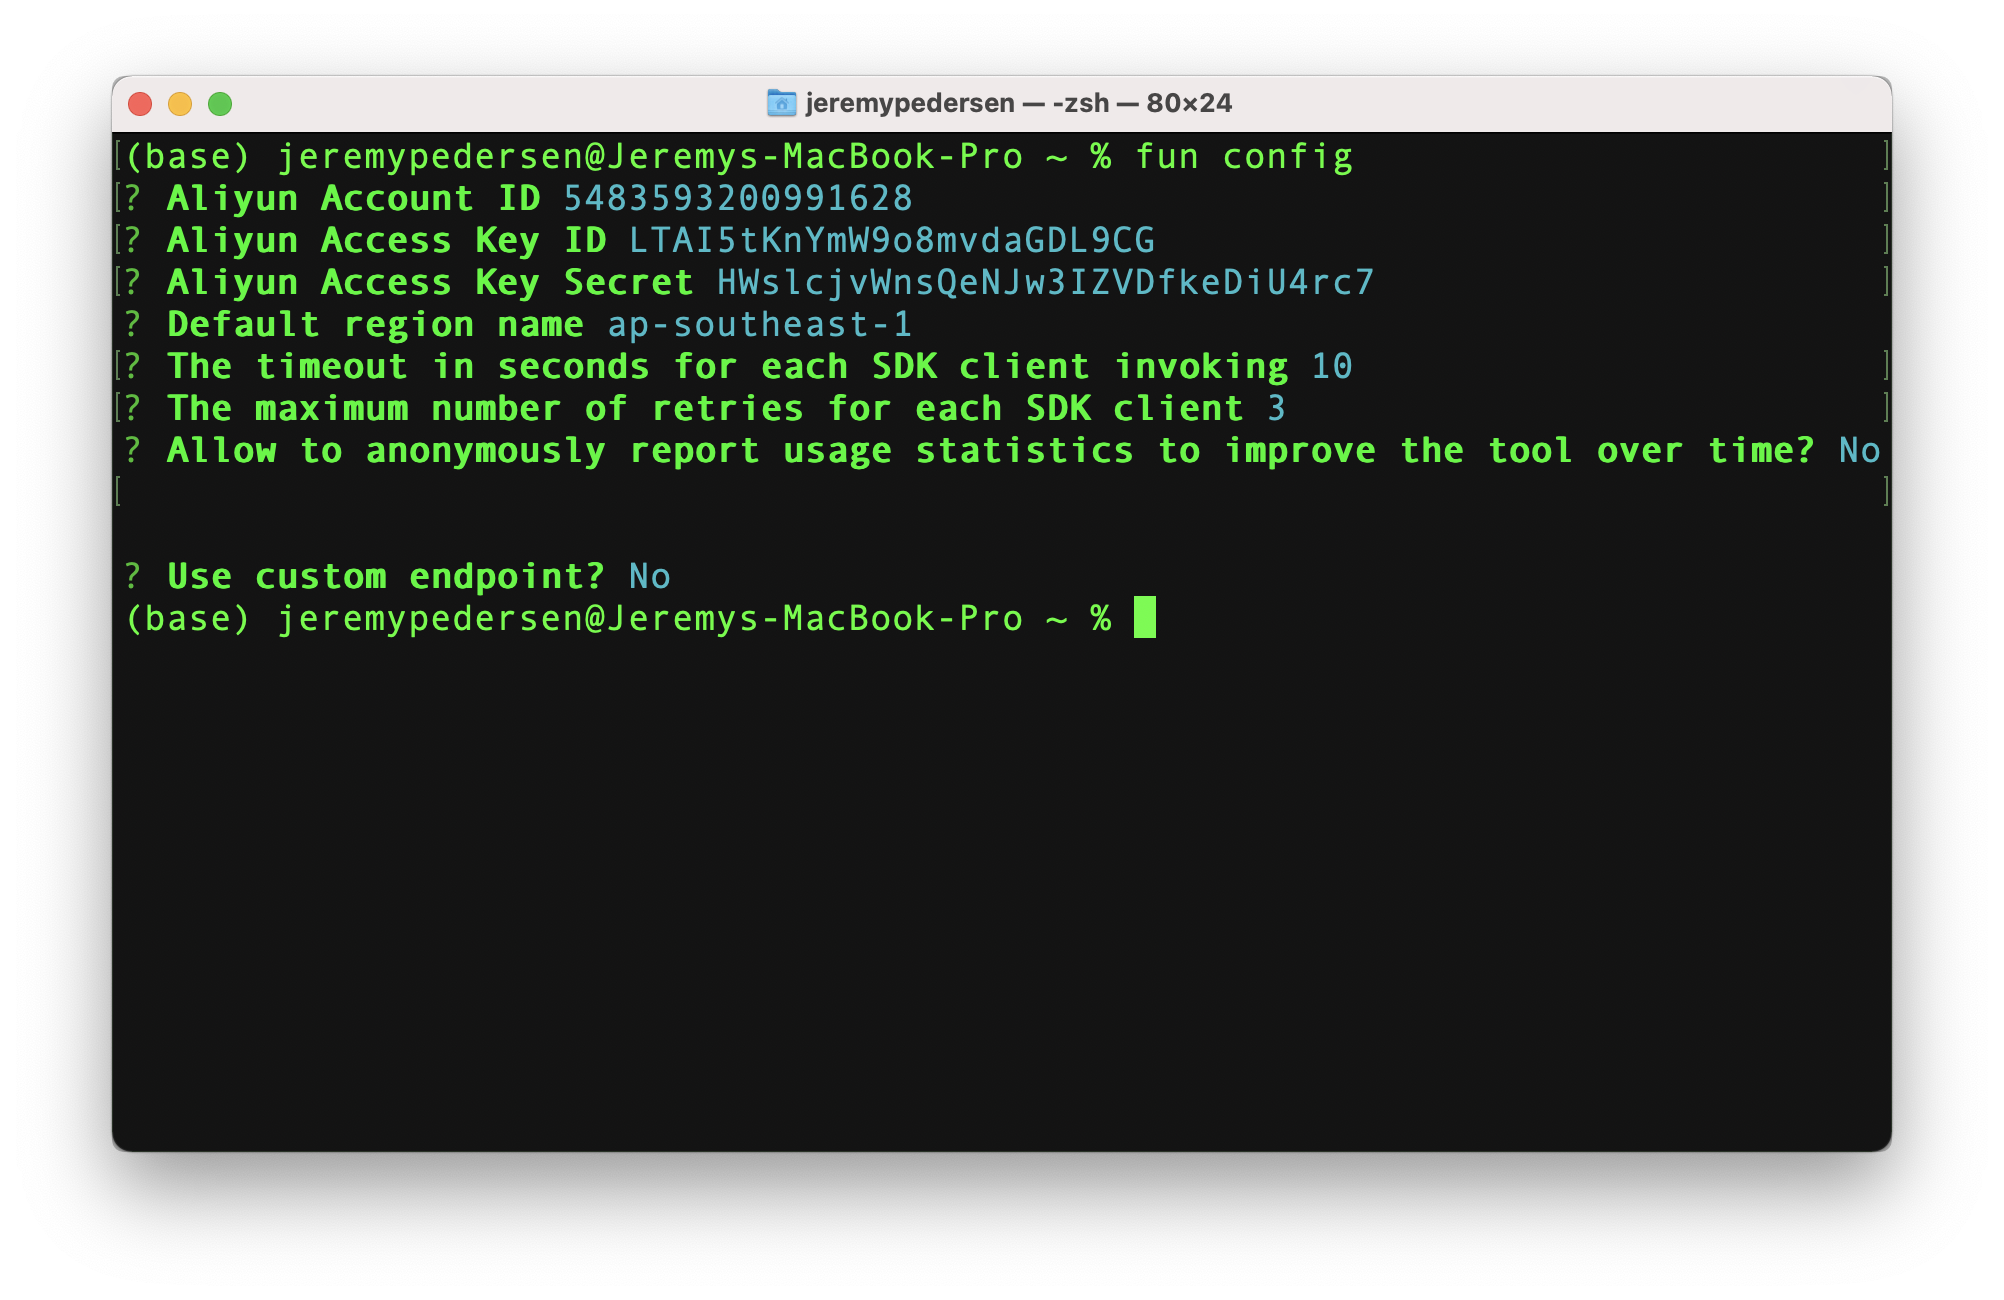
With fun installed, we now need to run the fun config command. This will pass critical information to fun, including:
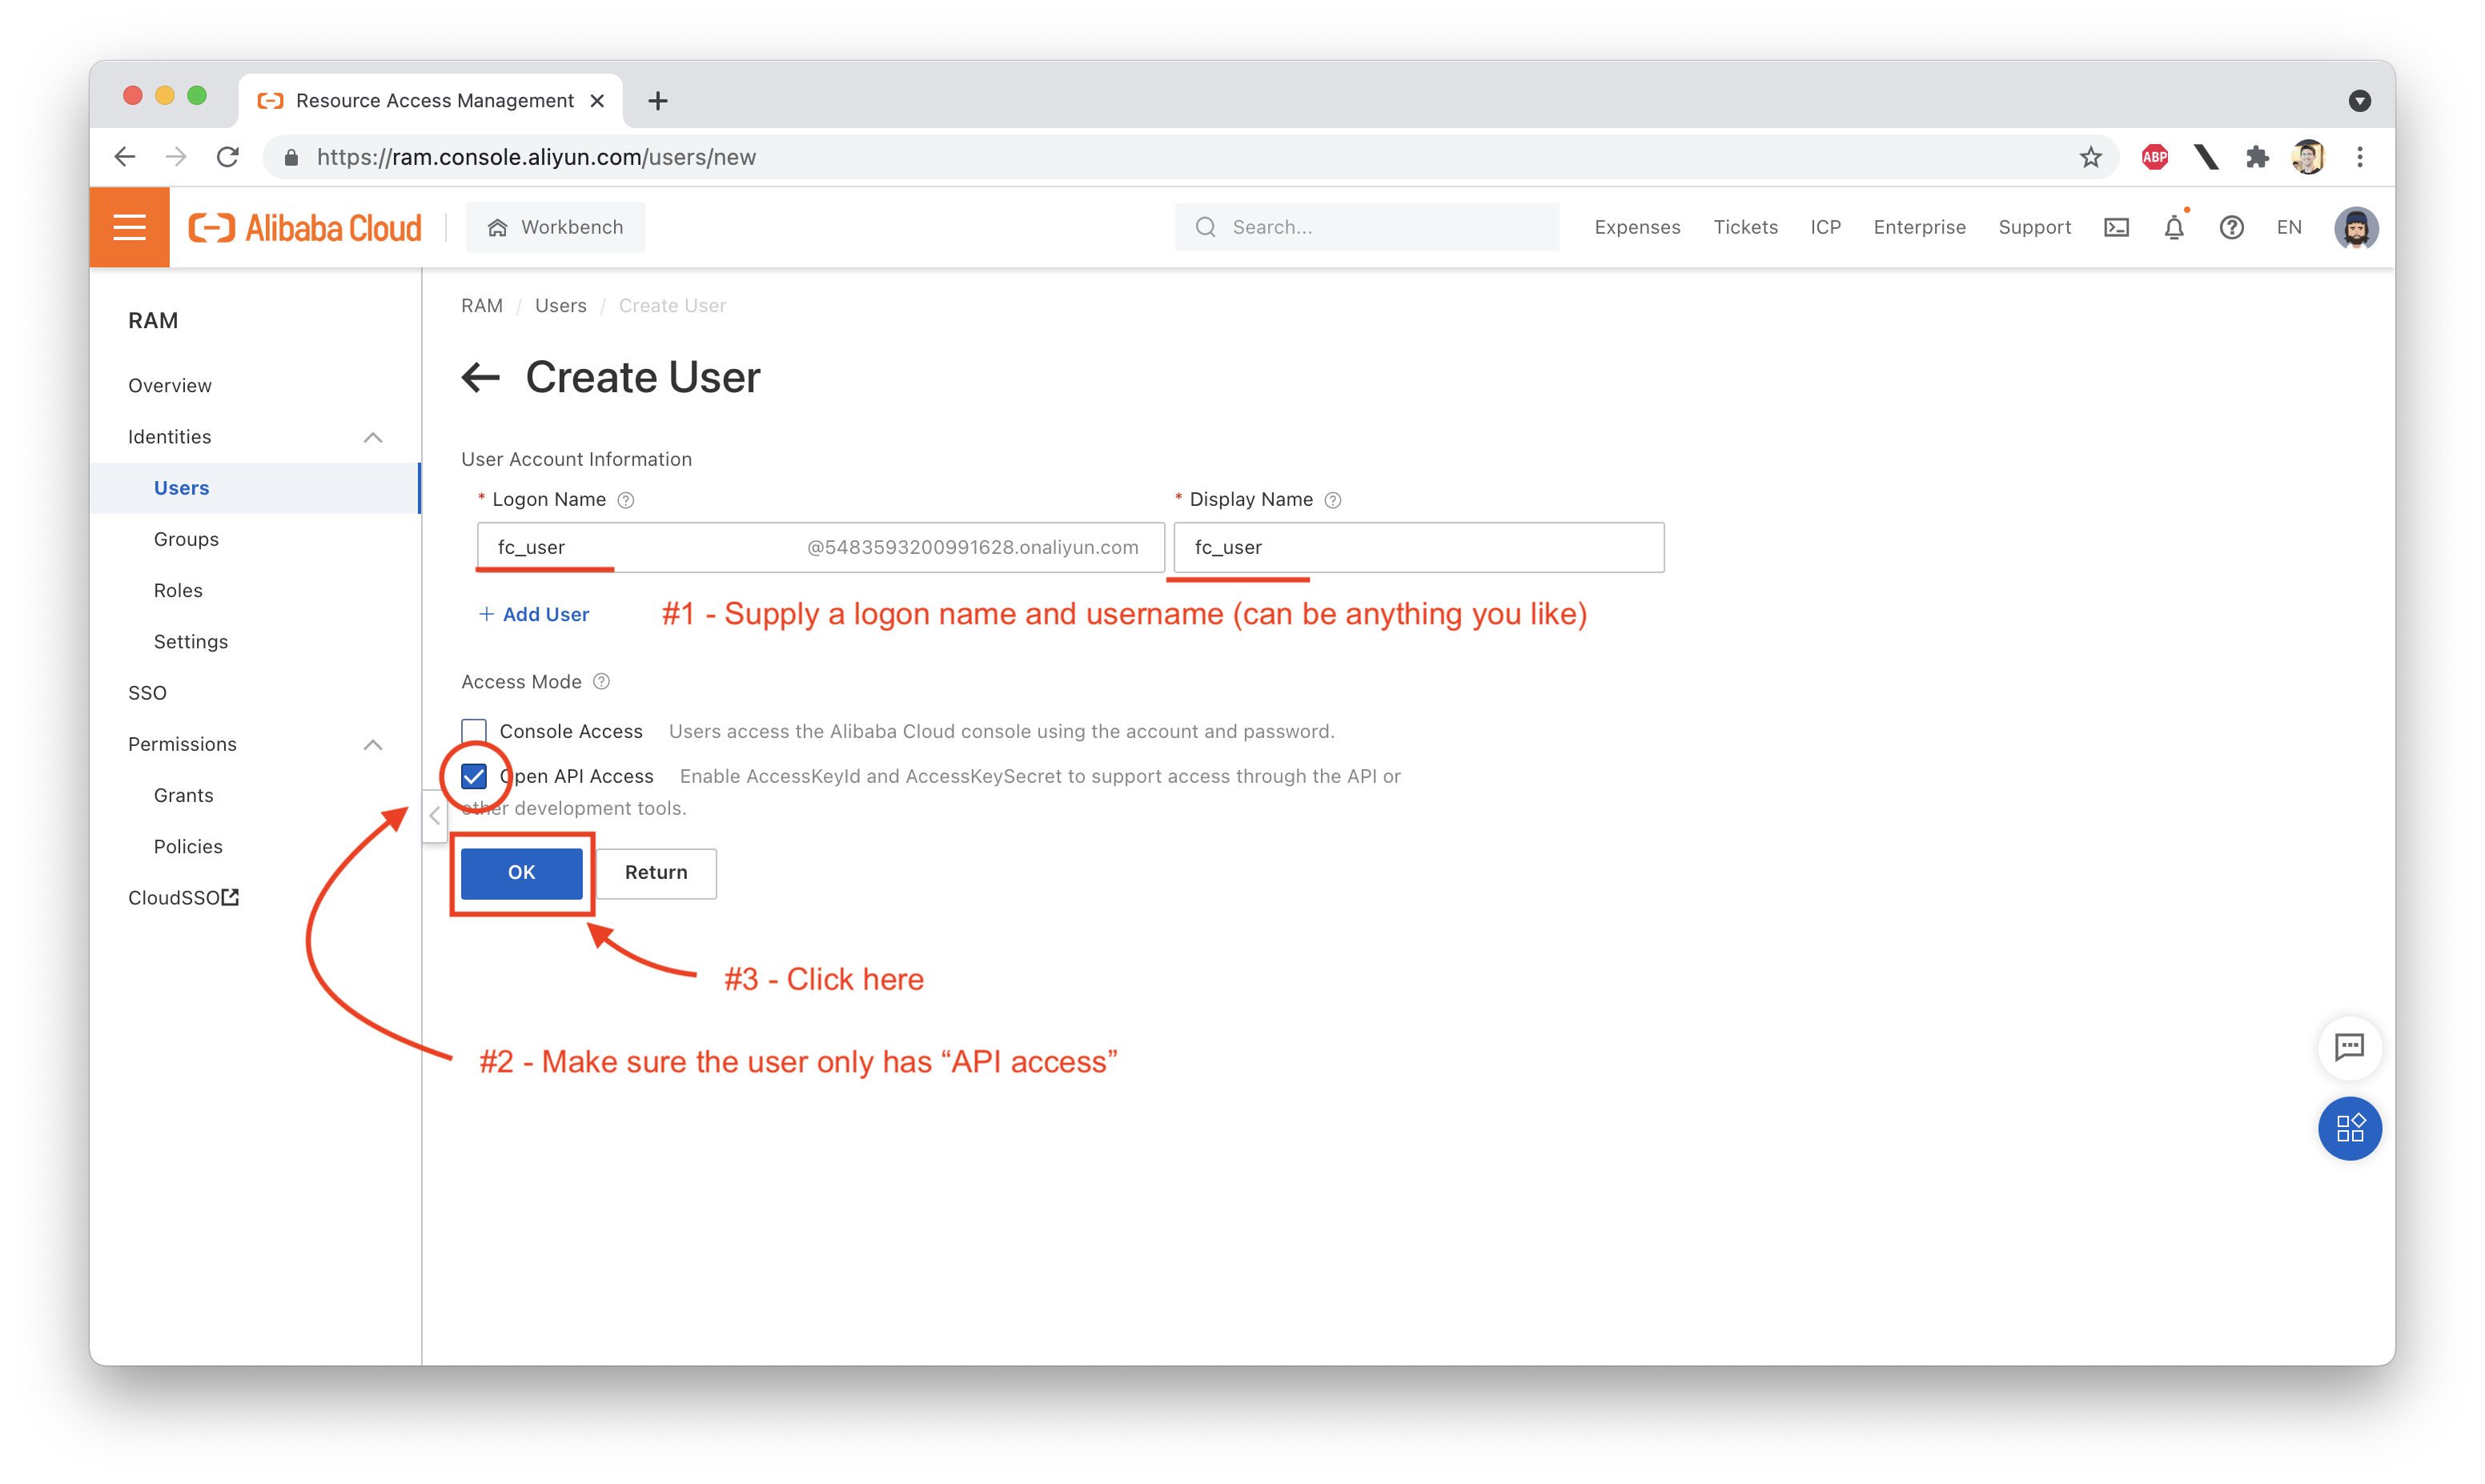
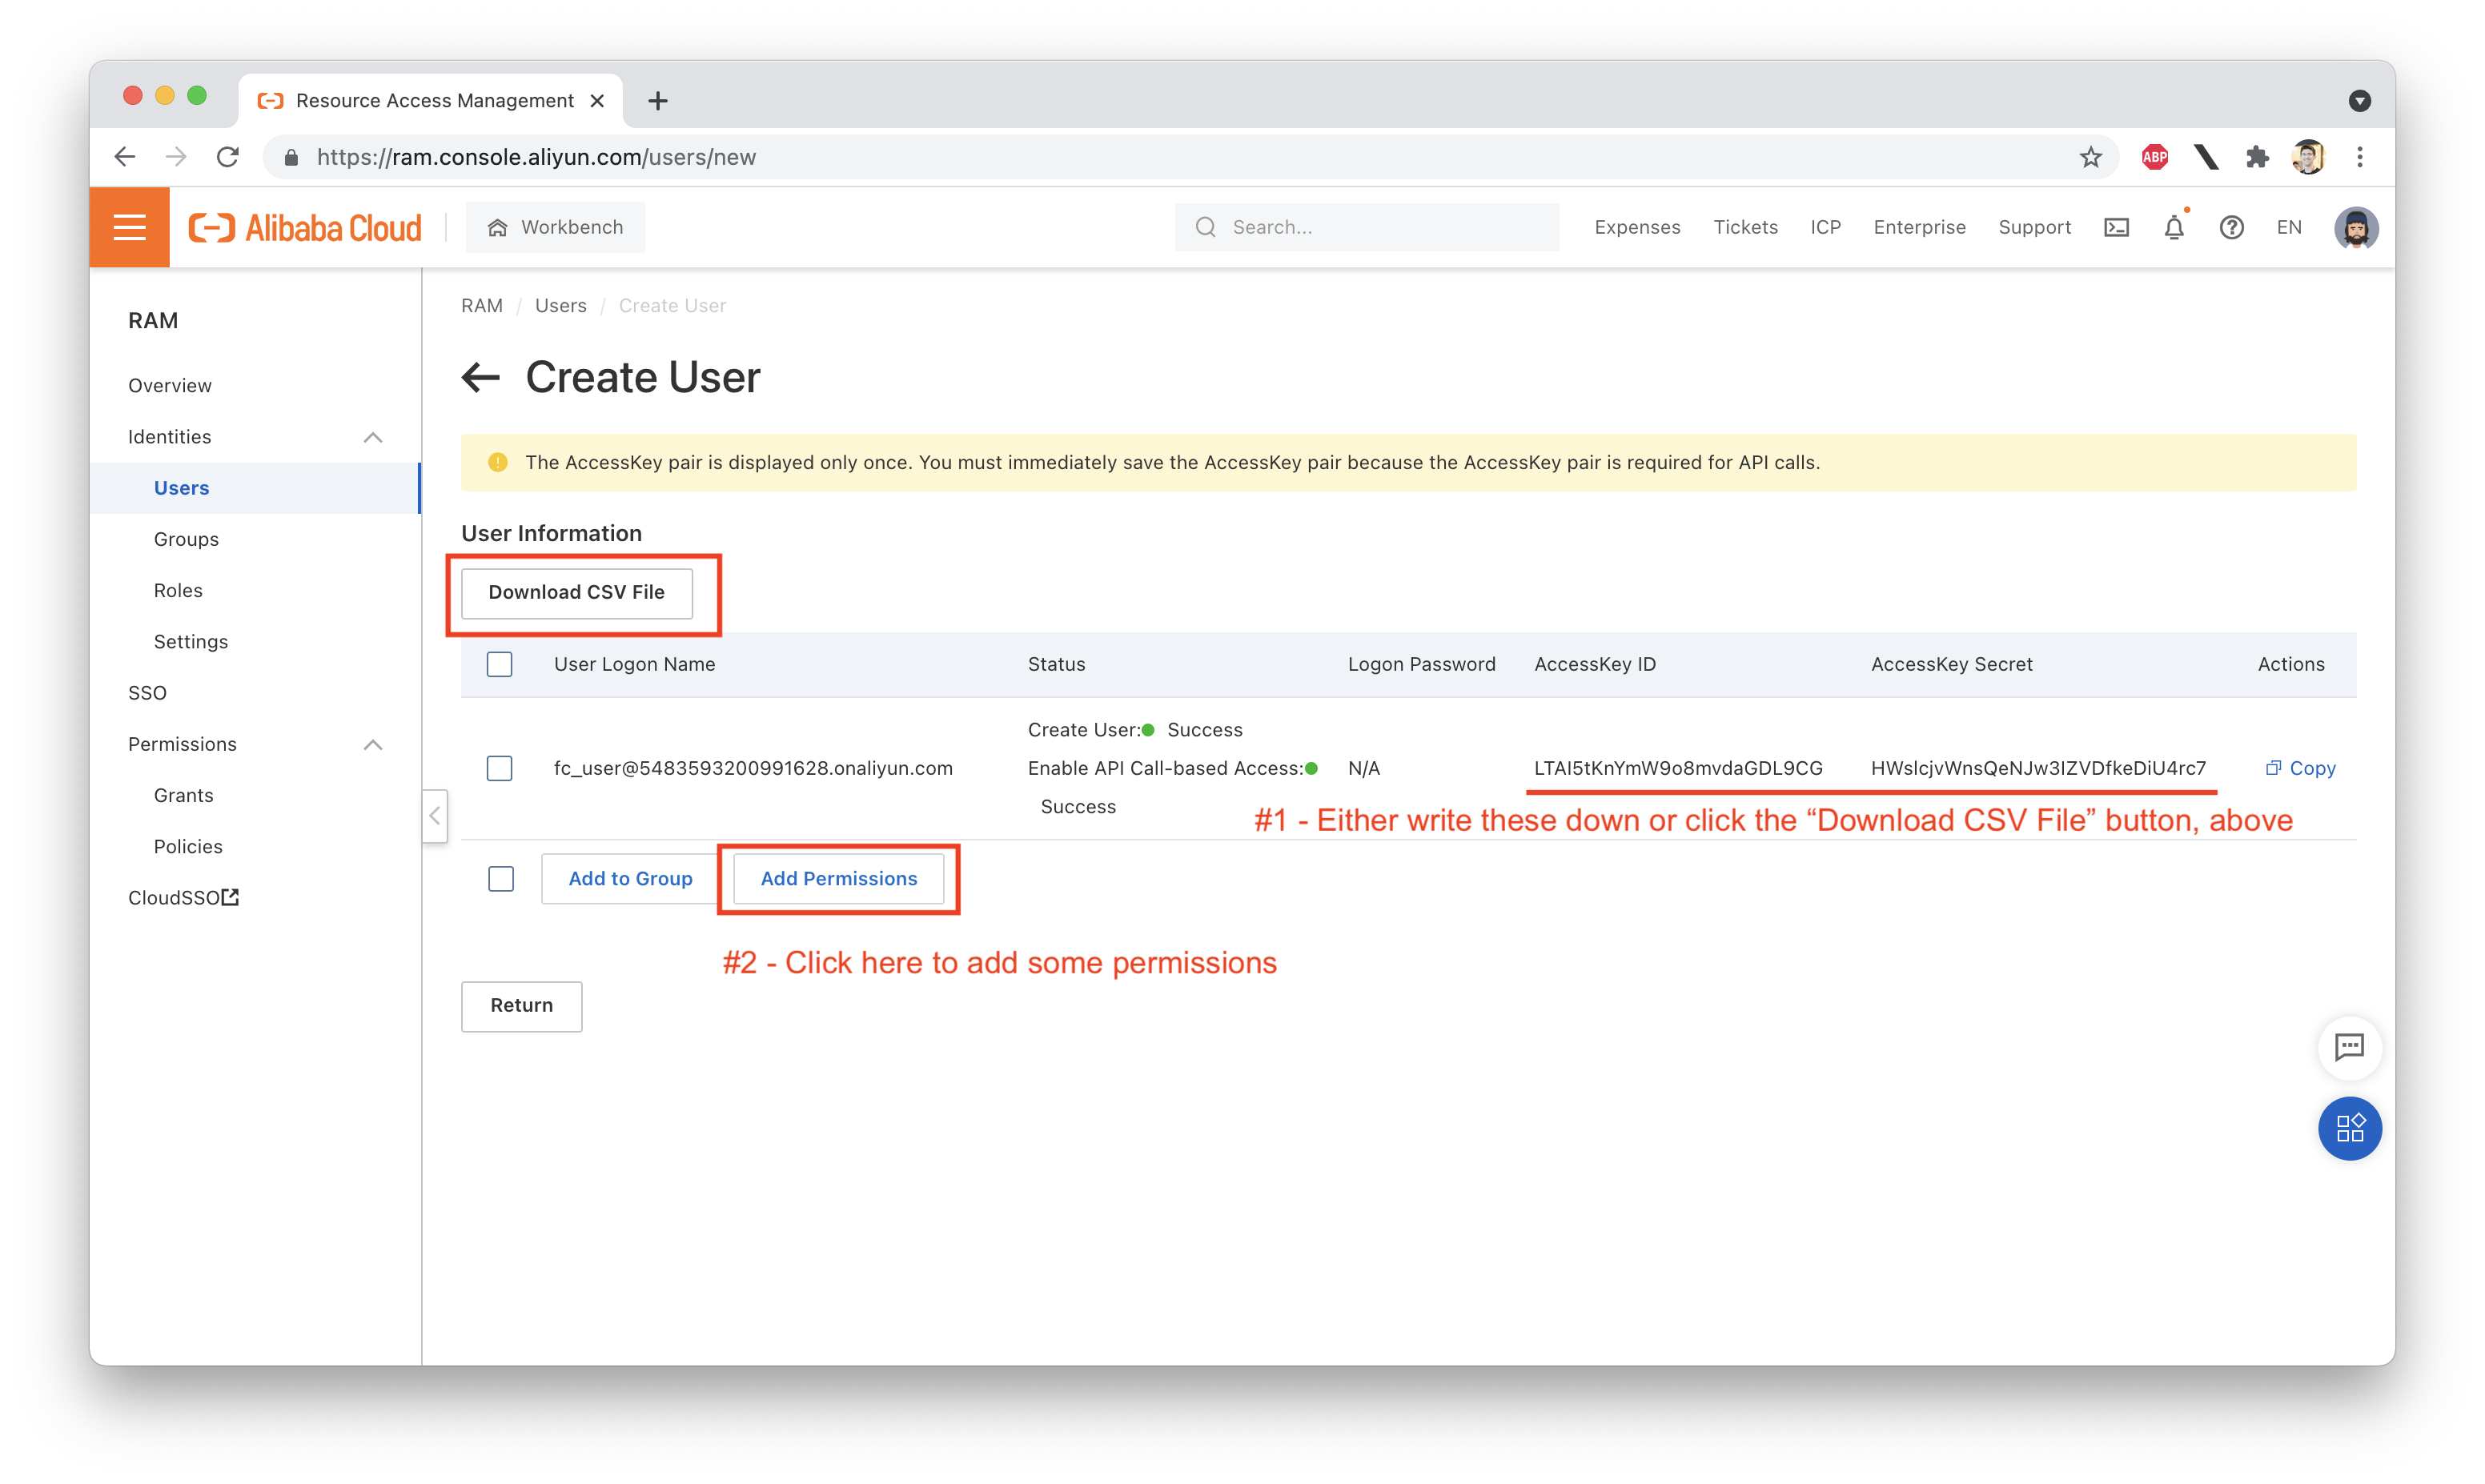
This means we need to log into the console, create a new RAM user, assign appropriate policies (permissions) to that user, and generate a new AccessKey. We also need to look up our Account ID.
Let's learn how.
First, log into your Alibaba Cloud account, then navigate to the Console homepage:
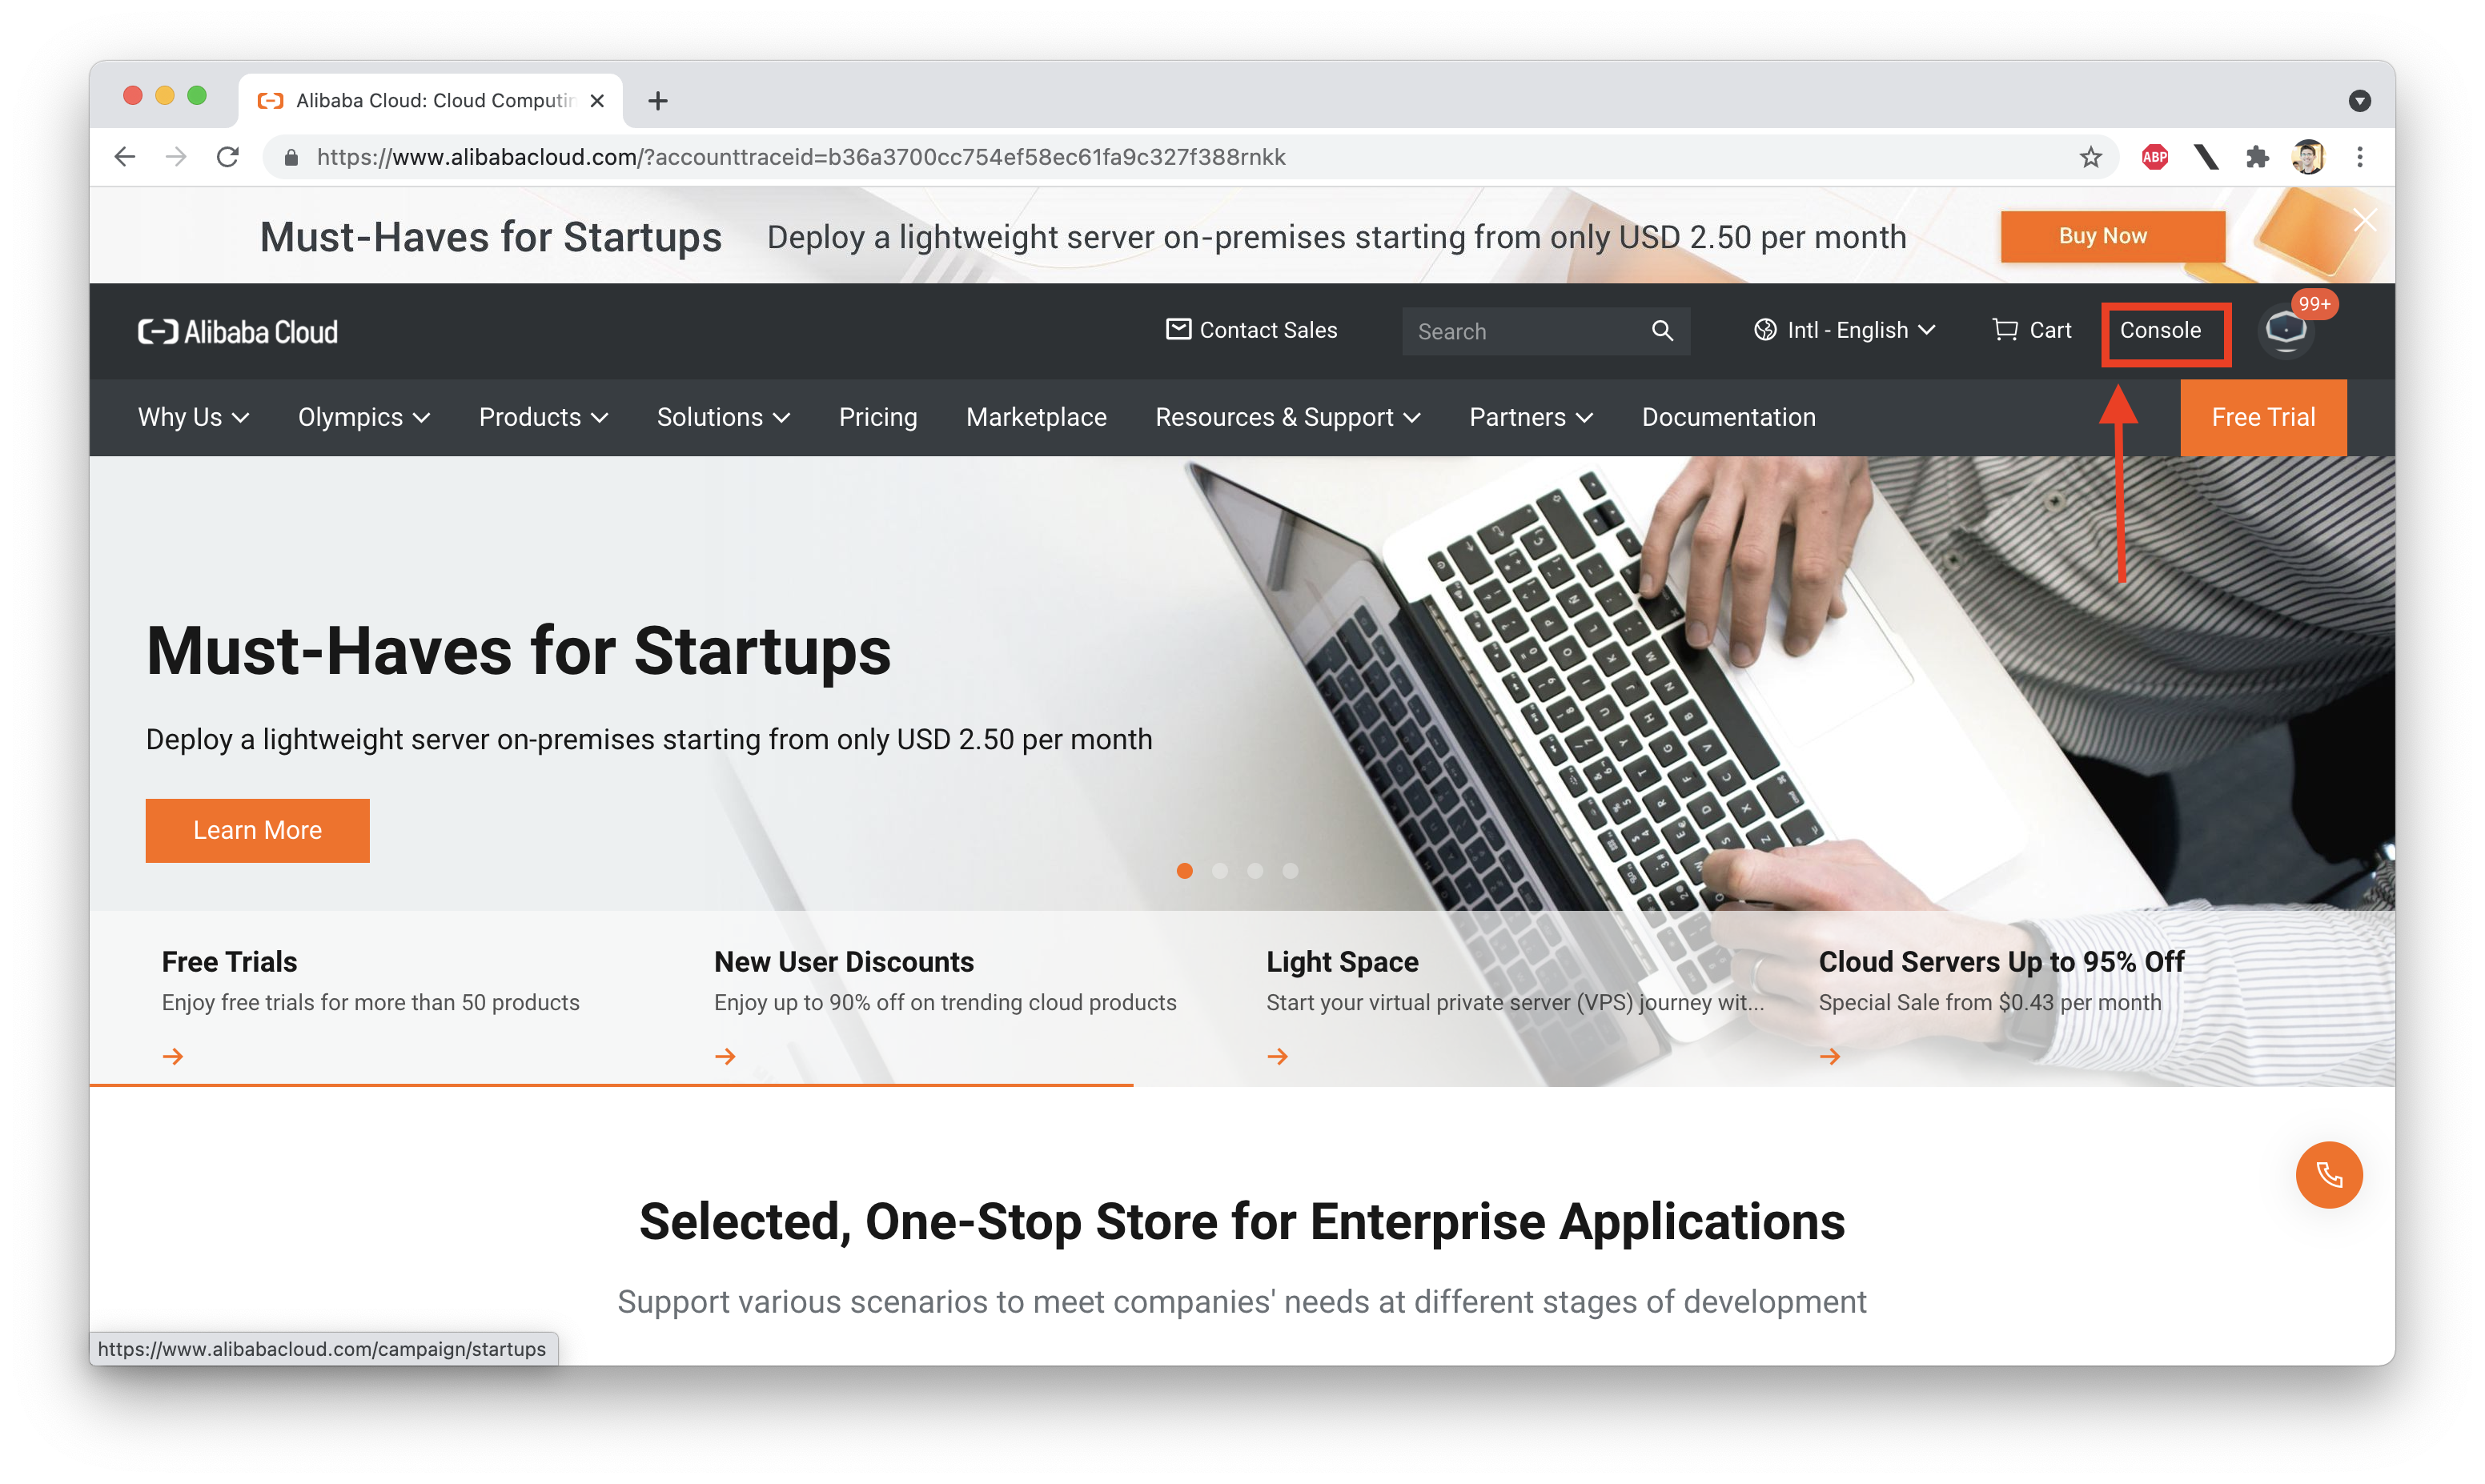
Next, mouse over your "avatar" (the little icon in the upper right hand corner). Note you do not need to click on it, just move your cursor over it:
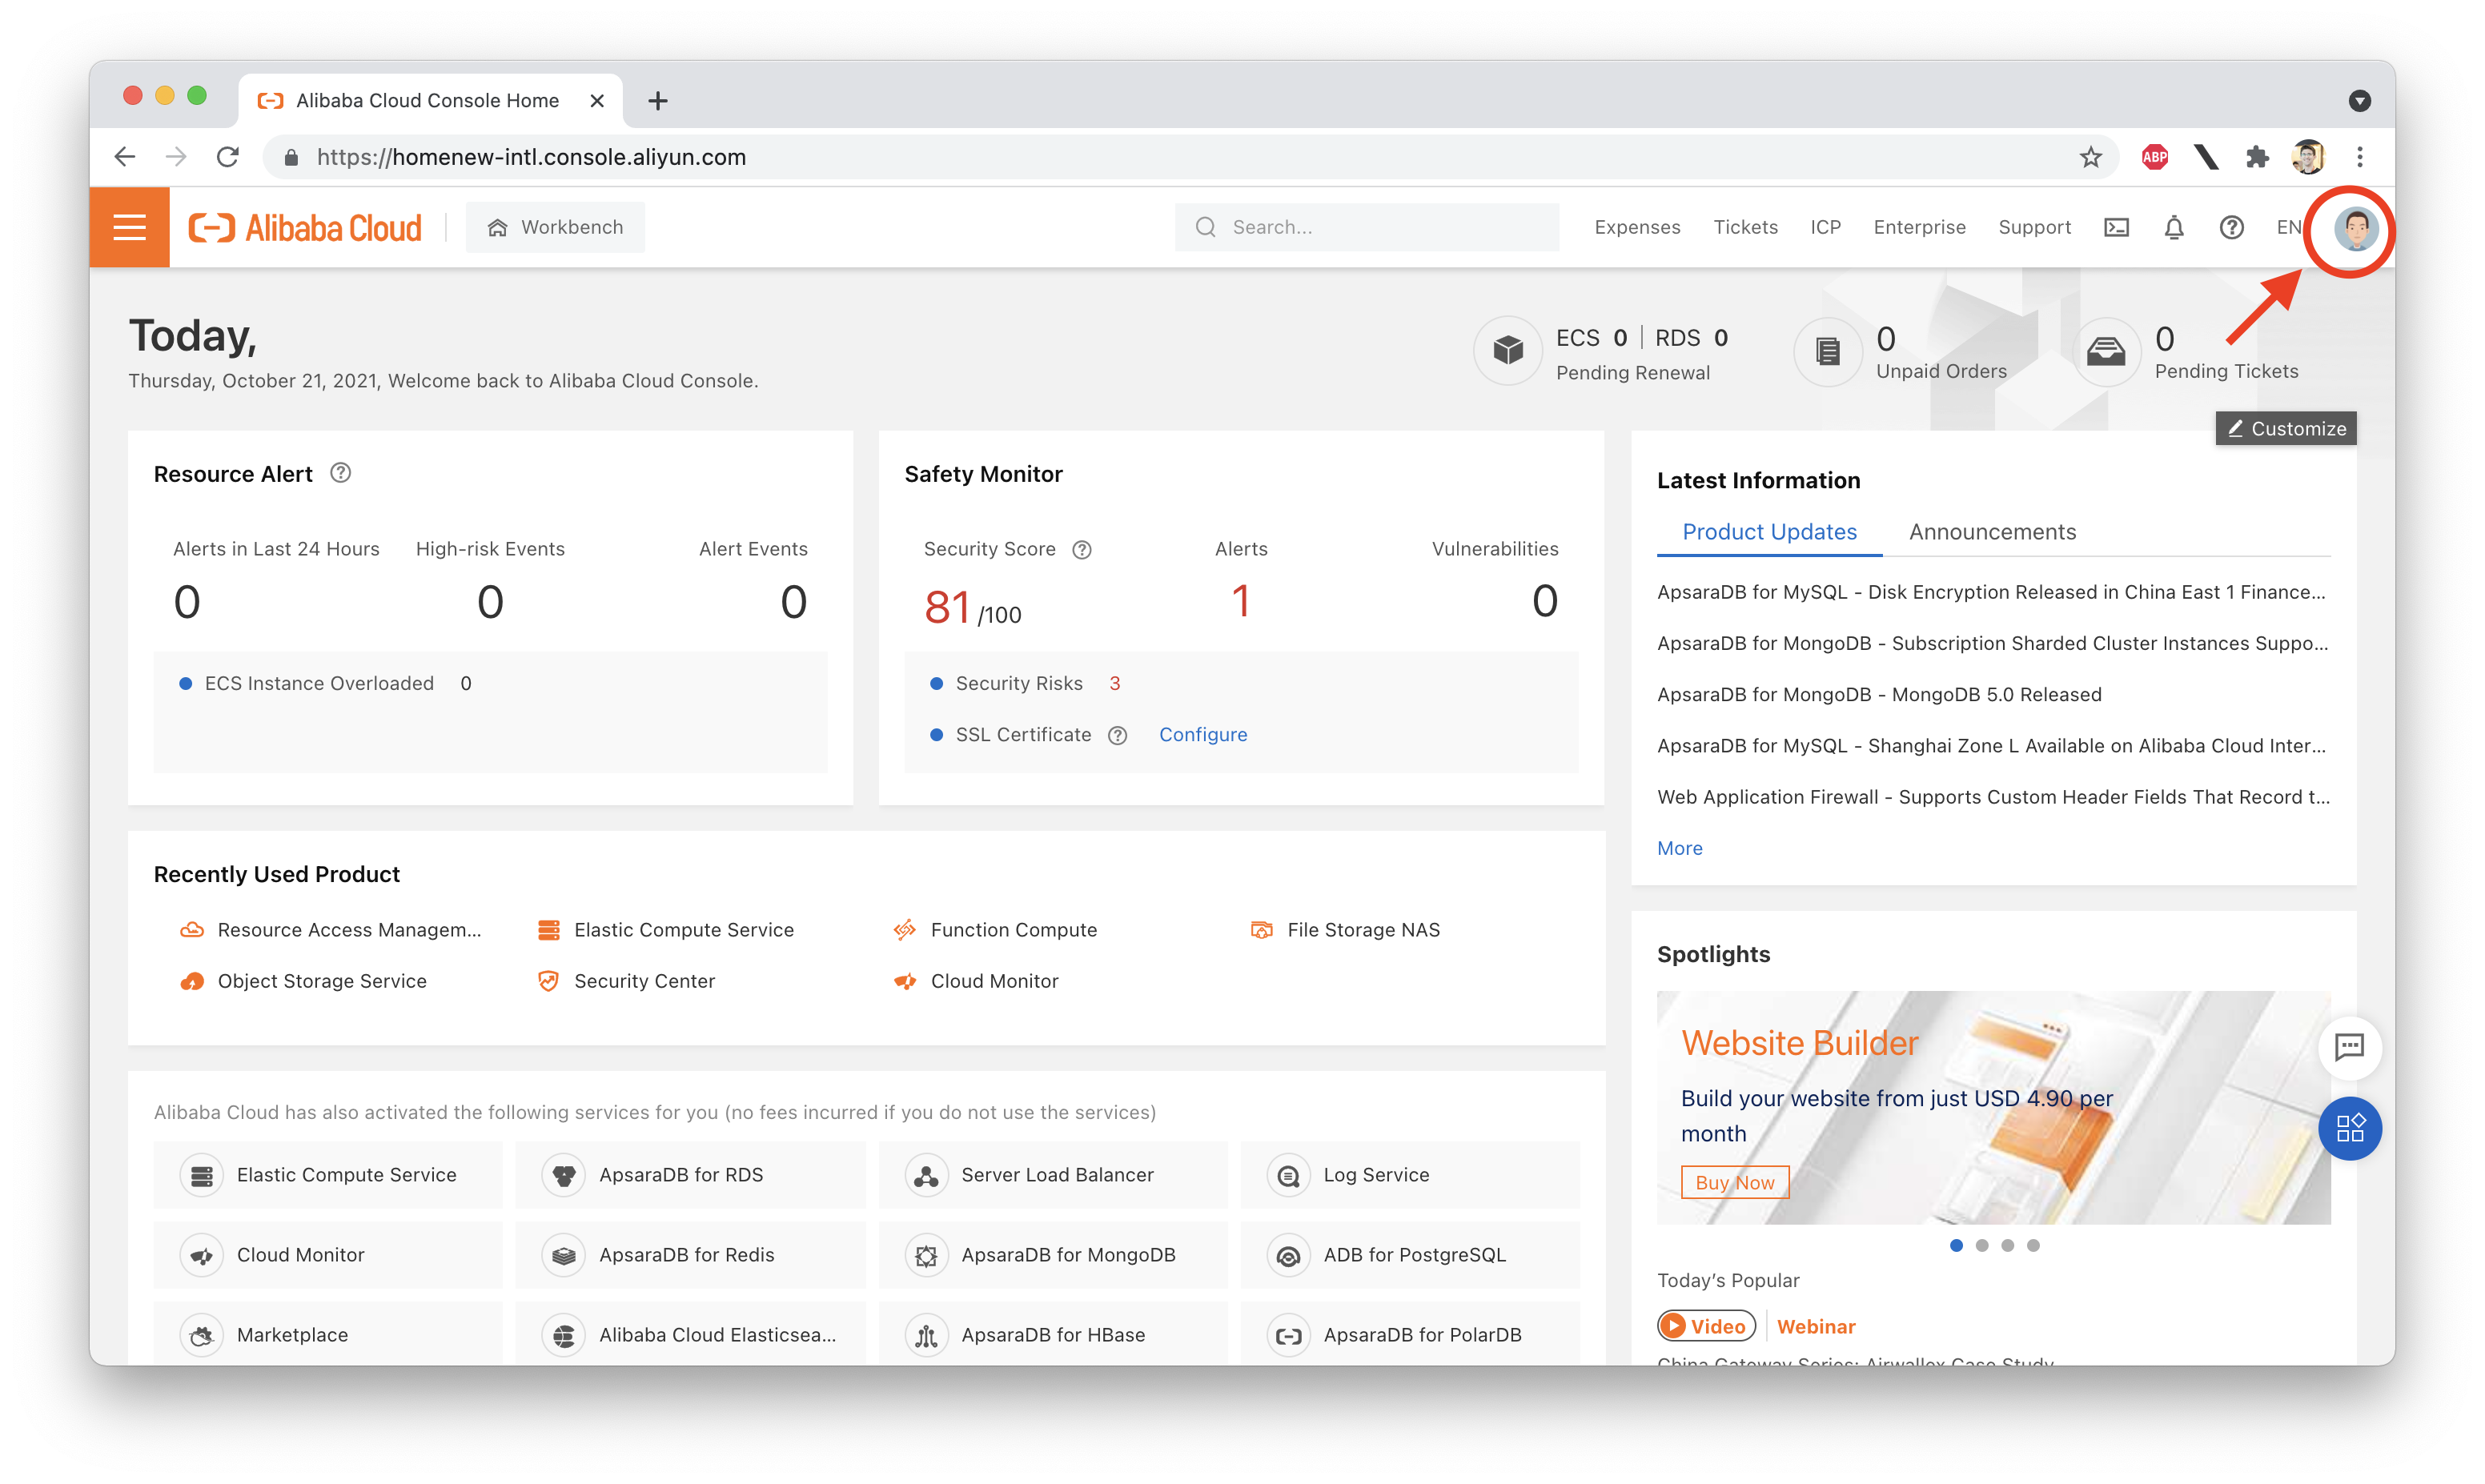
This will open a dropdown. Your Account ID is at the top. Click the little icon to the right of your account ID to copy it to your clipboard:
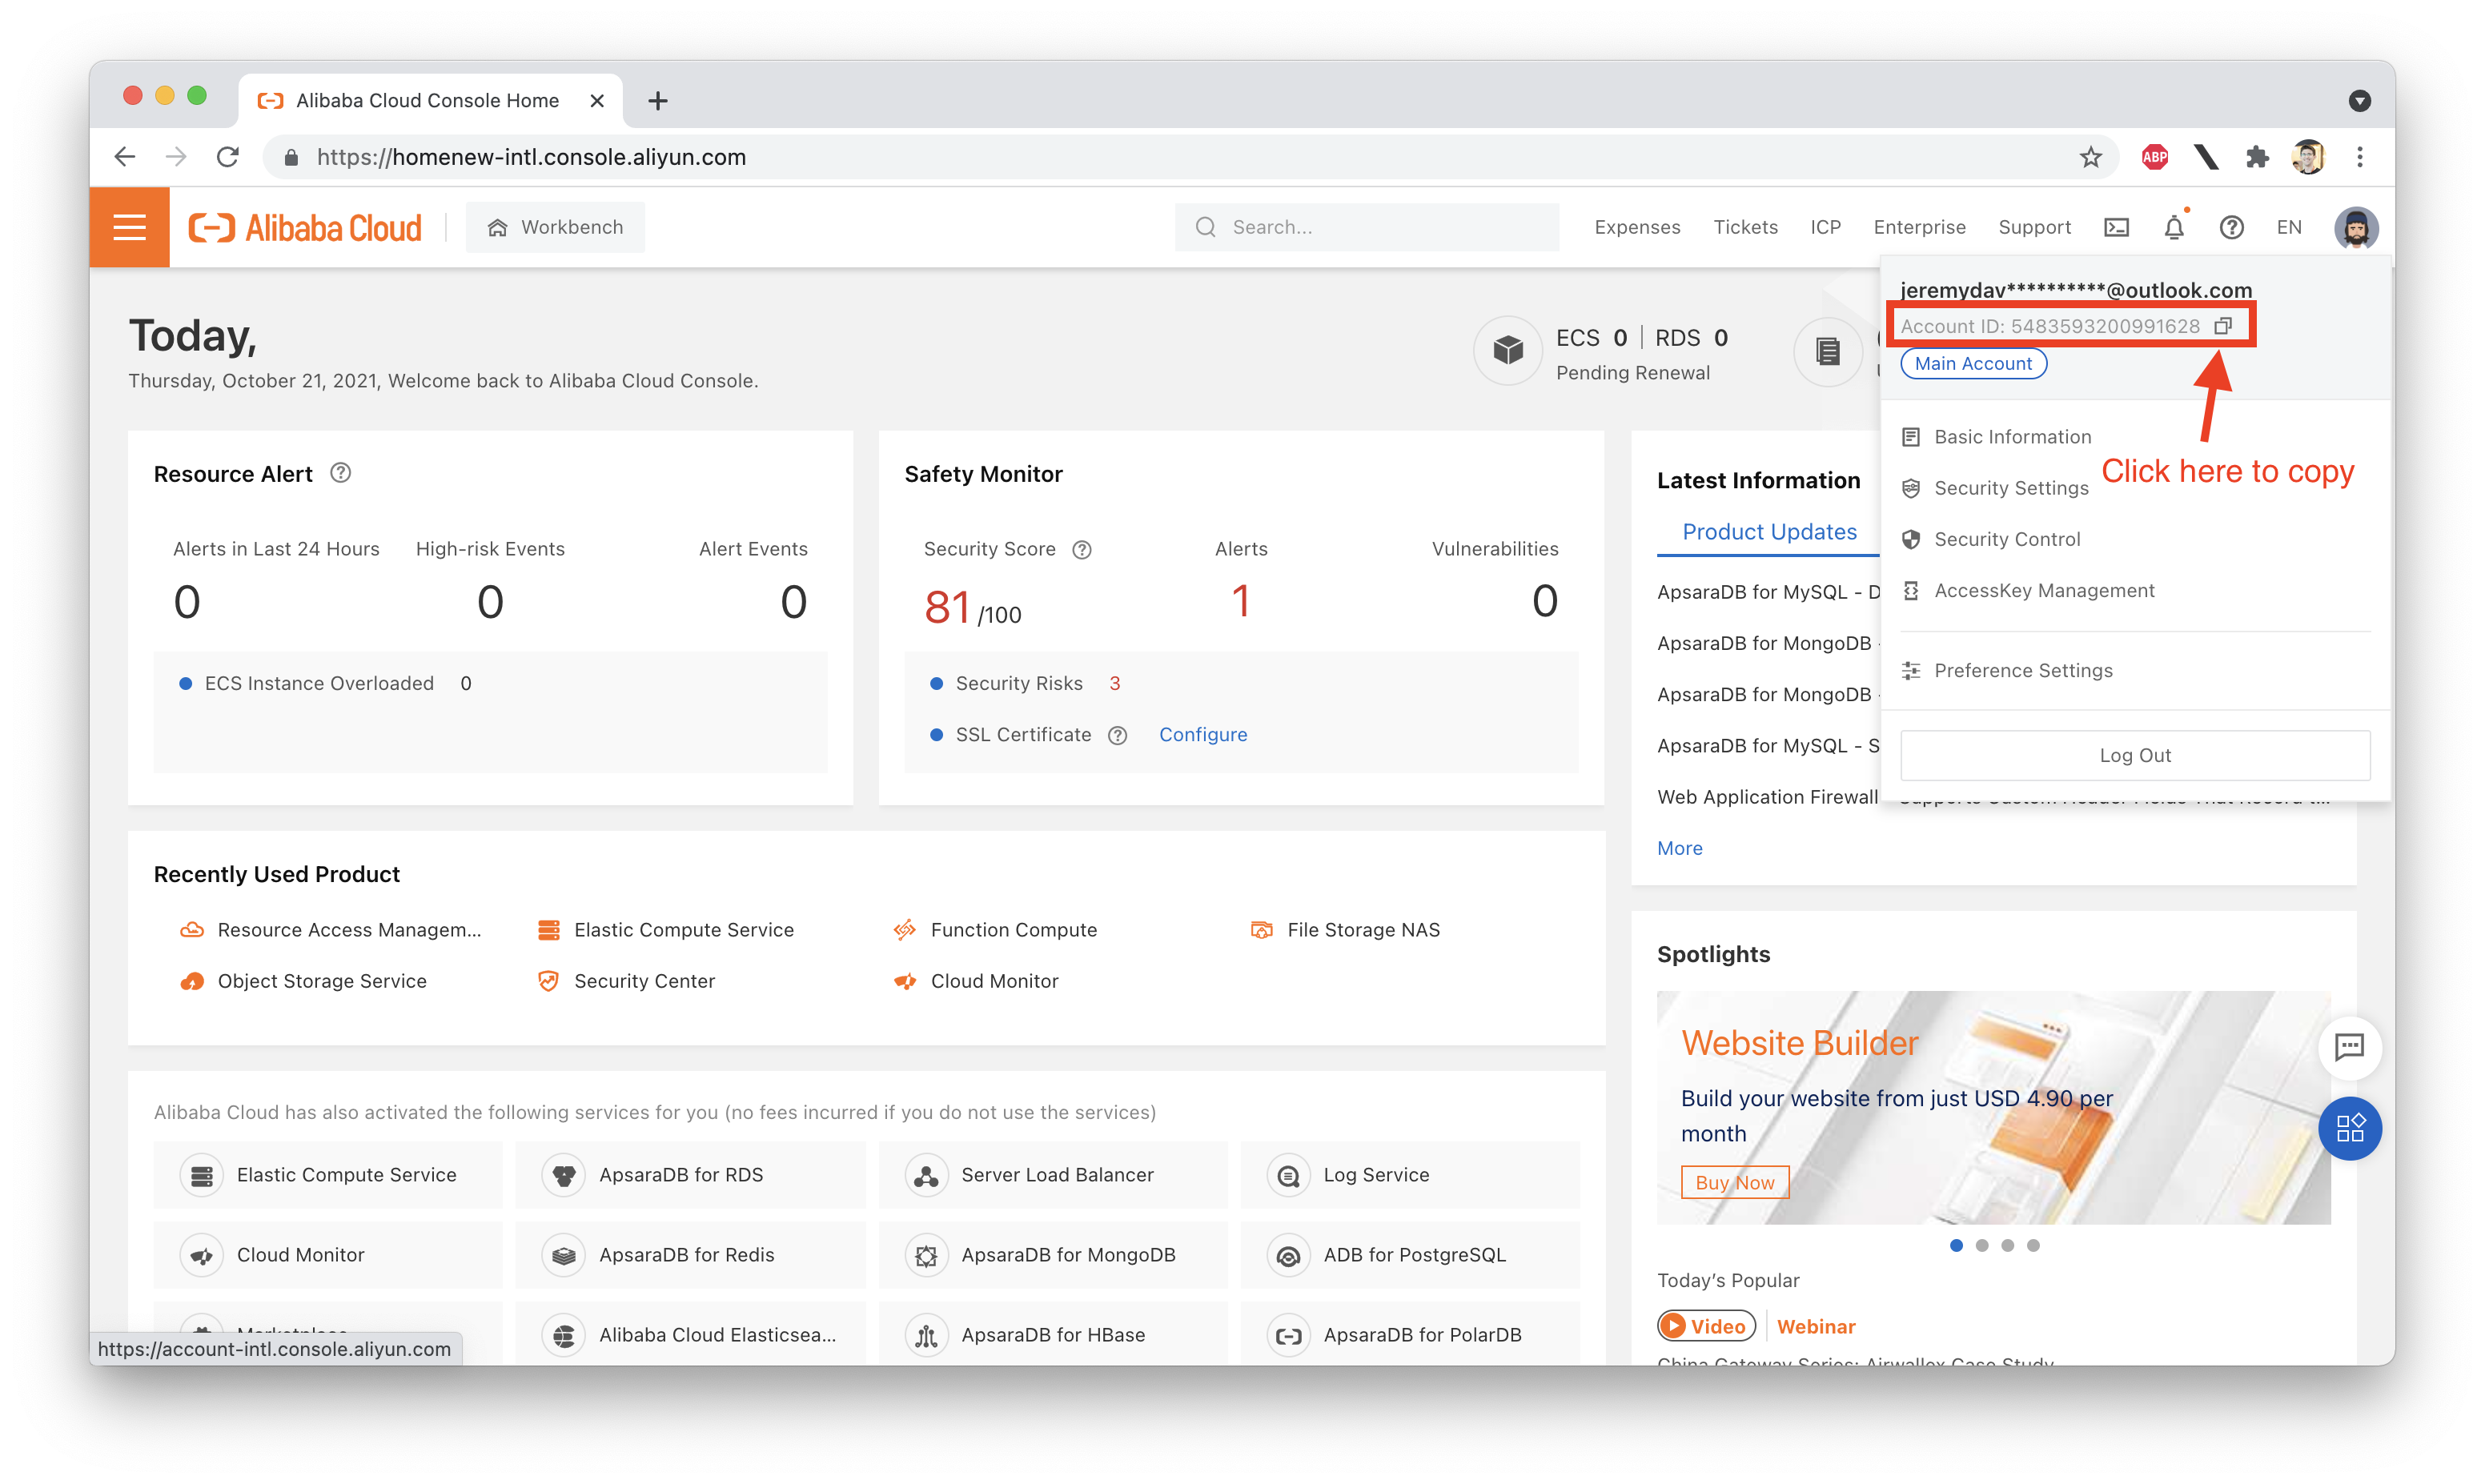
Write your Account ID down somewhere. We will need it when we run fun config
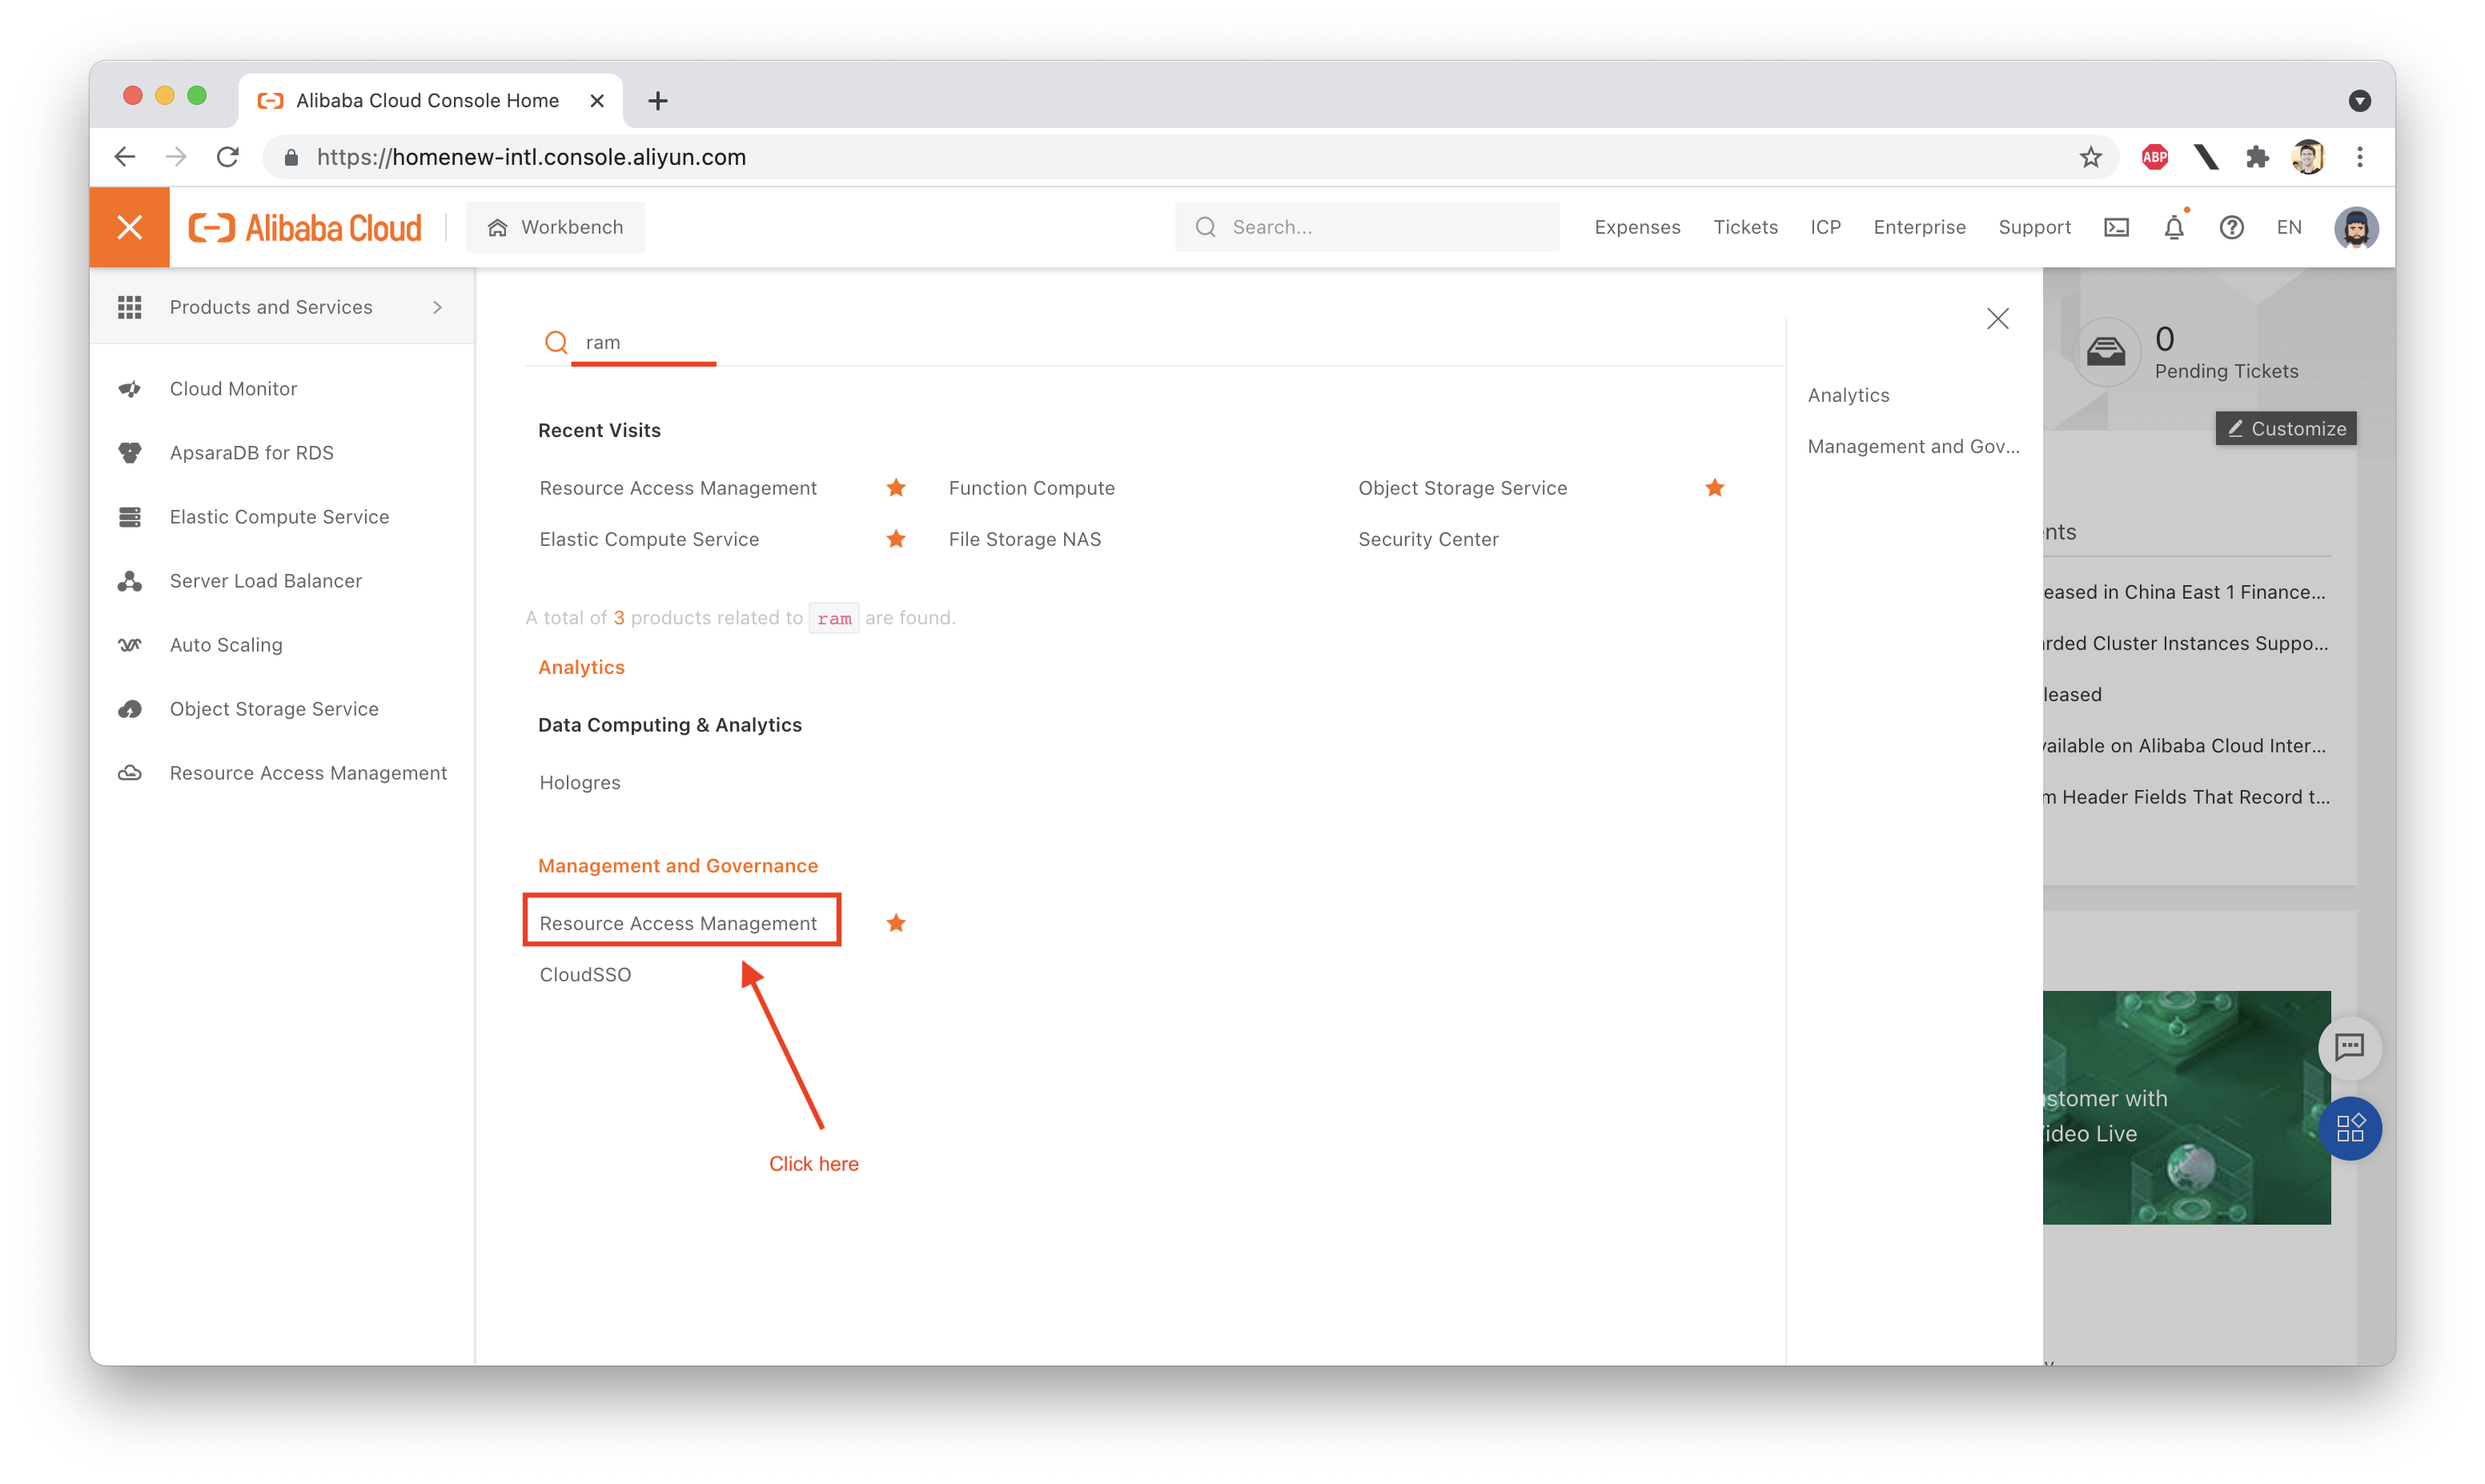
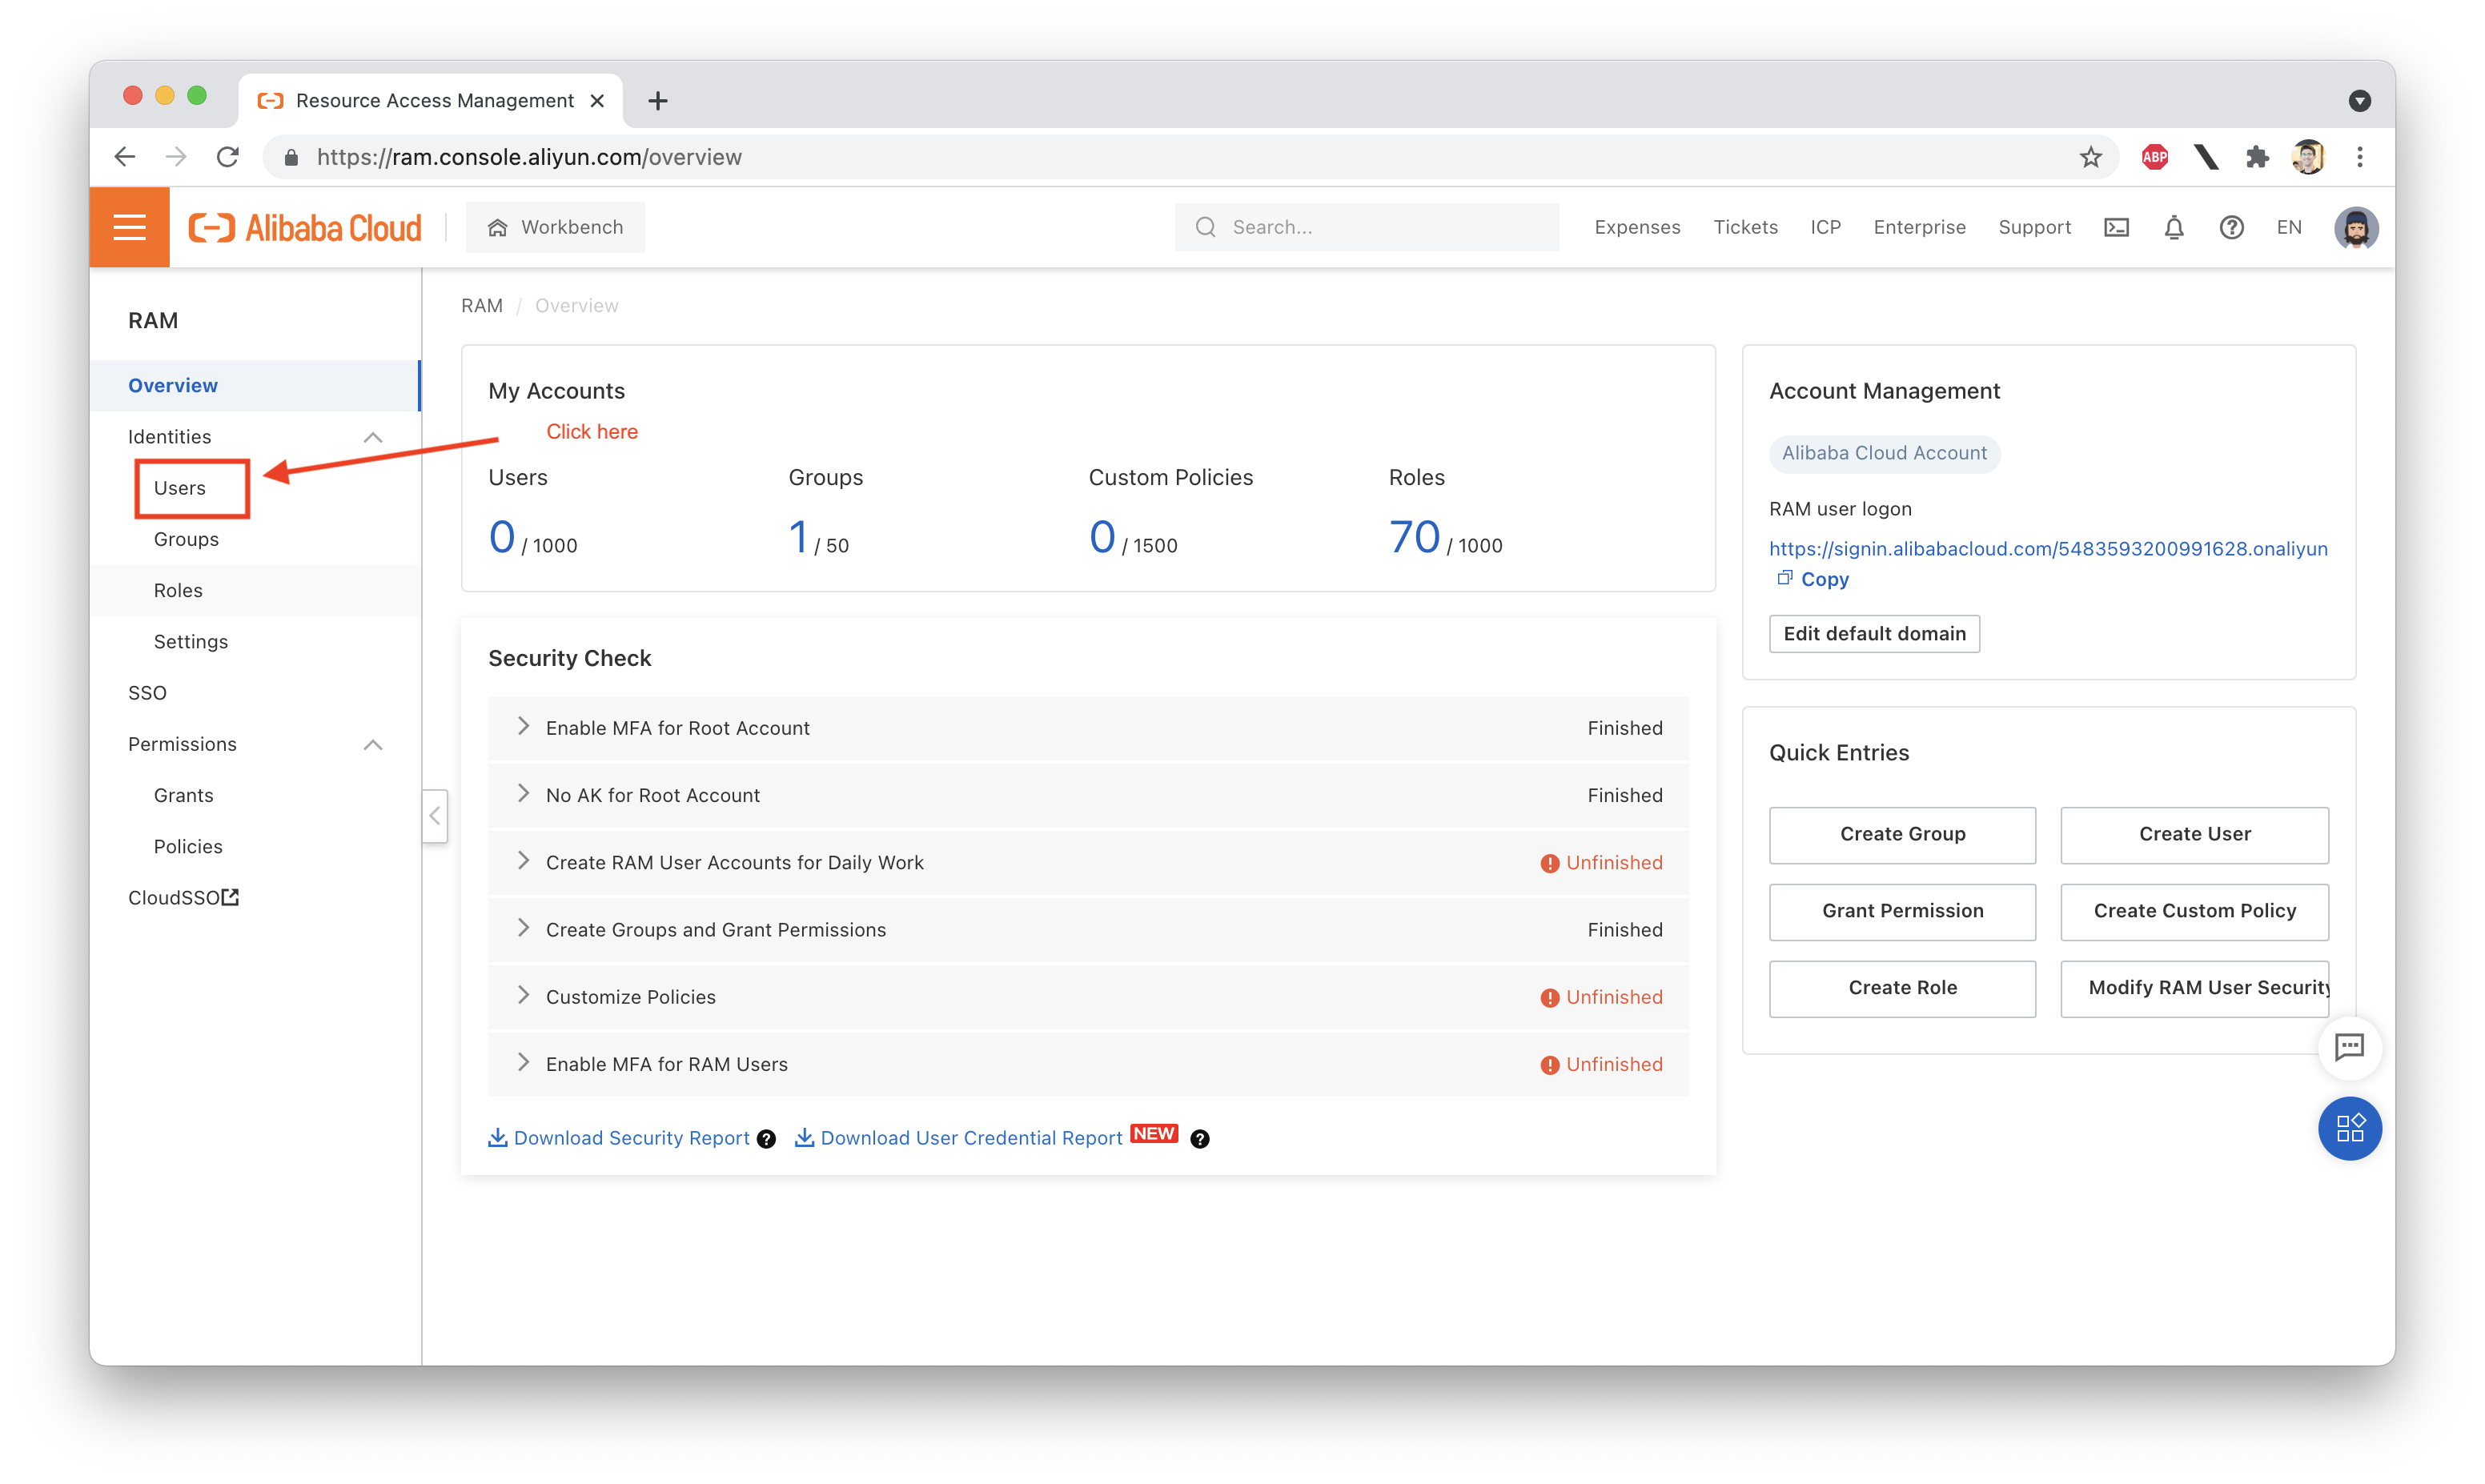
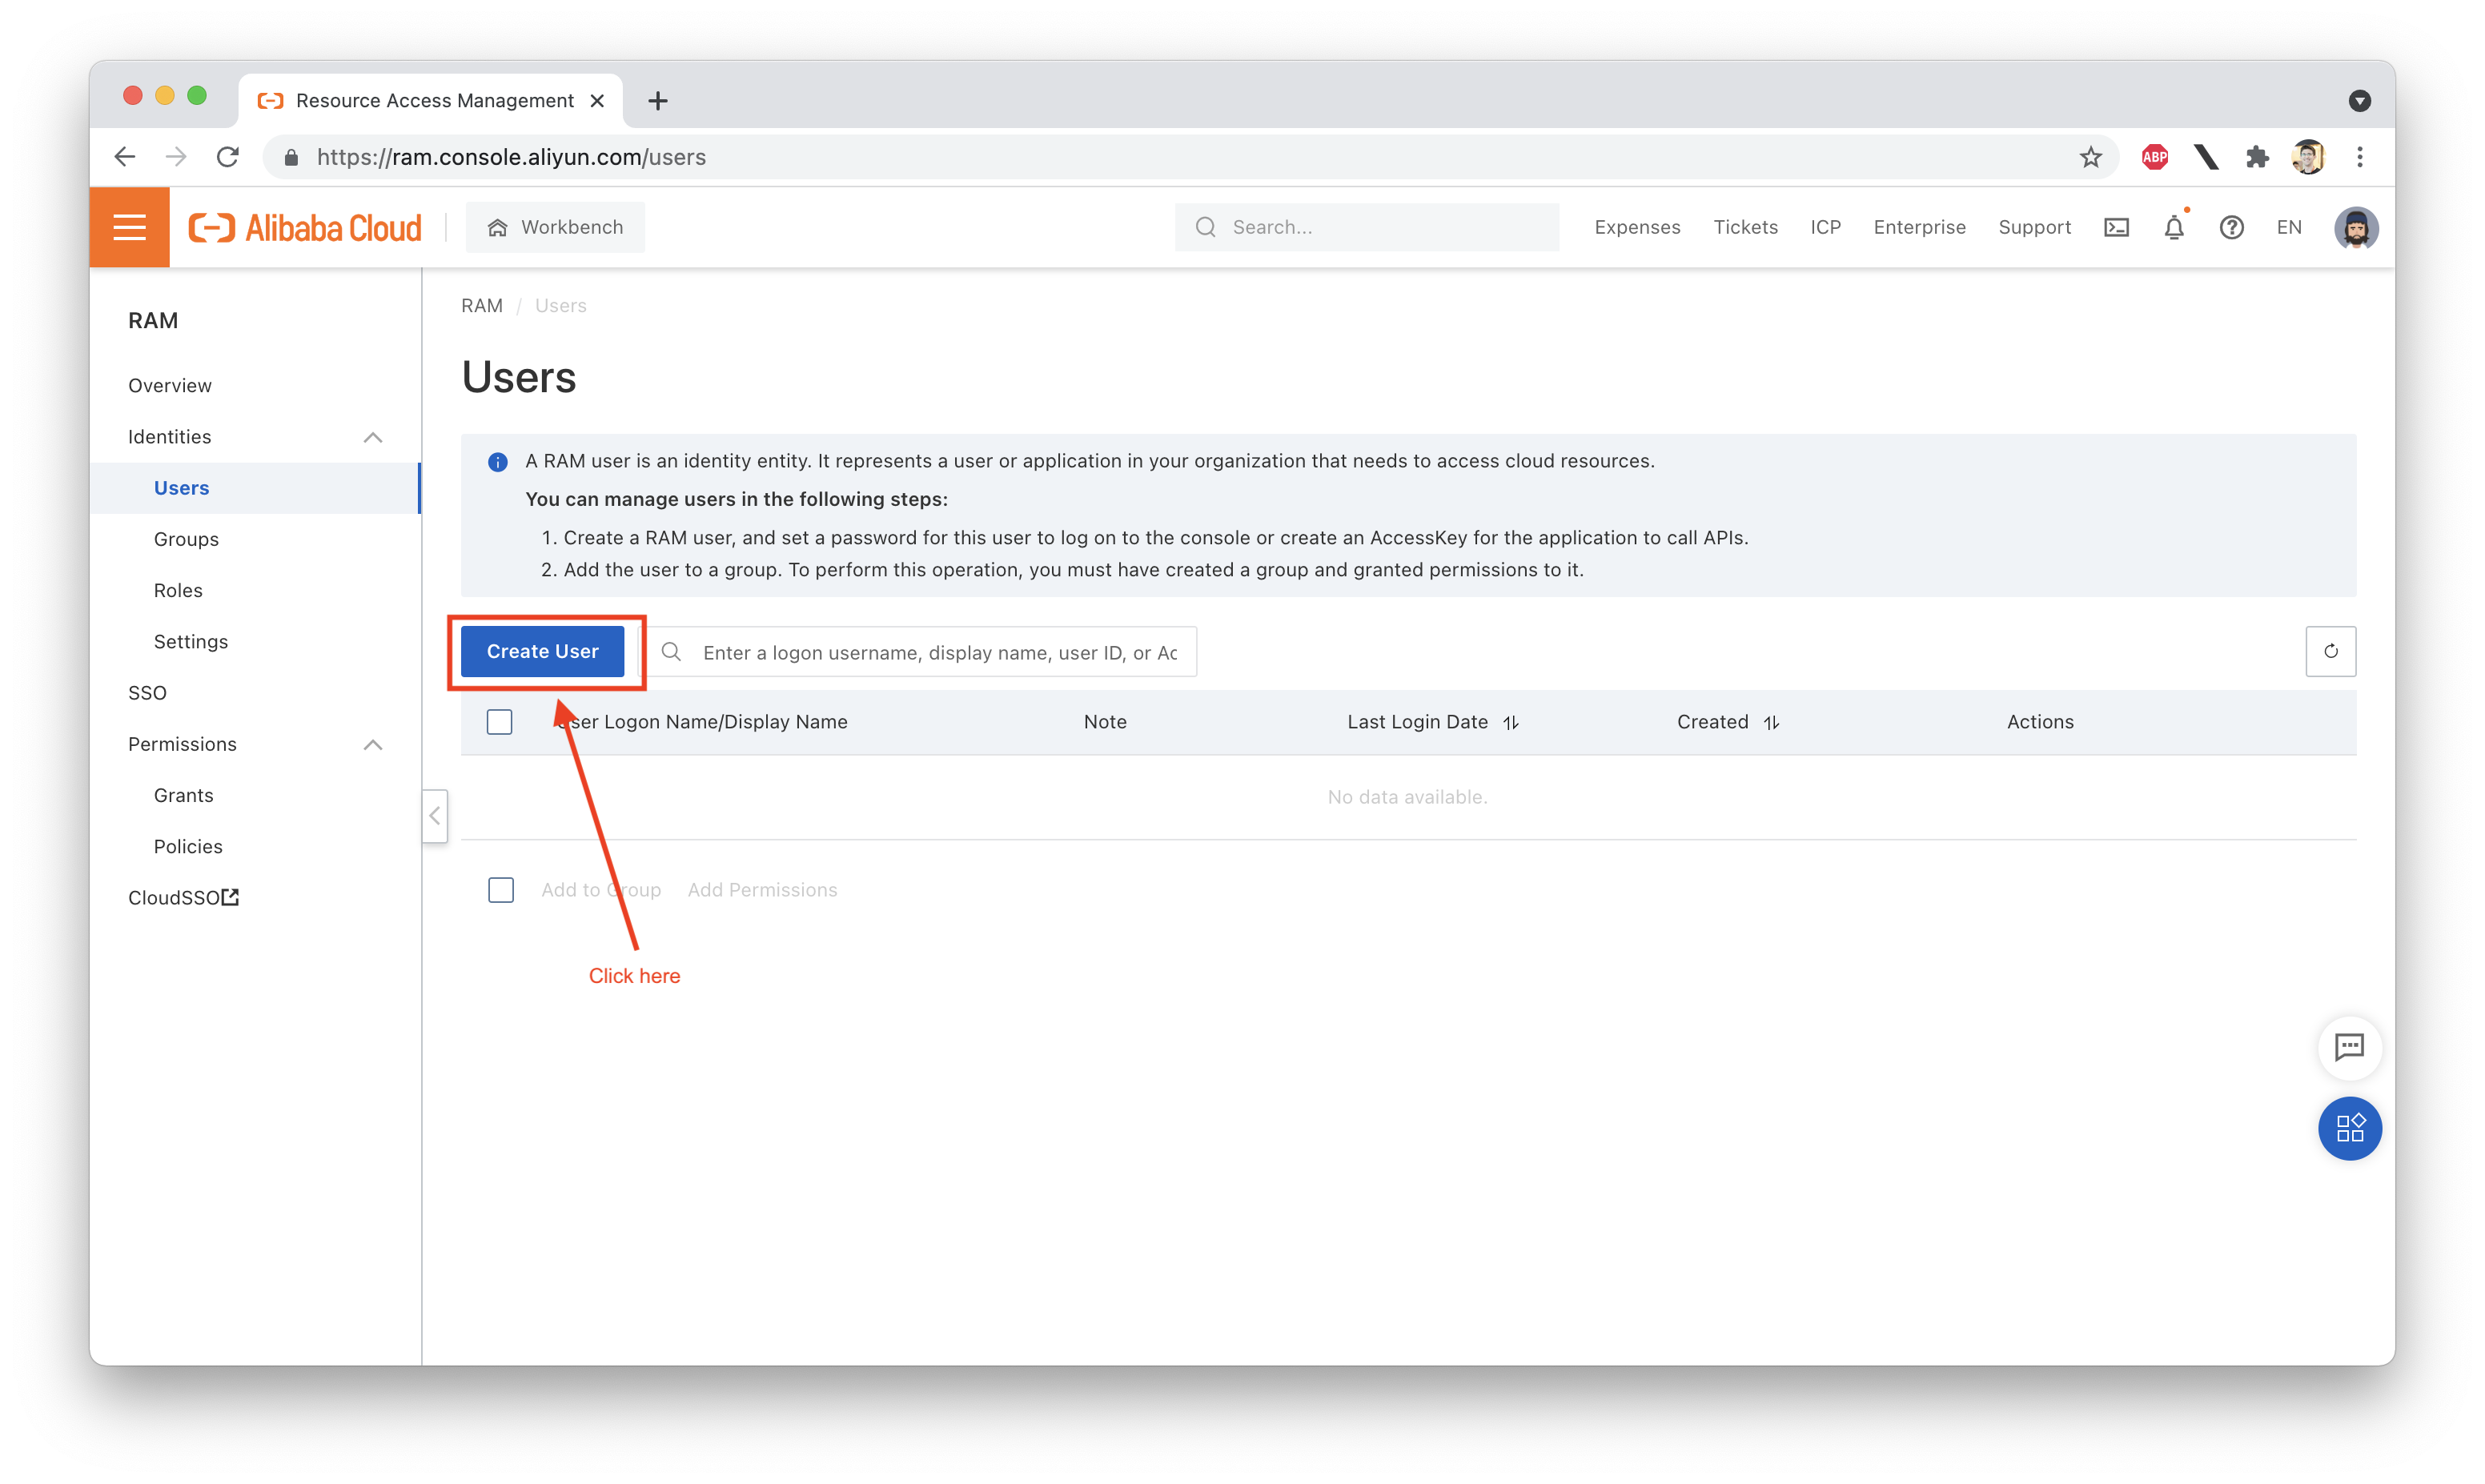
Next, we need to navigate to the RAM console and set up a new user and a new Access Key. Follow along with these screenshots to learn how:
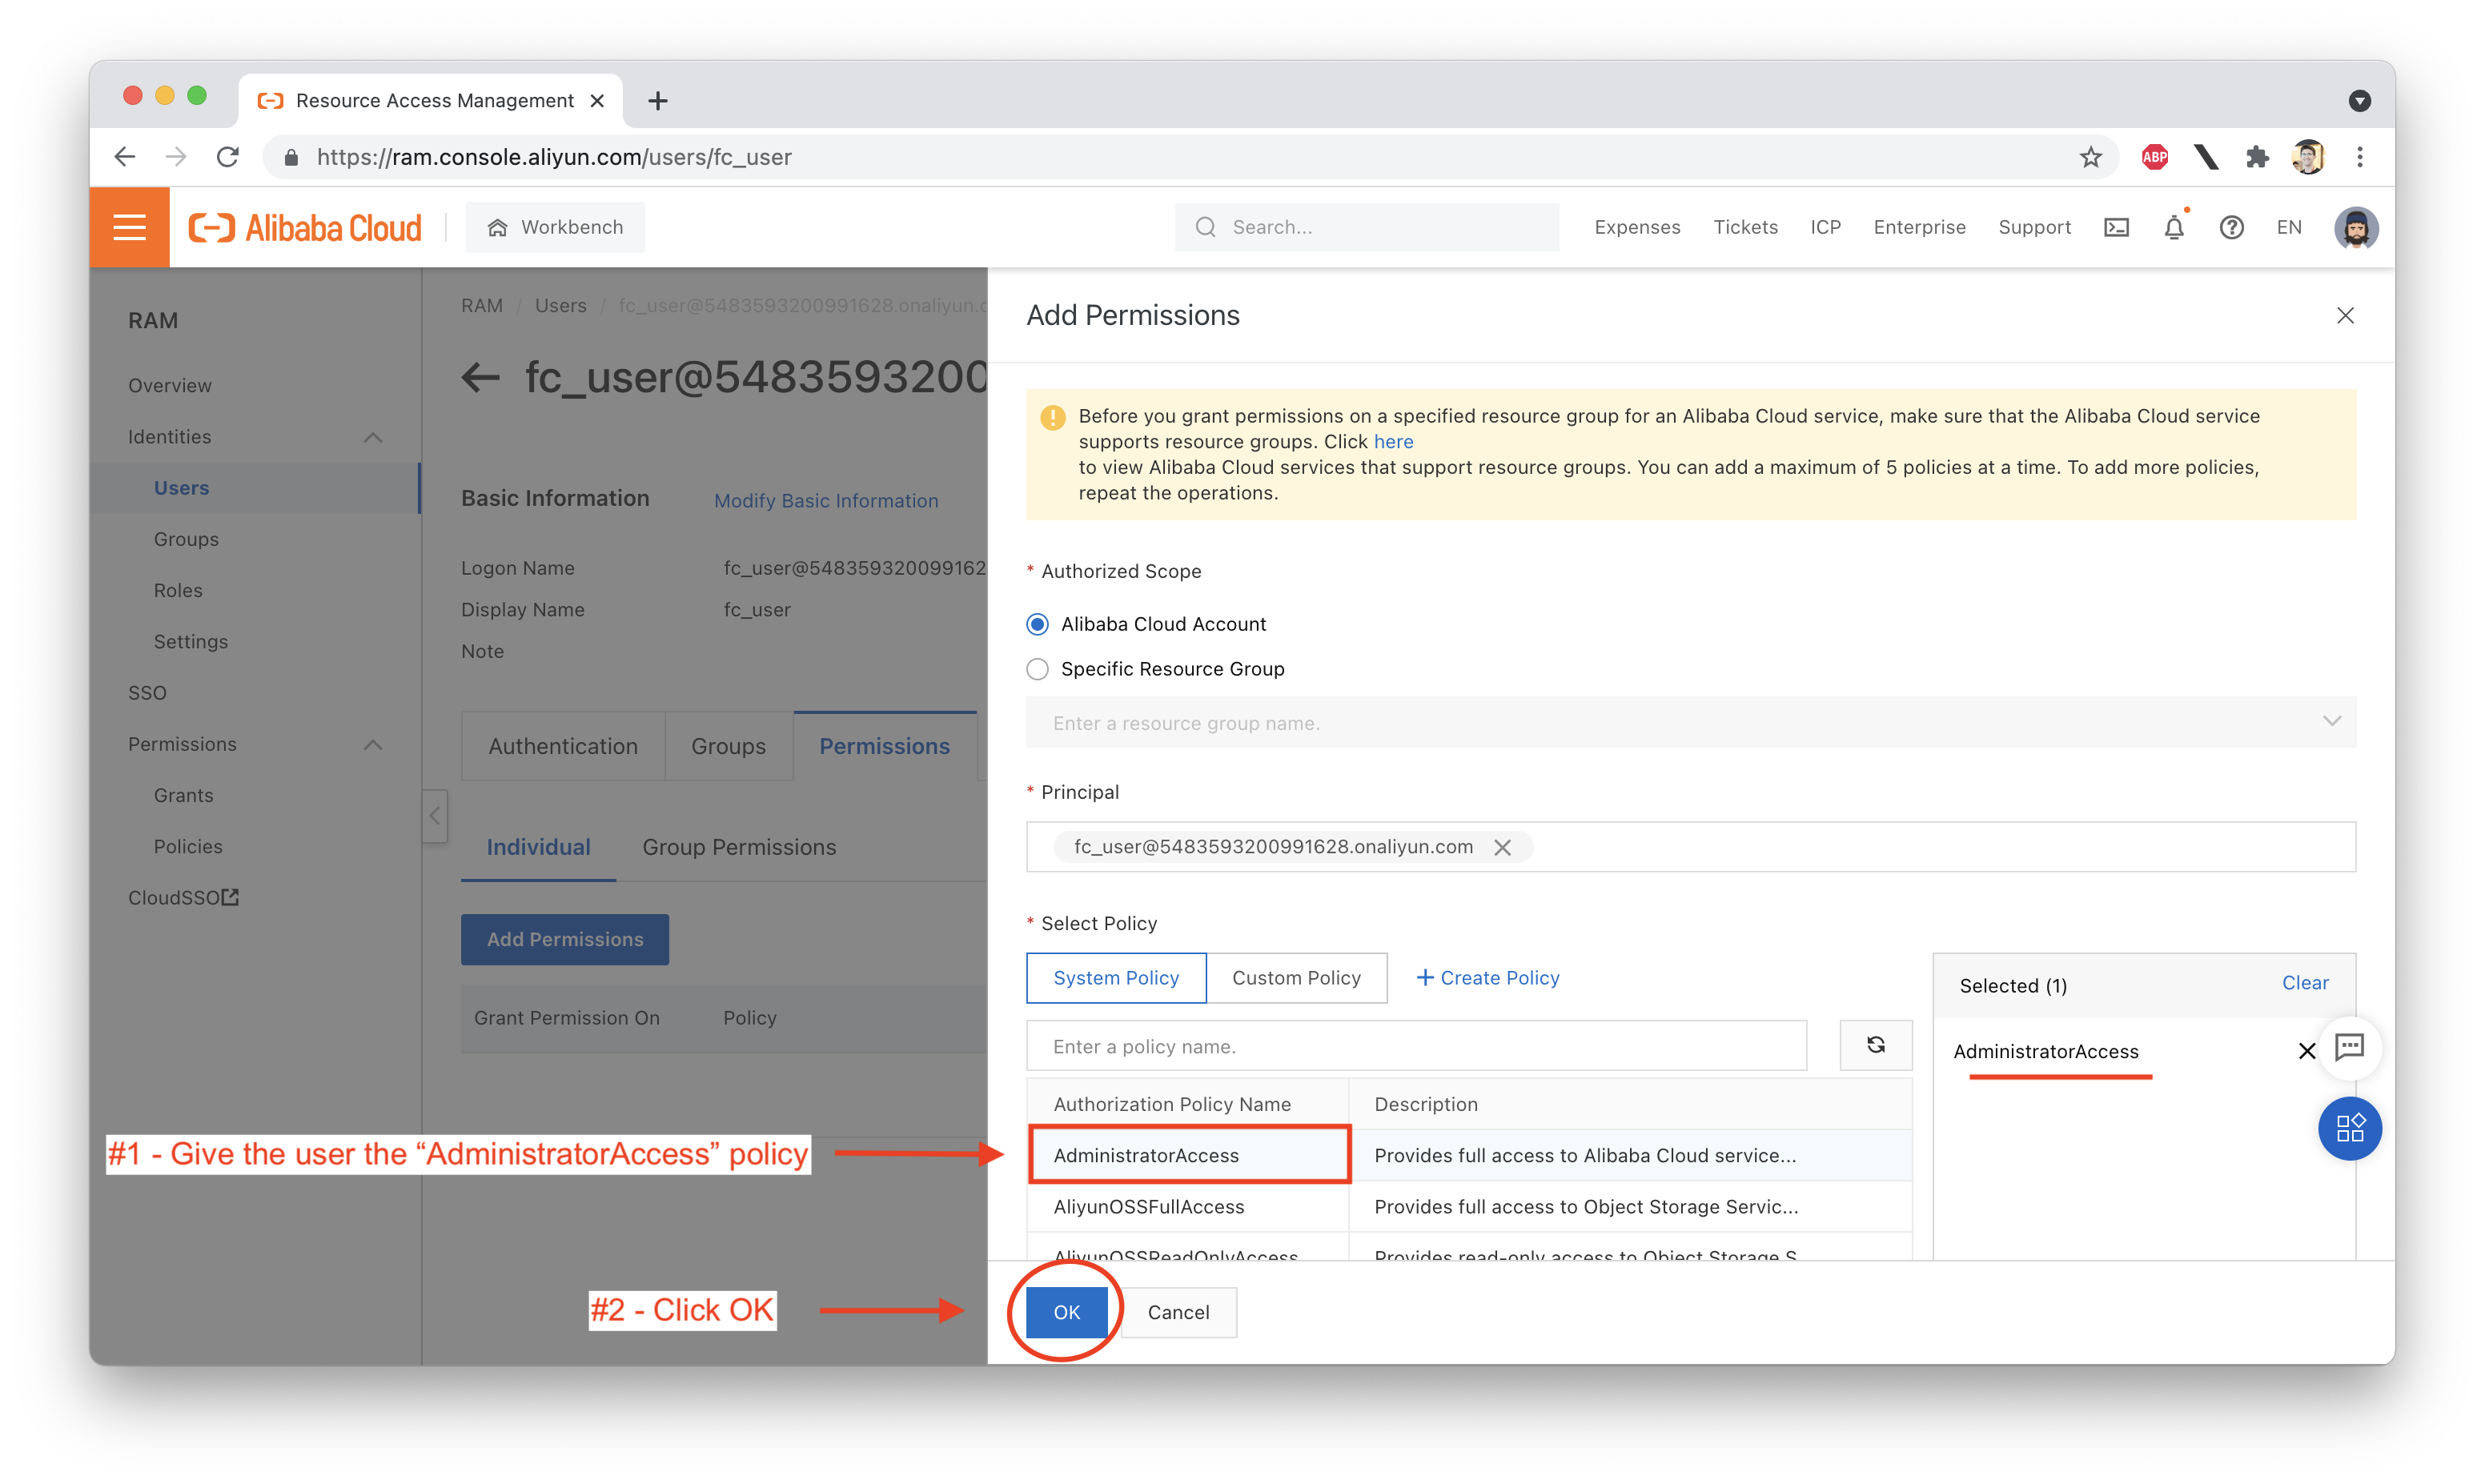
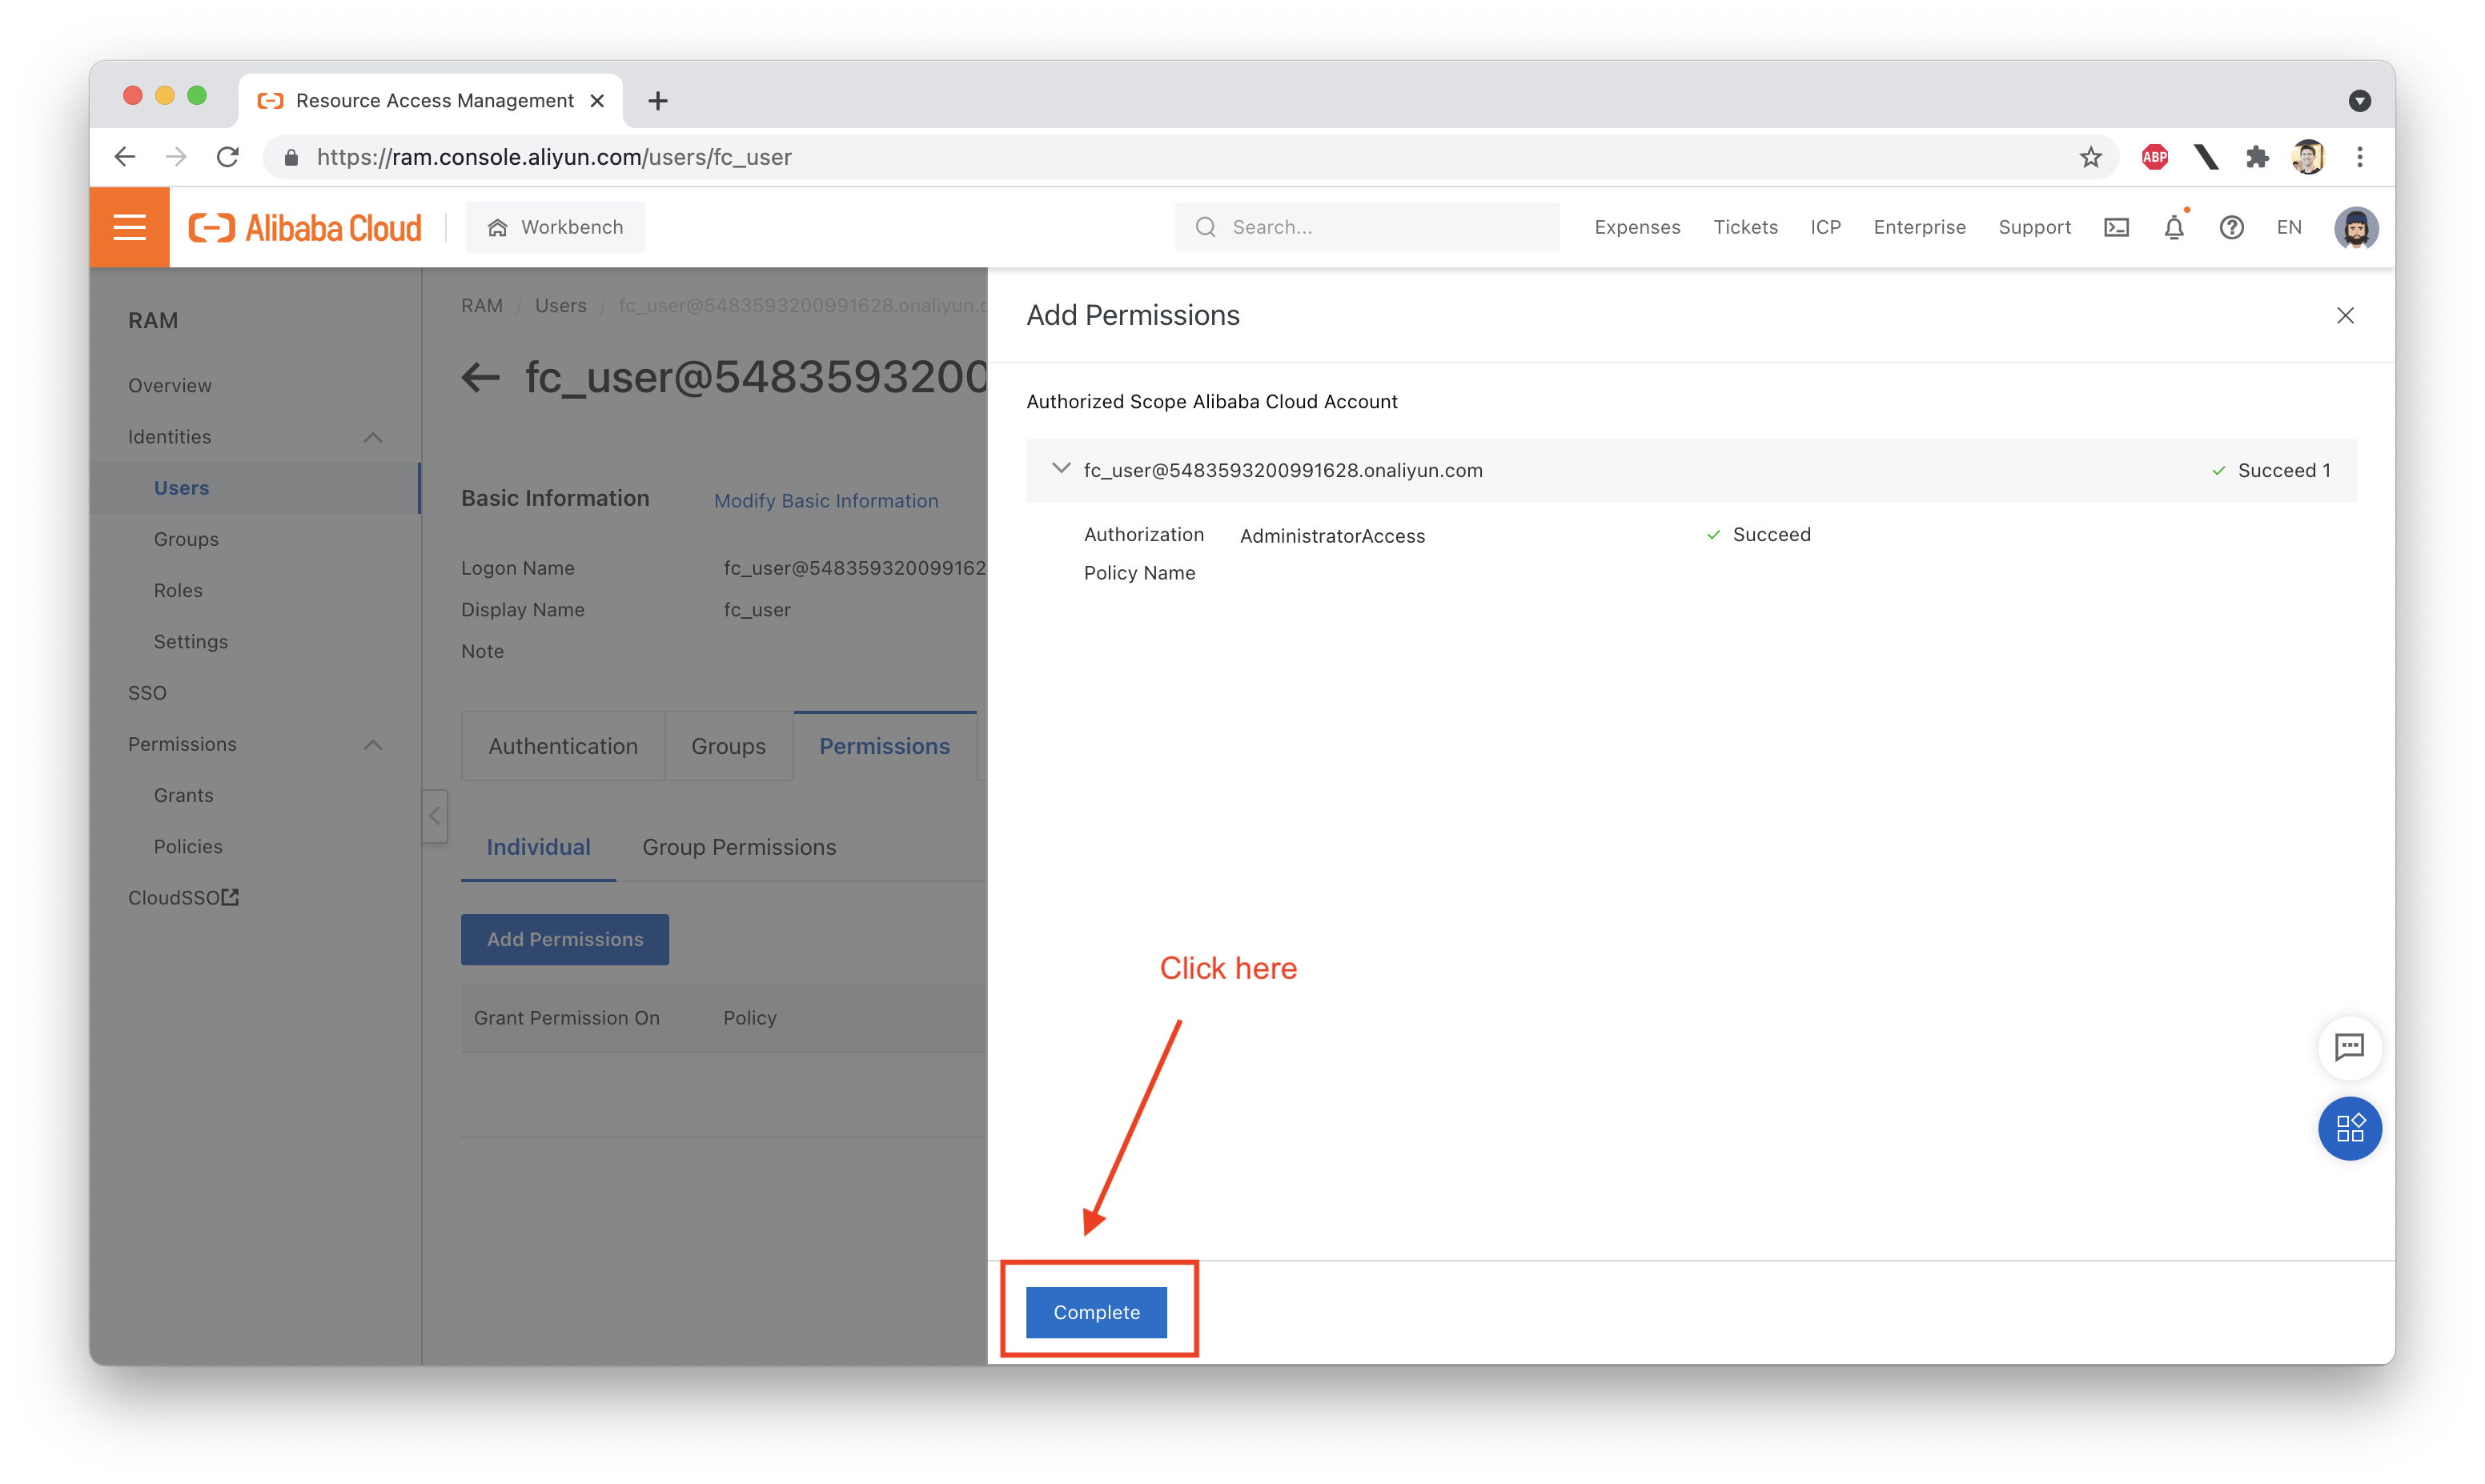
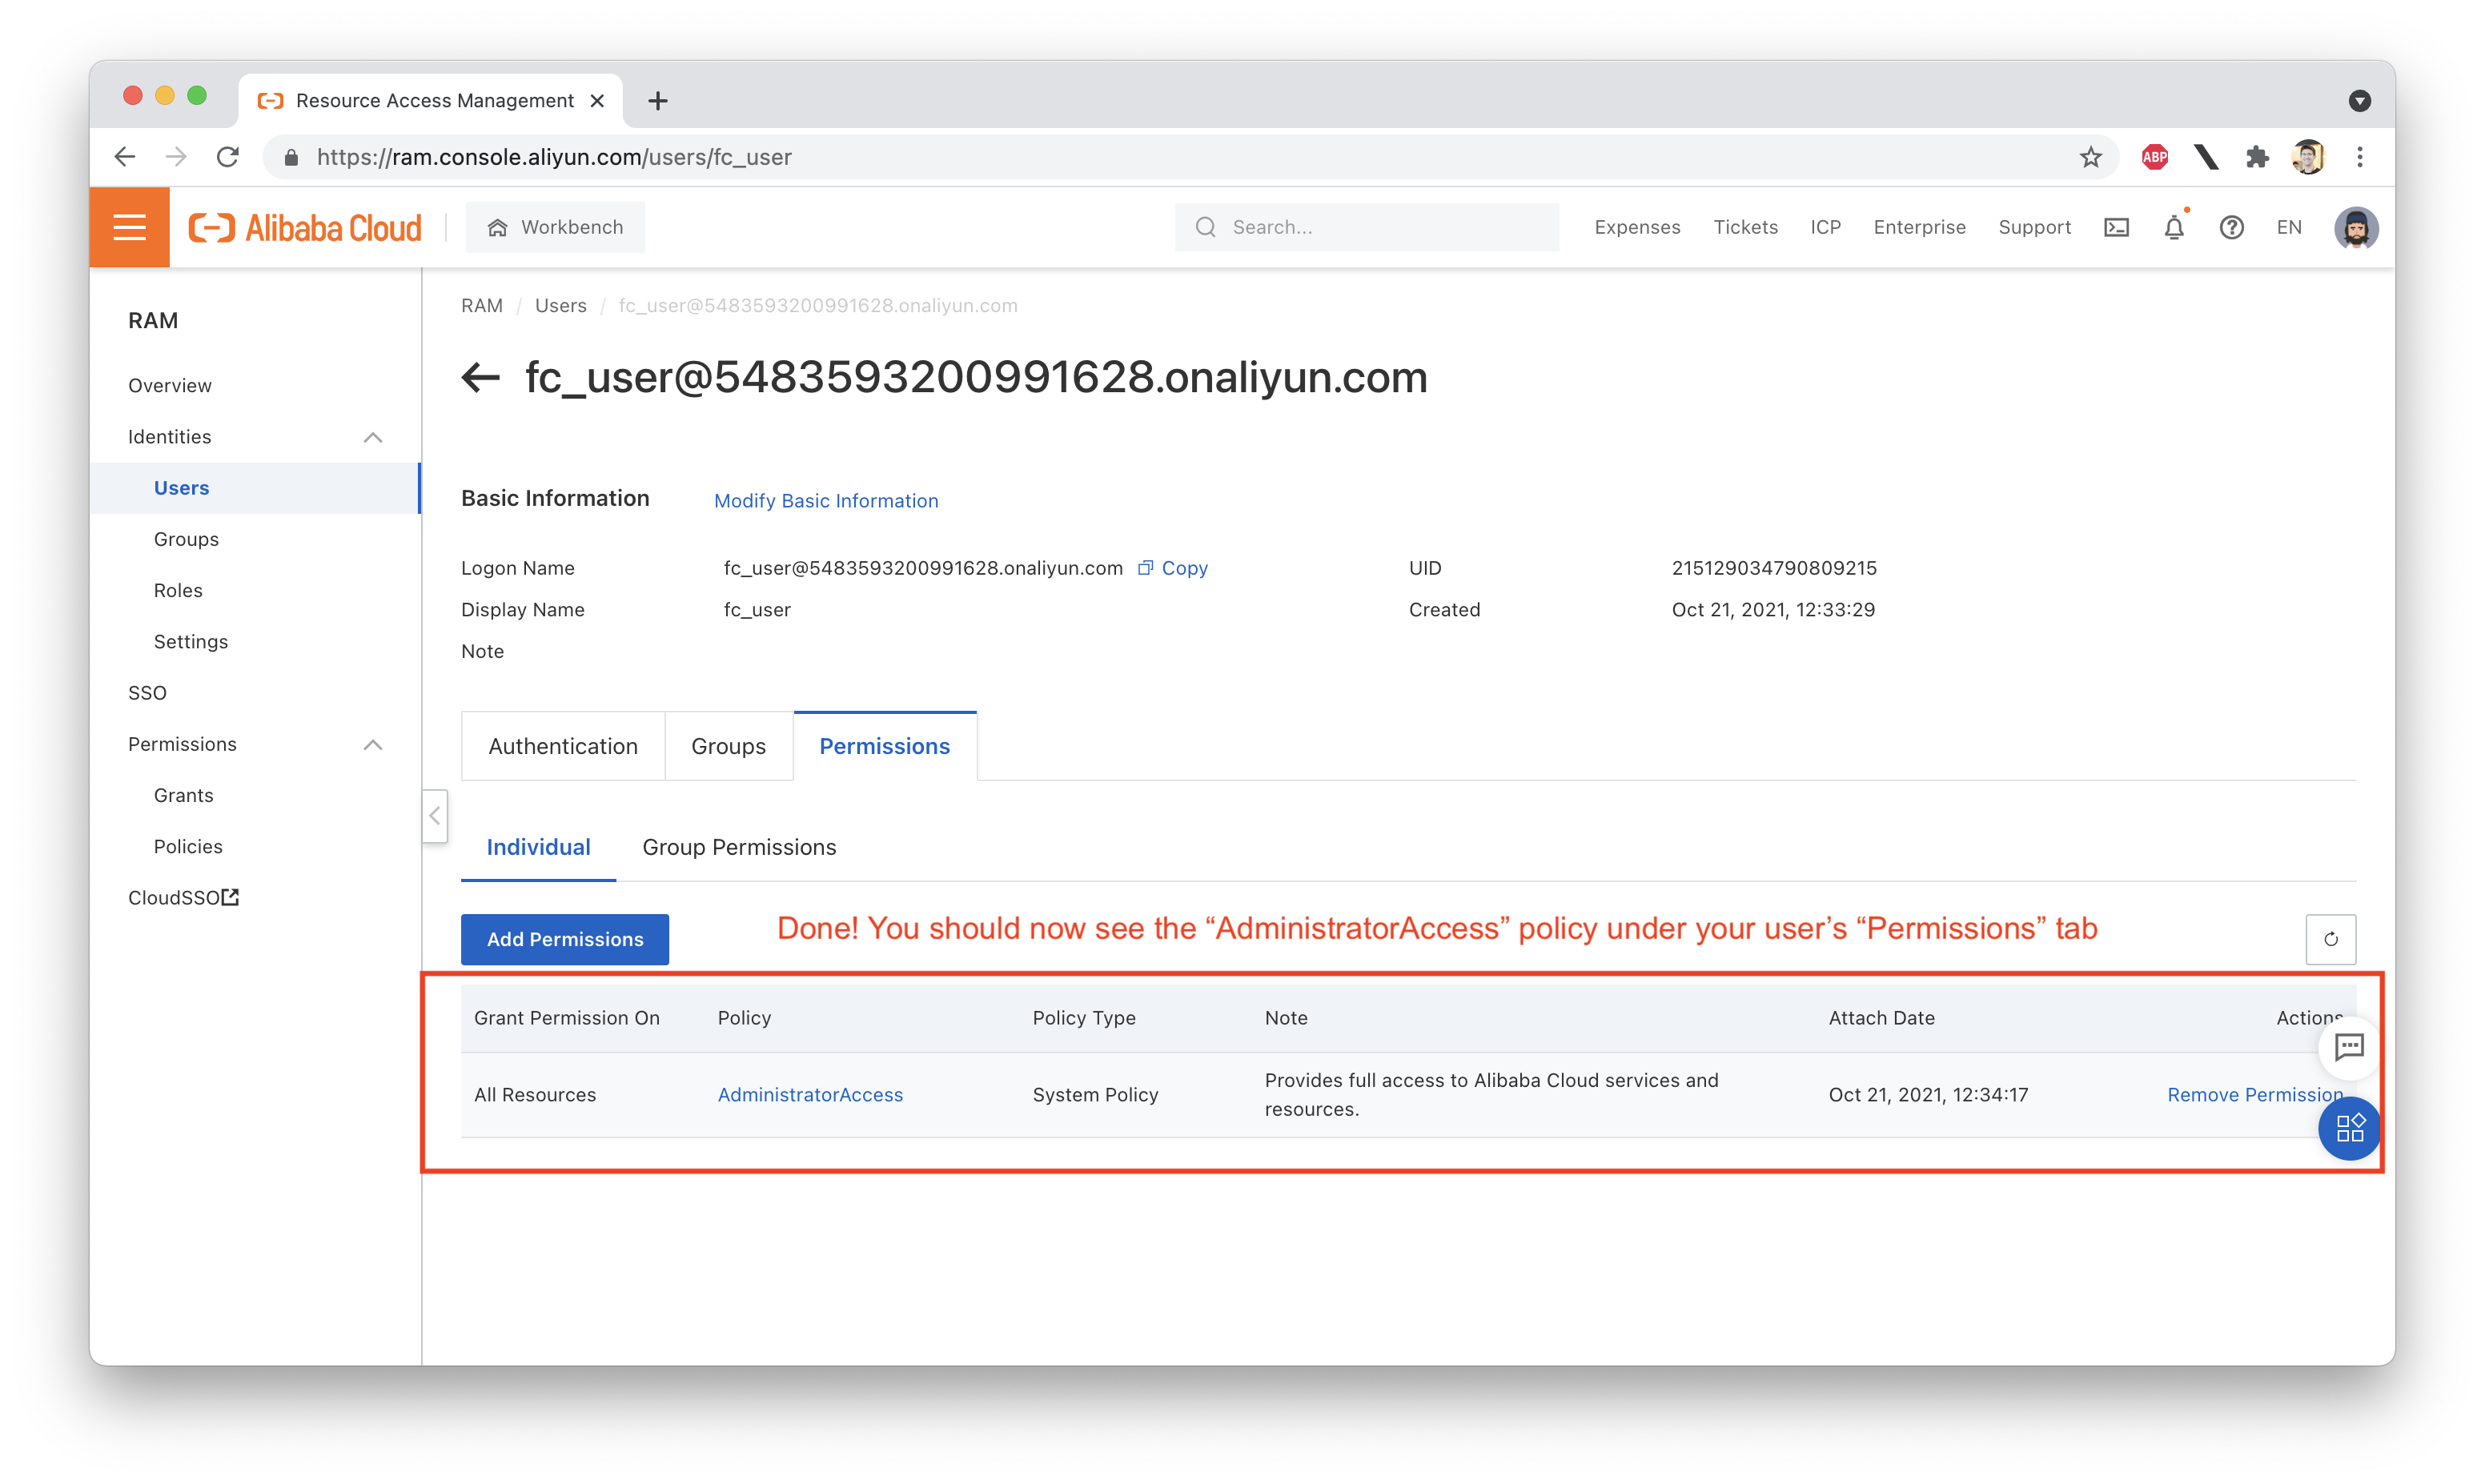
fun config
Ok! We are now ready to run fun config. The process should look like this:
With our environment setup completed, it's time to fetch the Function Compute code that we'll use to trigger our disk snapshots.
I have uploaded example code to the official Alibaba Cloud Academy team GitHub page. Specifically we want the repository called function-compute which holds all our function compute samples.
We can get a copy of that code with:
git clone https://github.com/Alicloud-Academy/function-compute.gitIf you don't have Git installed yet or don't want to install it, click on the "Code" link at the top of the page, and download a ZIP file instead, as shown here:
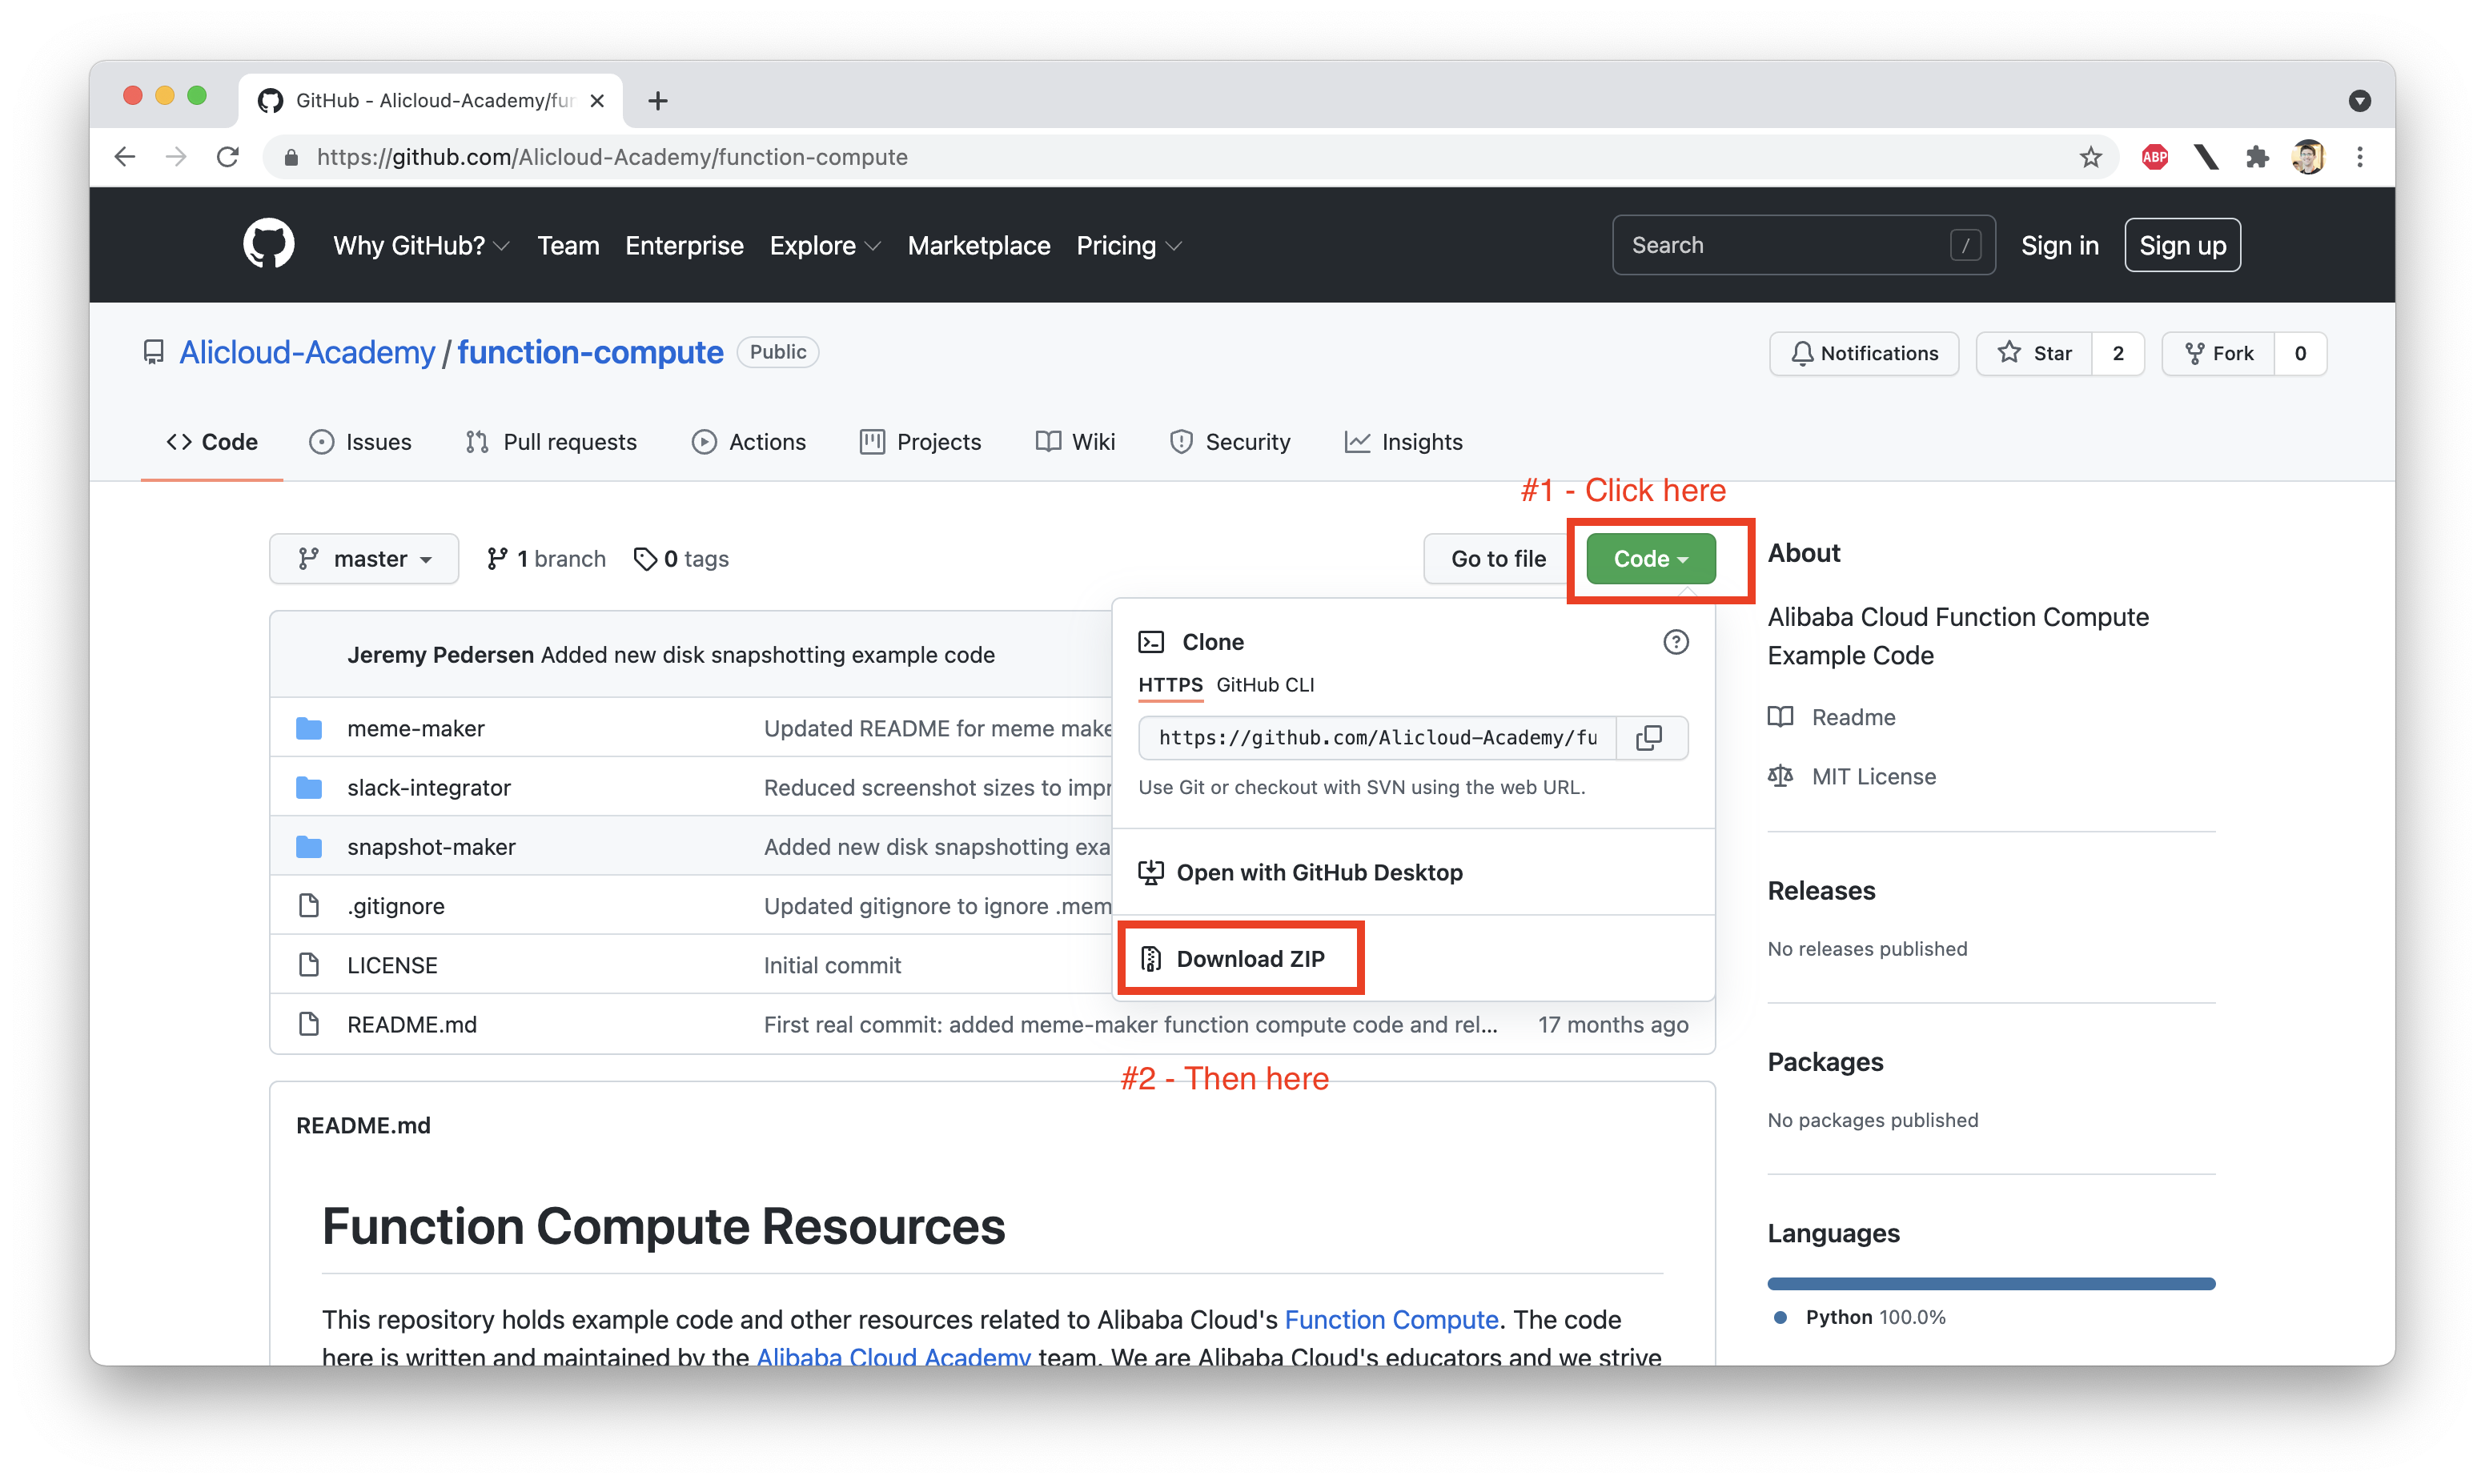
Once you unpack the ZIP file (or git clone completes downloading a copy of the repository), take a look at the contents of the function-compute folder. You should see a folder called snapshot-maker.
Inside snapshot-maker is a README file that explains how to build and run the code, as well as an fc-function directory which actually contains the code for the function itself.
There are two files inside fc-function:
index.pytemplate.ymlThe first file, index.py contains the body of our function. This is the code that will actually run when our function is triggered.
The second file, template.yml, is a YAML file that explains to the fun command how our function should be set up. It looks like this:
ROSTemplateFormatVersion: '2015-09-01'
Transform: 'Aliyun::Serverless-2018-04-03'
Resources:
  snap-srv:
    Type: 'Aliyun::Serverless::Service'
    disk-snap:
      Type: 'Aliyun::Serverless::Function'
      Properties:
        Handler: index.handler
        Runtime: python3
        Timeout: 60
        MemorySize: 128
        CodeUri: .
      Events:
        http-test:
          Type: HTTP
          Properties:
            AuthType: ANONYMOUS
            Methods: ['GET']
When we run fun deploy, the fun command will look at the above template. From this template, it will learn that:
snap-srv
disk-snap
handler inside a file called index.py
Again, we could do all that setup by hand from the web console, but creating template.yml instead is a best practice. And it speeds things up!
index.py
Let's take a look at the index.py file itself. Pay attention to this section at the top:
###########
# GLOBALS #
###########
access_key = "ak_key" # Ex: LTAI5tSArY9Zgi41tbGGovQe
secret = "ak_secret" # Ex: 4KJY6vQ3RGc4rn8KDOGSWT4xm9iz9N
region = "region" # Ex: ap-southeast-1
We need to change this section to use the correct region (ap-southeast-1), and paste in our AccessKey and AccessKey Secret.
Go ahead and change the values in "" marks now. Done? Good. Don't forget to save the file!
There's a lot going on inside index.py but we can ignore most of it. A lot of the code is devoted to error handling and parsing URL parameters, since our function uses an HTTP trigger and will pass in values as URL parameters.
The really critical section of code is this:
#
# CreateSnapshot call
#
if allIsWell:

   client = AcsClient(access_key, secret, region)

   request = CreateSnapshotRequest()
   request.set_accept_format('json')
   request.set_DiskId(diskID)
   response = client.do_action_with_exception(request)
   retVal = str(response, encoding='utf-8')
These lines are what actually trigger the creation of a new disk snapshot, by making the CreateSnapshot API call.
If you wanted to make your own FC function to perform some other operation like tagging ECS instances, creating OSS buckets, or the like, this is the part of the code you would want to change.
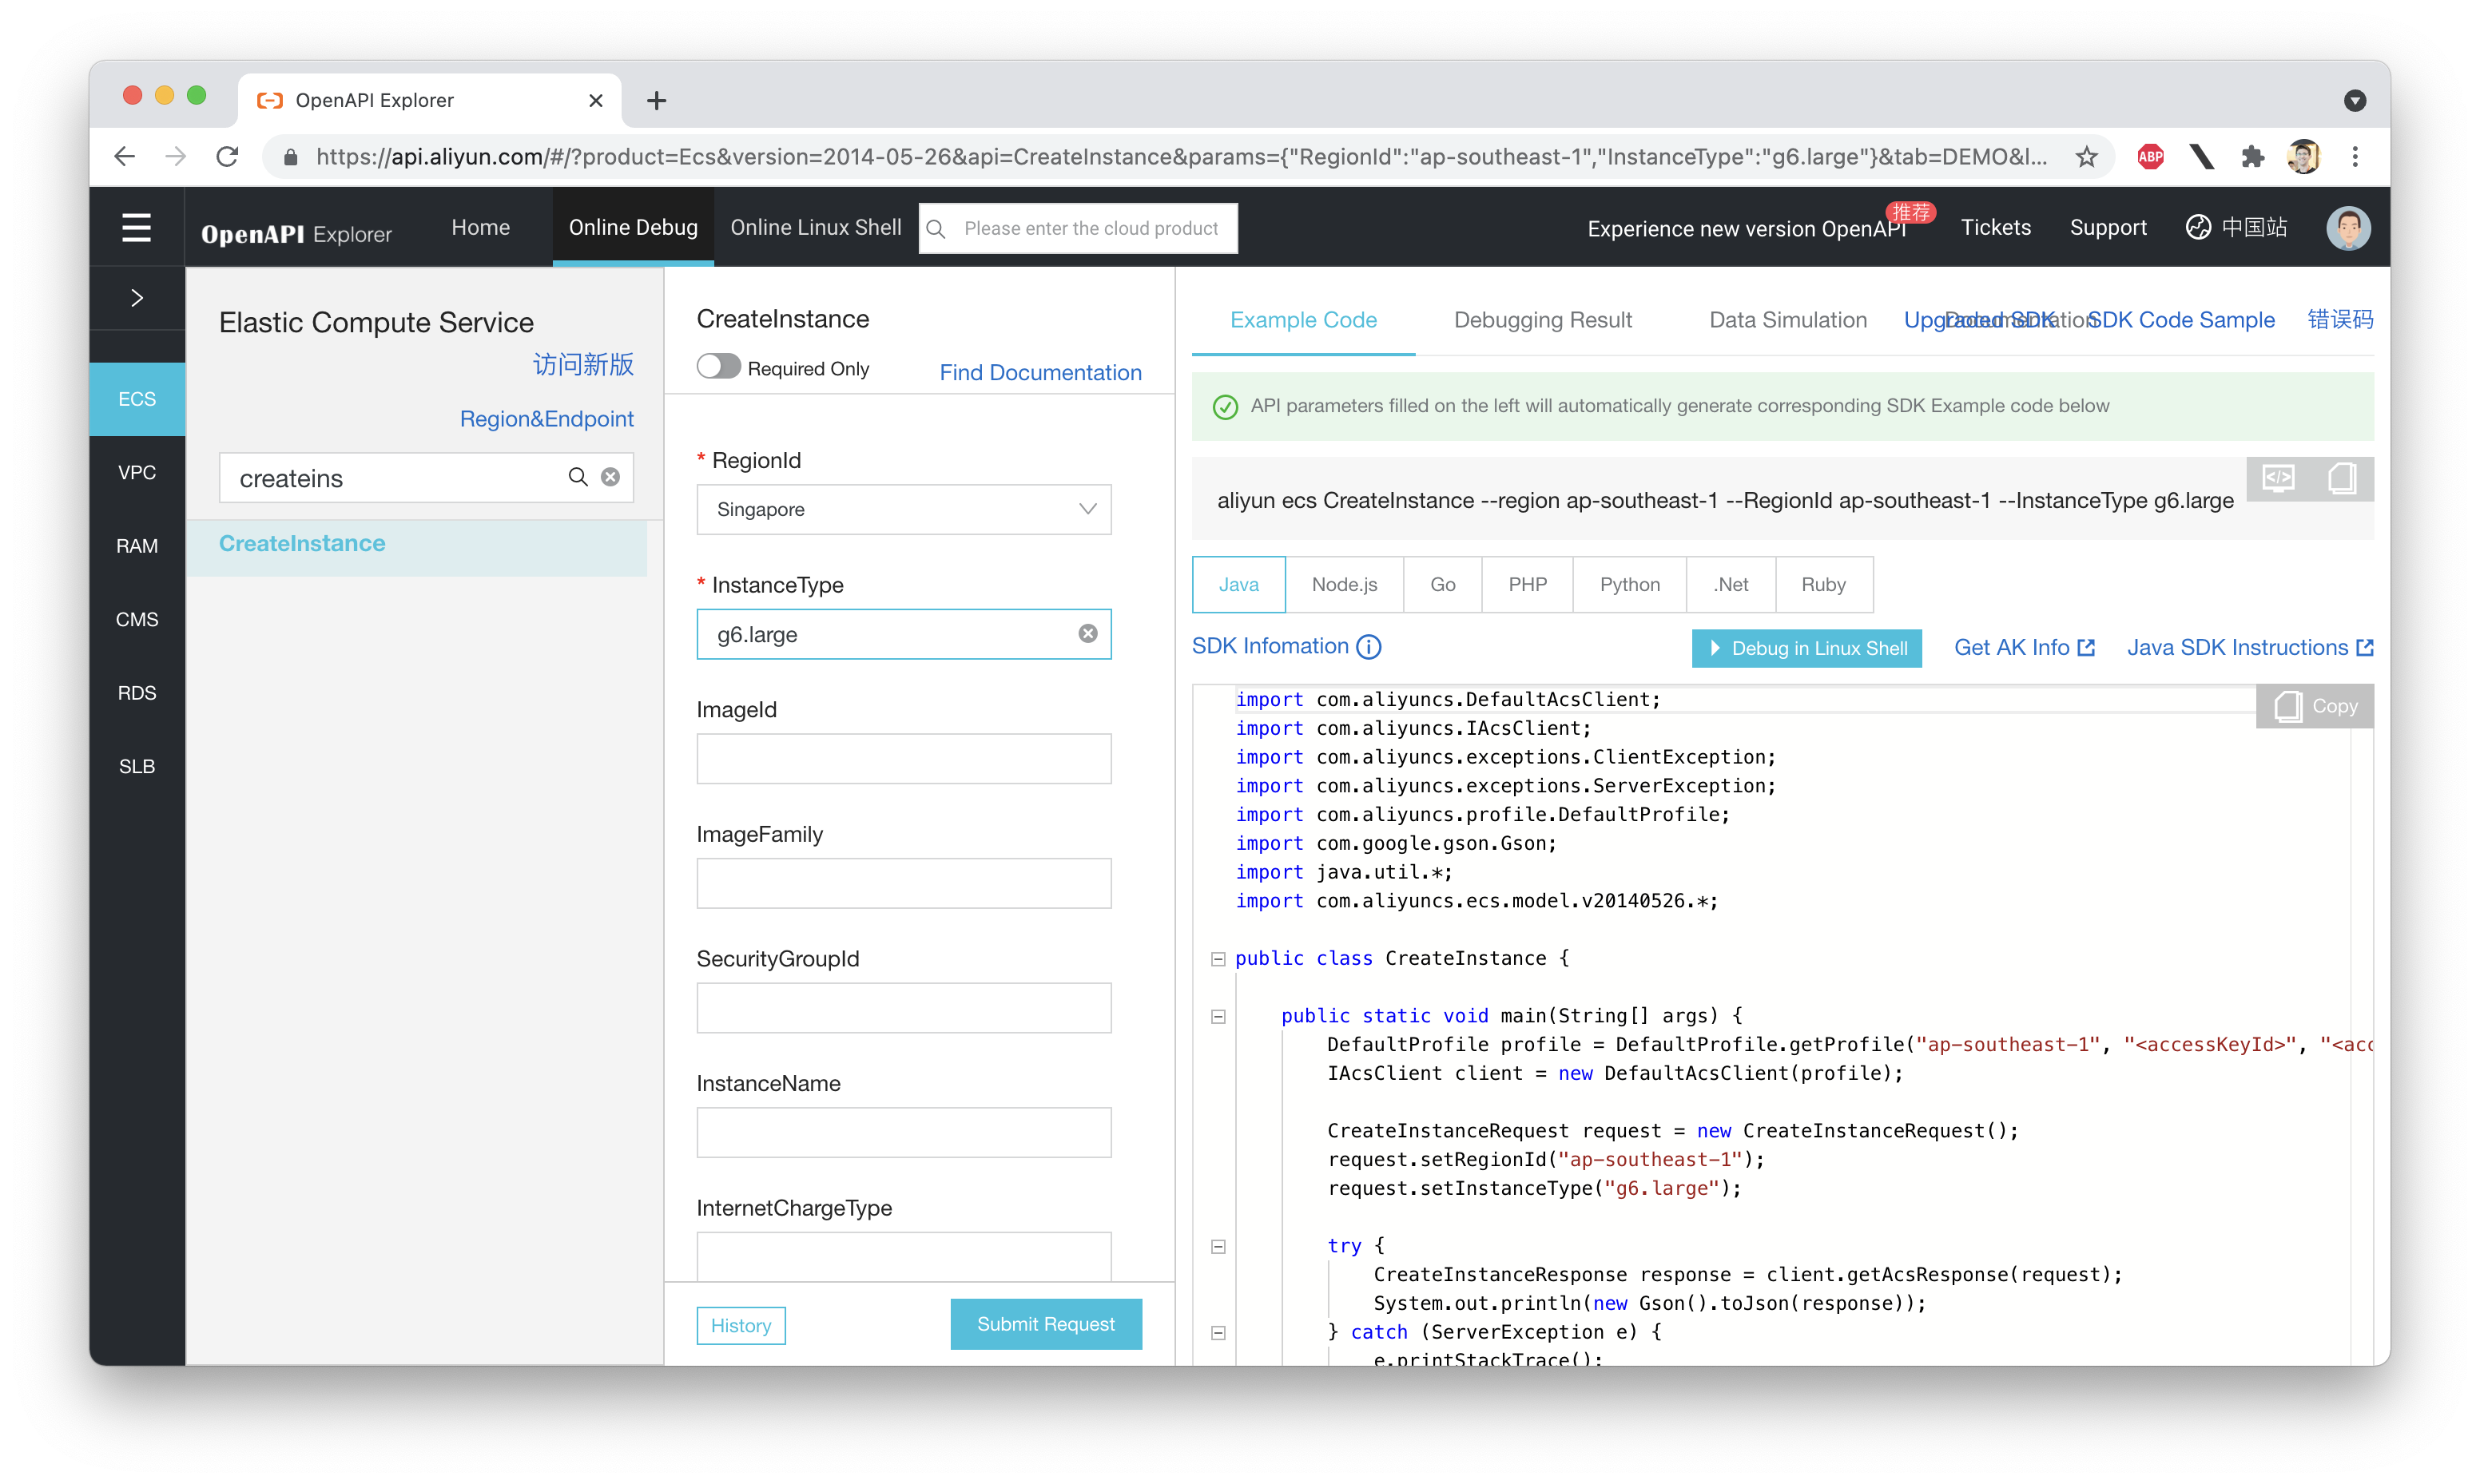
How would you know what to write? We have API call example code for multiple languages, available in Alibaba Cloud's OpenAPI Explorer. Here's an example of the CreateInstance operation, in Java:
fun deploy
From within the fc-function folder, run fun deploy. You should see some output like this:
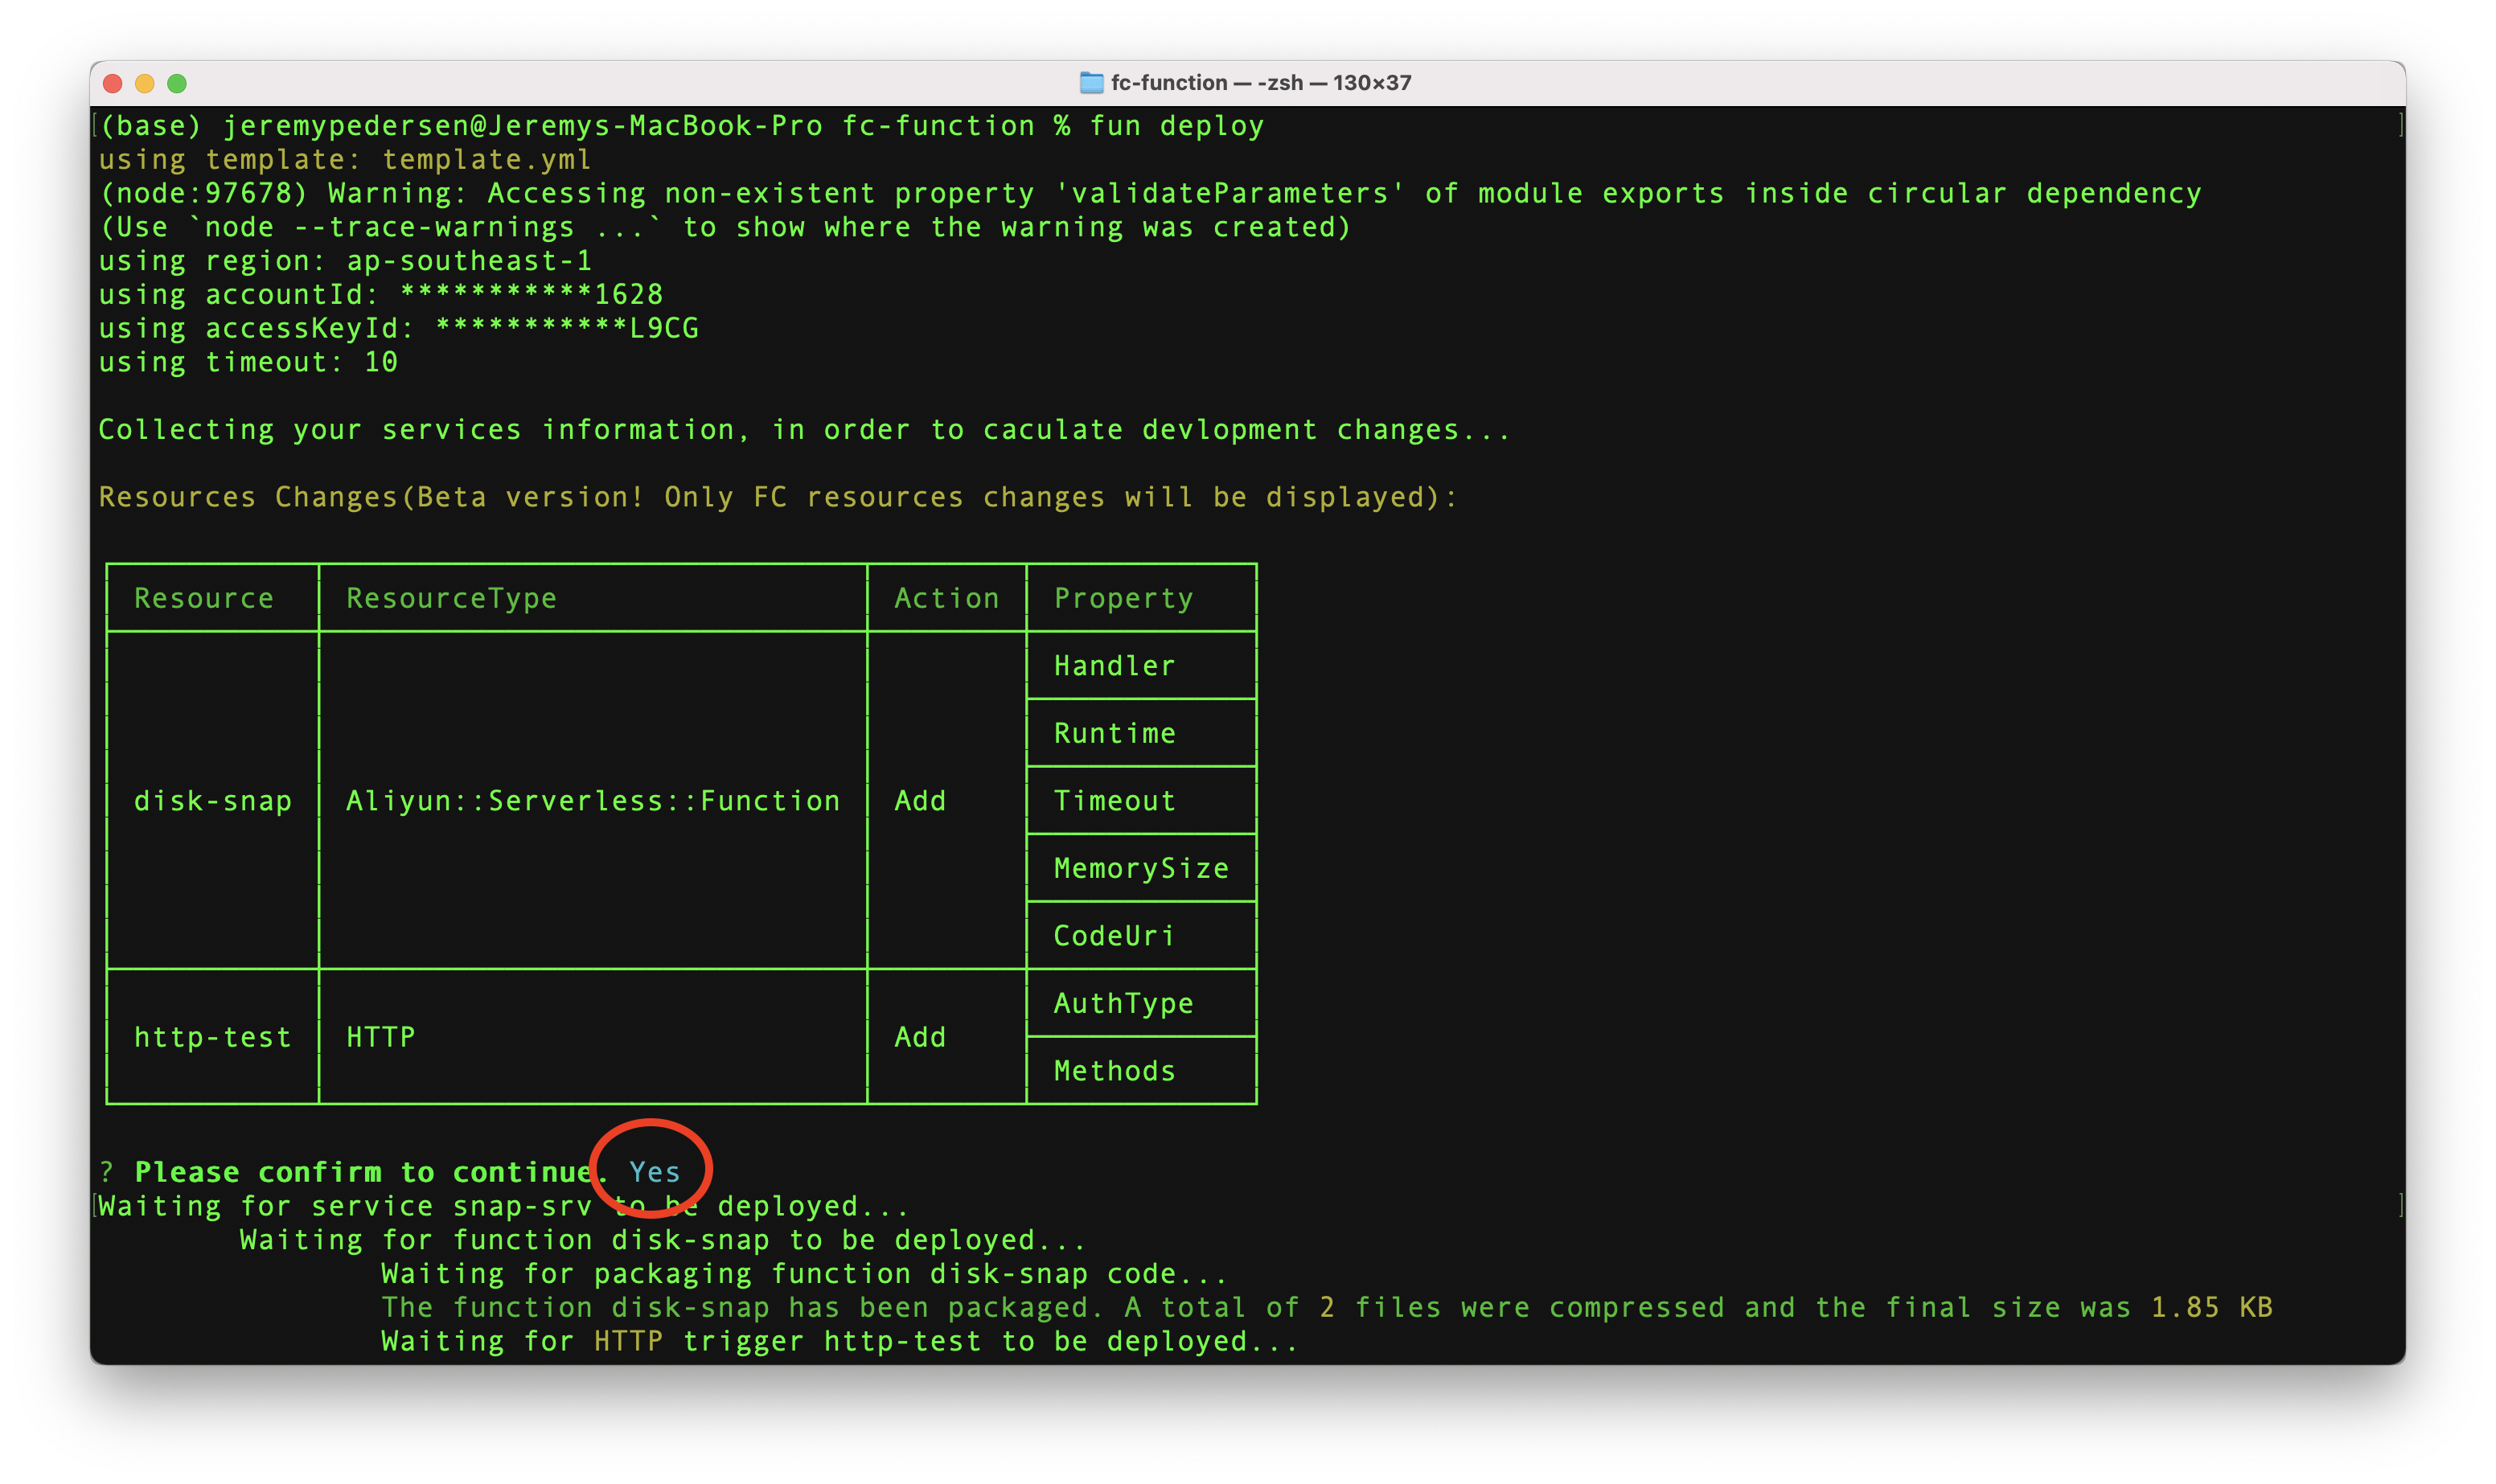
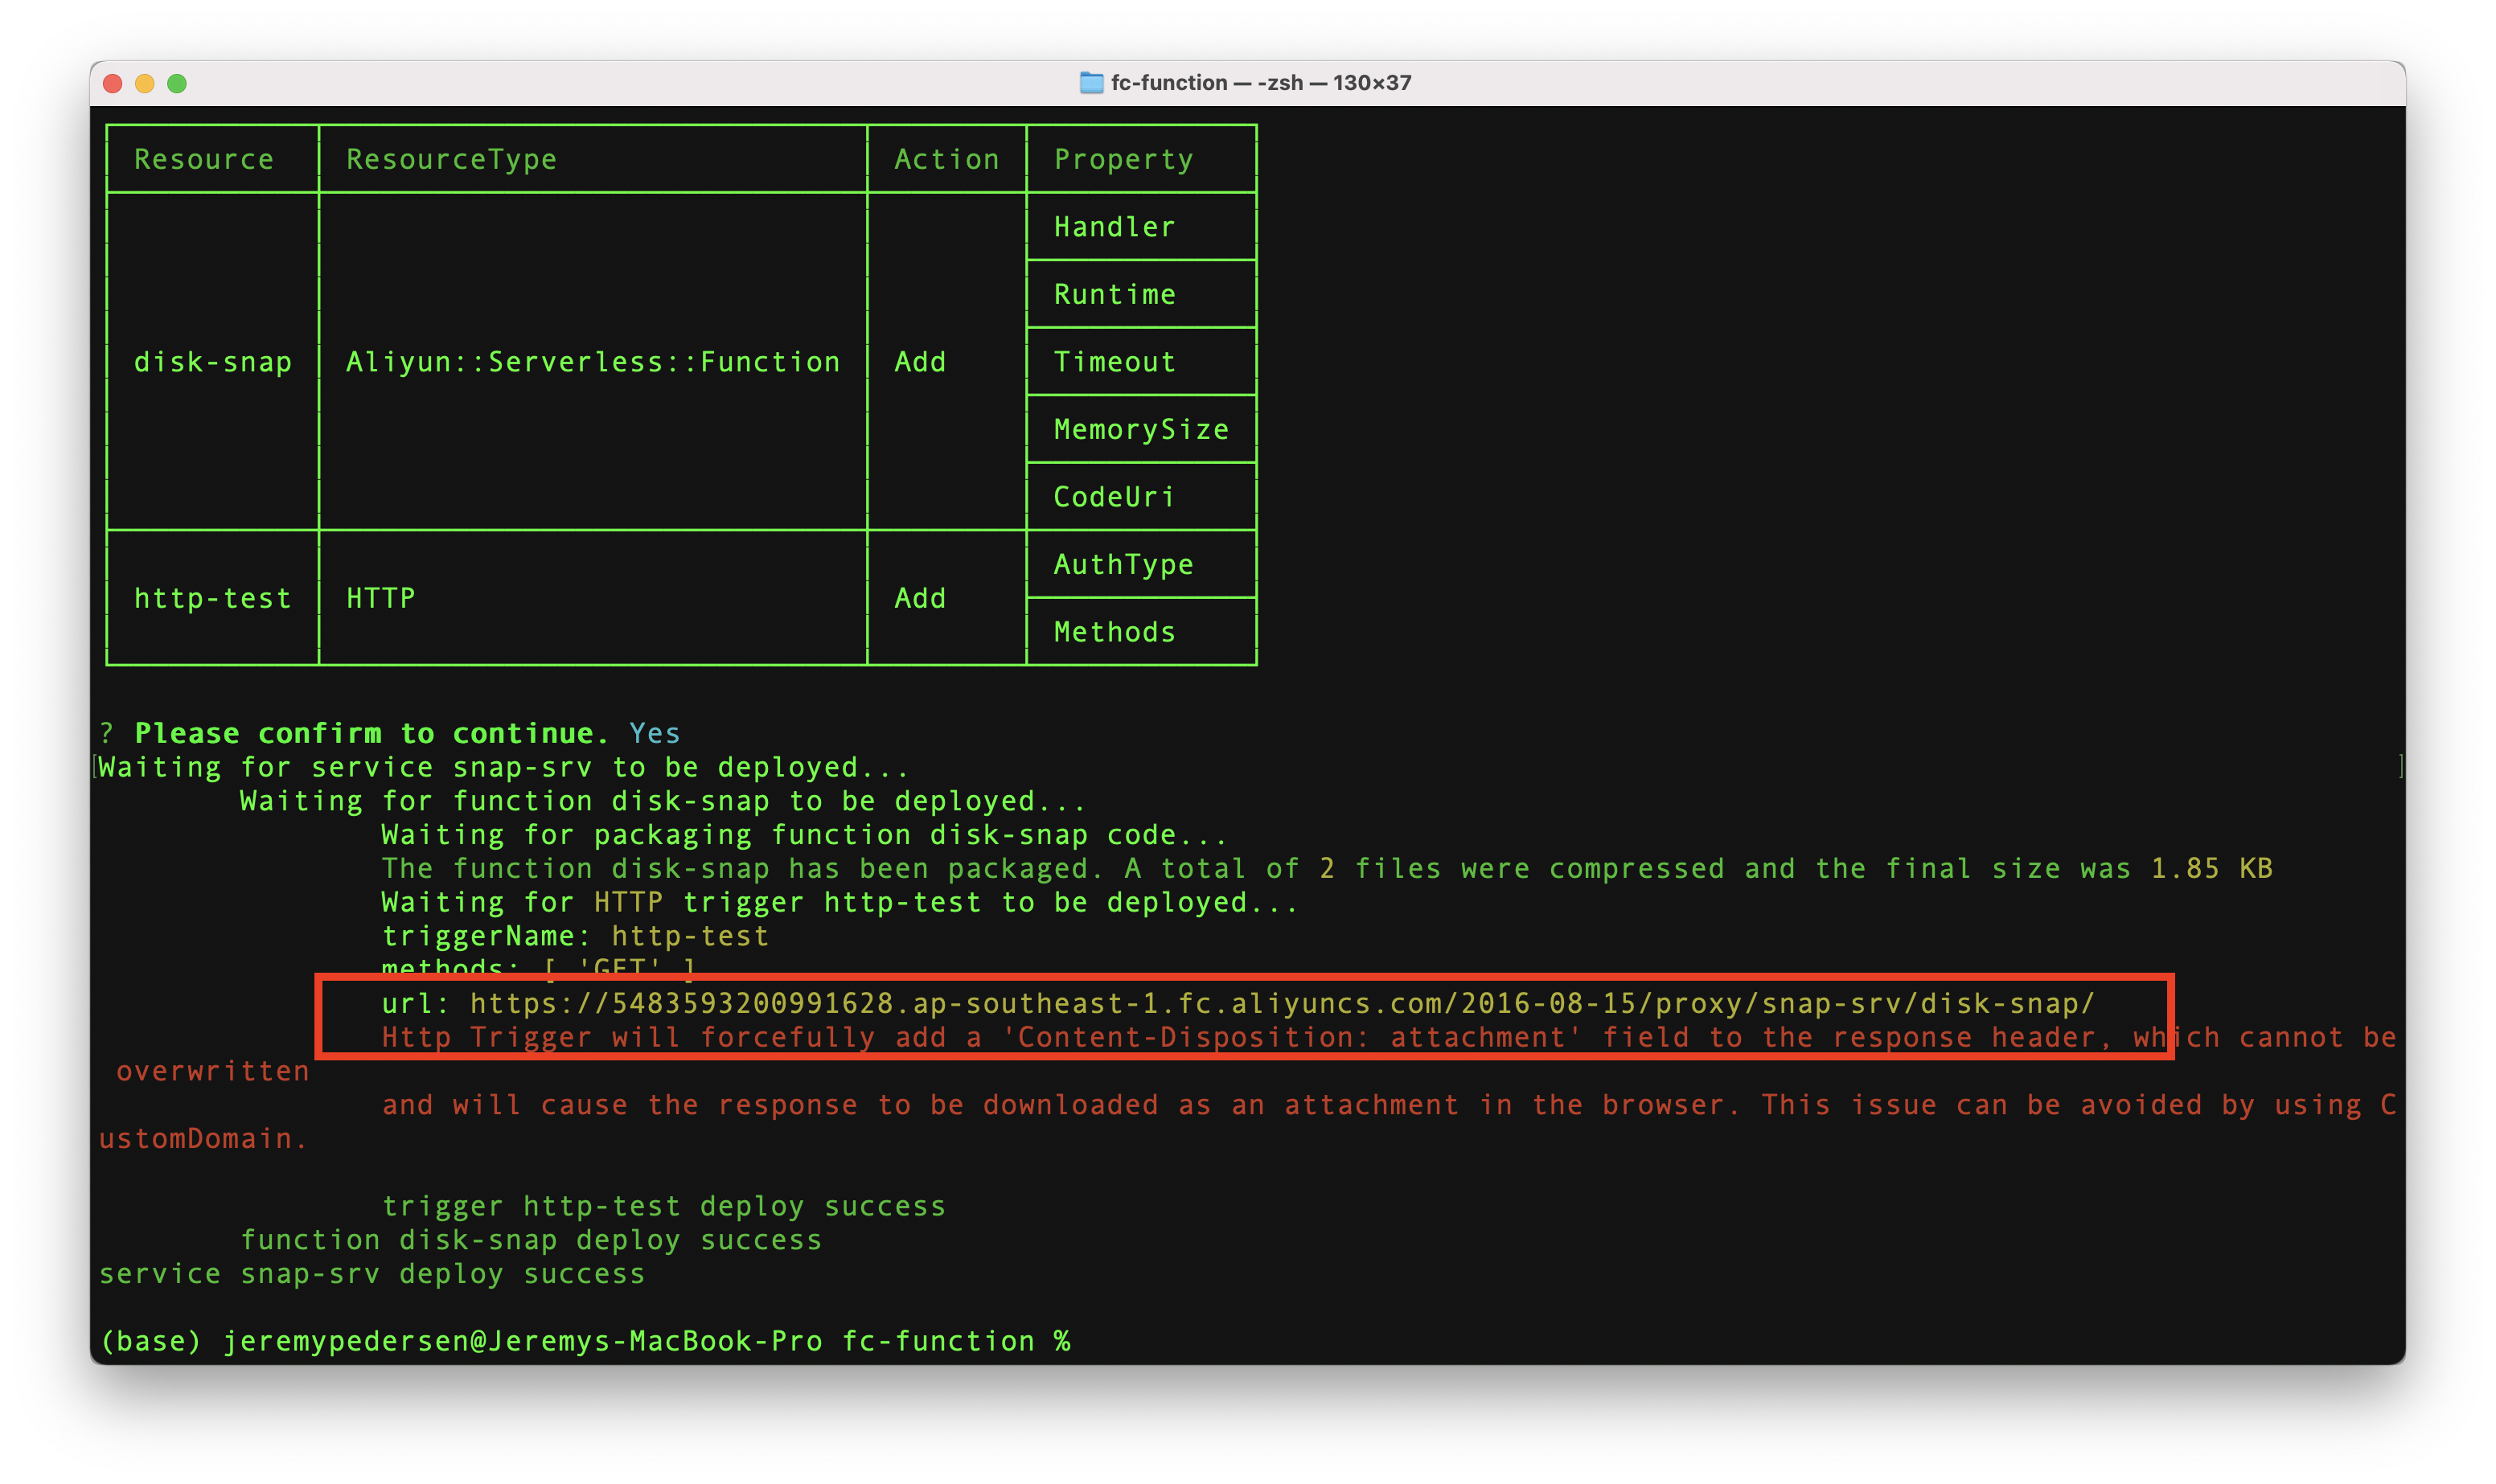
That's it! Our function is now deployed. That URL at the bottom is our HTTP endpoint for the function. When we want to call (or "trigger") the function, we'll type that URL into a web browser or run a command like curl. We'll try that out in the next section.
Now all we need to do is call the function!
We just need to take the URL from the fun deploy step and append a ?diskID= parameter at the end.
This of course means we need to have at least one ECS instance running. Go ahead and set up an ECS instance in the Singapore region (since our FC function is deployed there), and locate its disk ID under "Disks", as shown here:
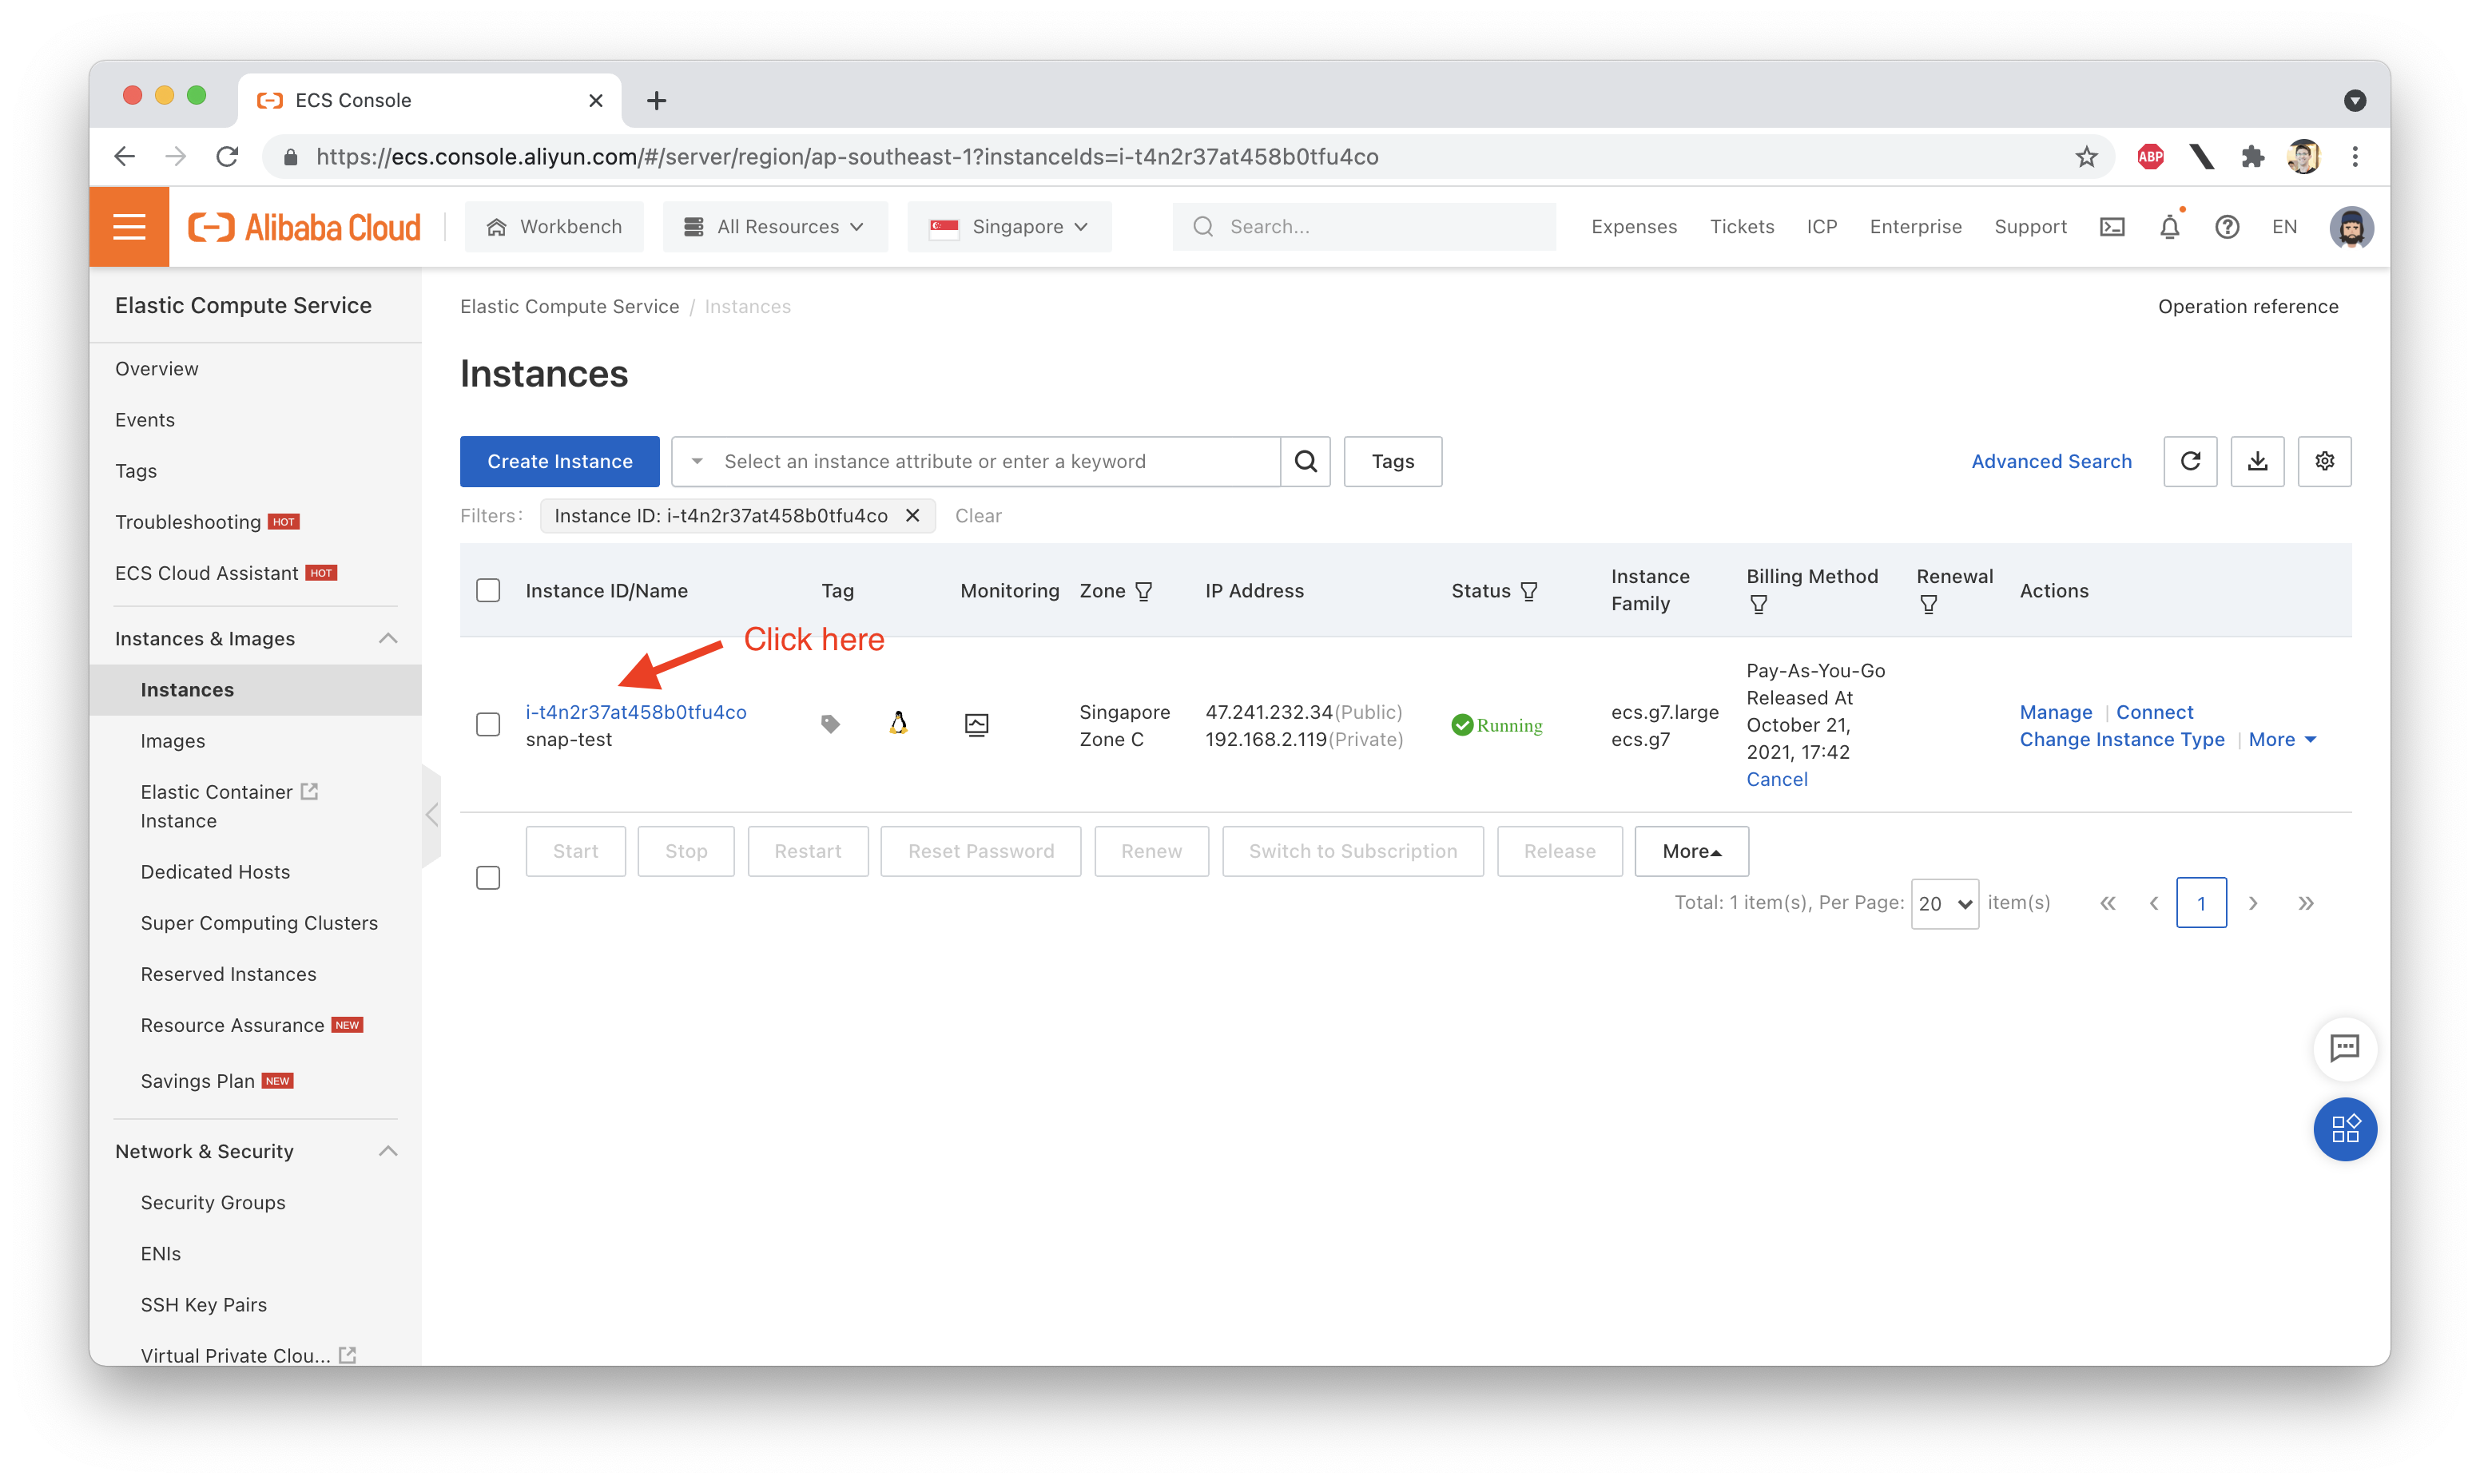
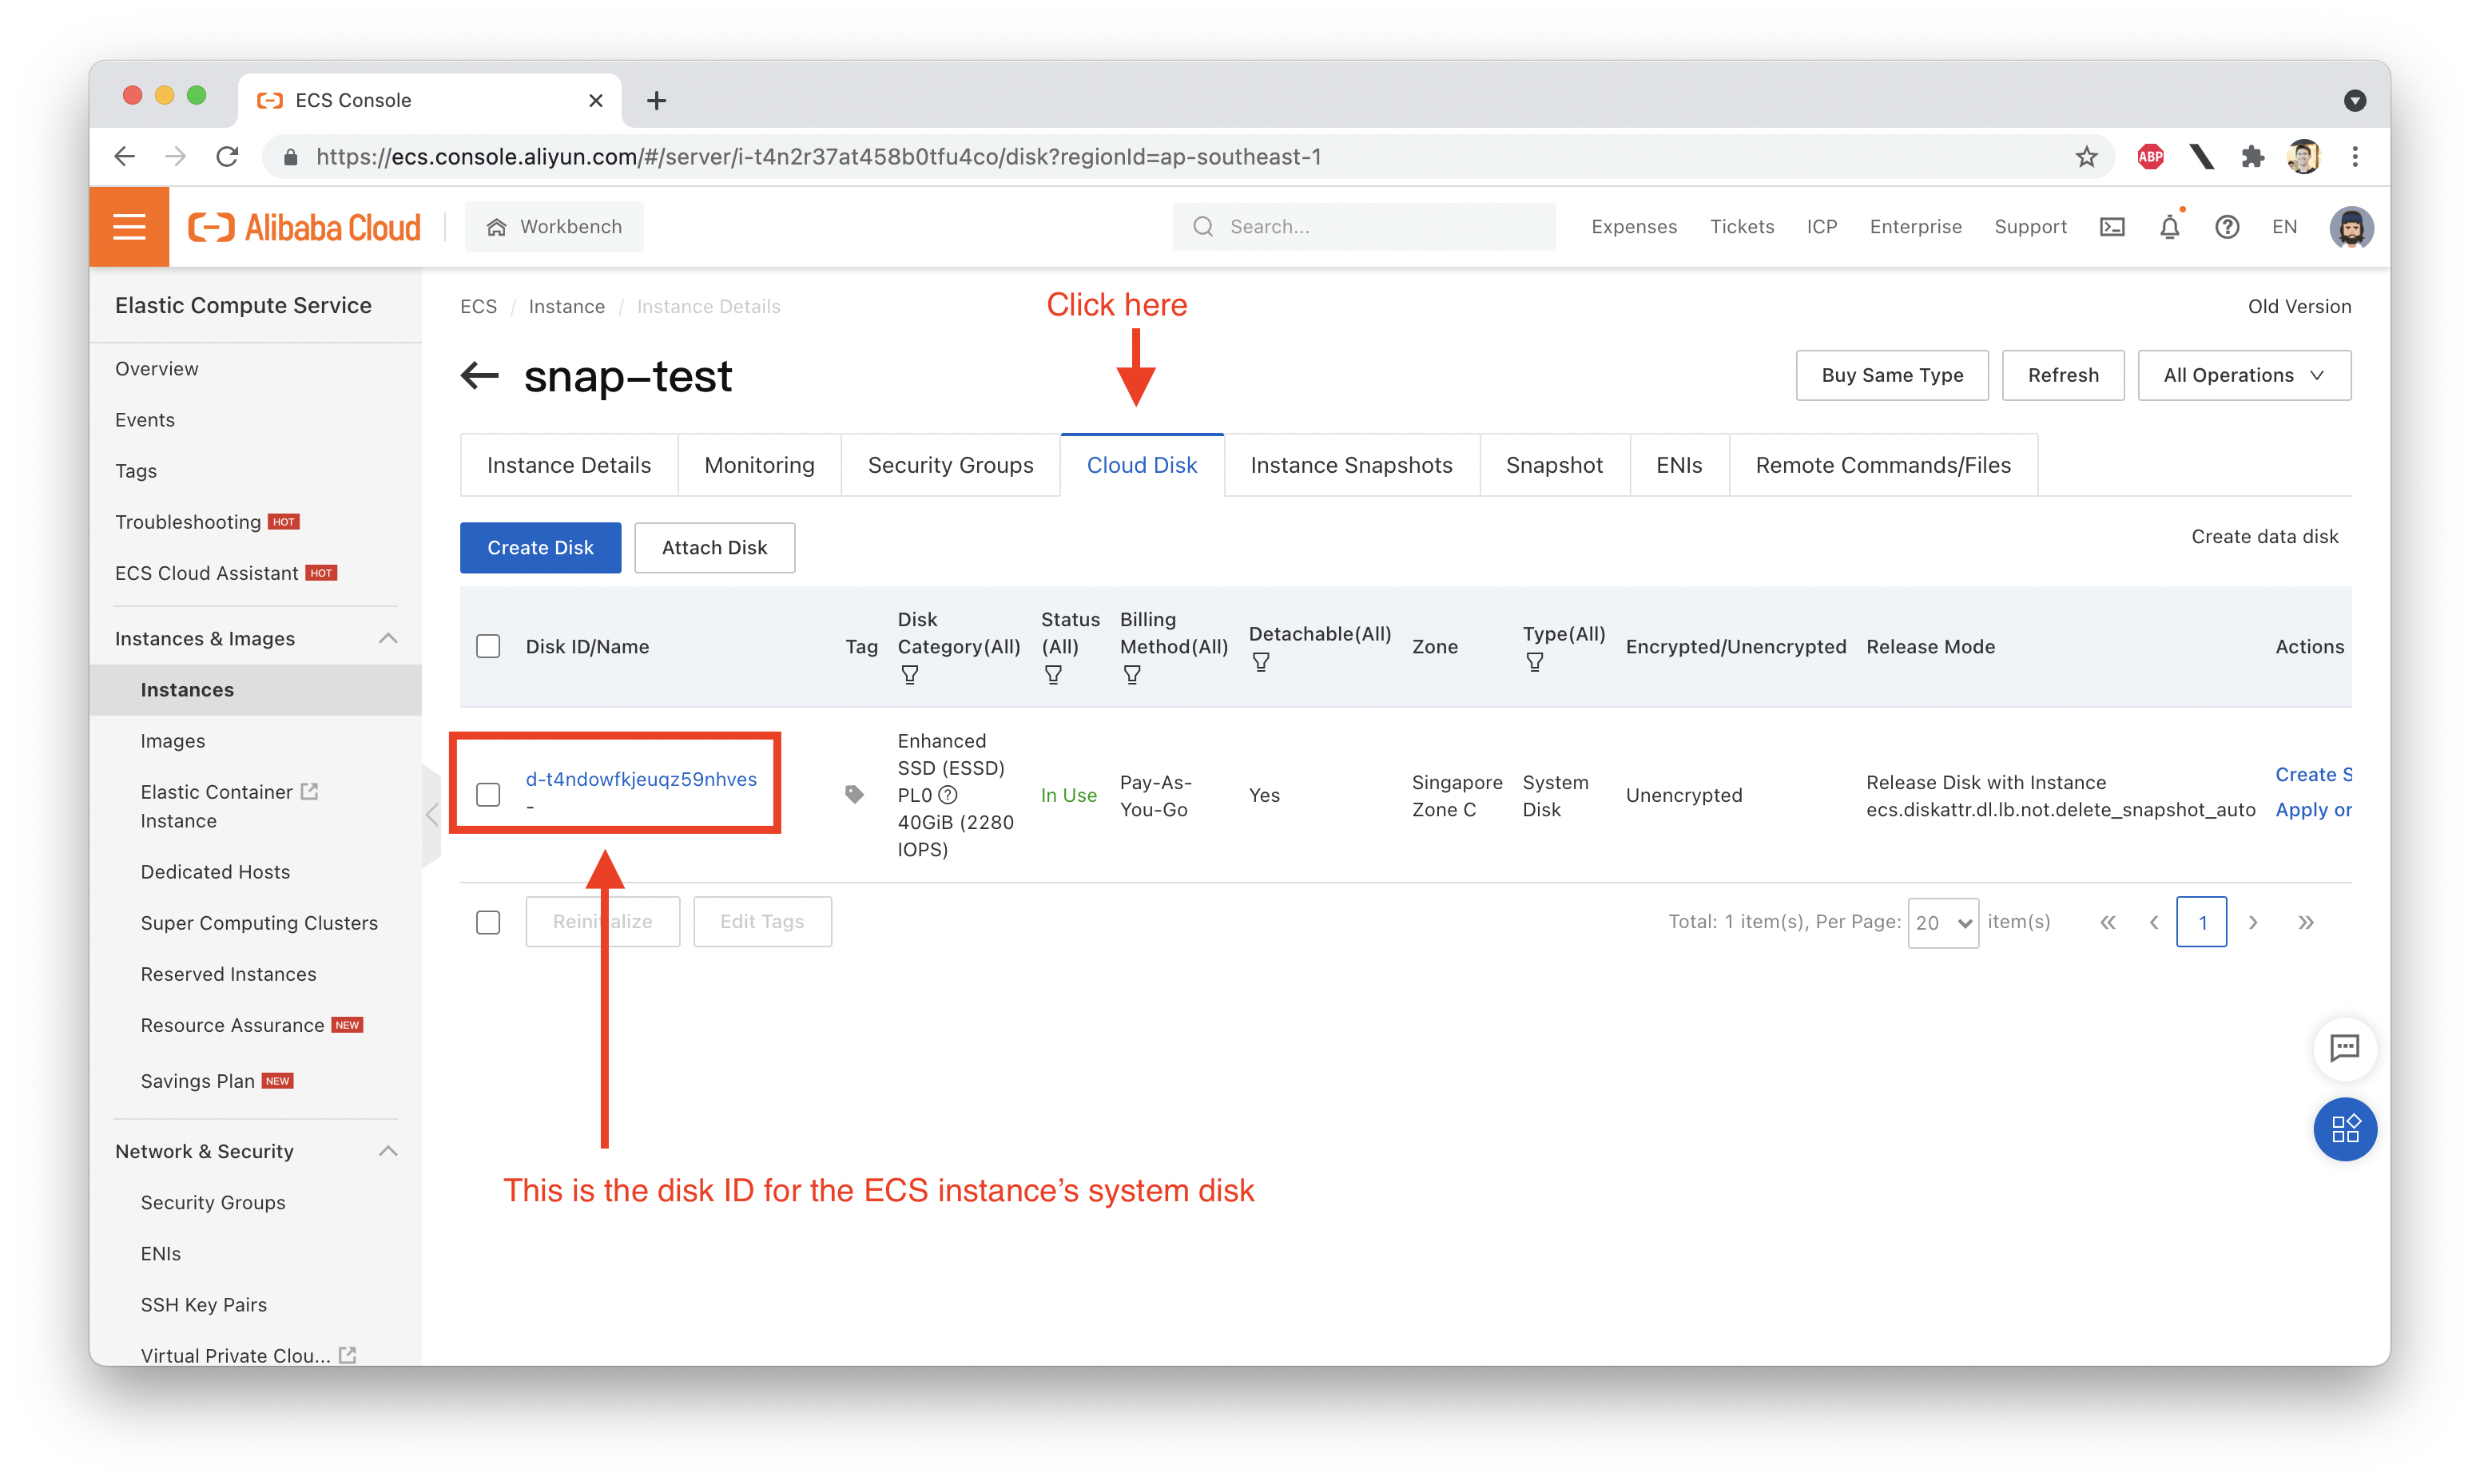
Now we can execute a curl command like this one, to trigger our FC function:
curl "https://5483593200991628.ap-southeast-1.fc.aliyuncs.com/2016-08-15/proxy/snap-srv/disk-snap/?diskID=d-t4ndowfkjeuqz59nhves"Note: your URL and diskID will be different.
If your curl command throws a a long error message that starts with...
{
    "errorMessage": "HTTP Status: 404 Error:InvalidAccessKeyId.NotFound Specified access key is not found. RequestID: ED76FACB-CD25-3F2C-9AC2-DD1E4D60376D",
    "errorType": "ServerException",
...it means you probably forgot to update index.py with your AccessKey, AccessKey Secret, and preferred Region (ap-southeast-1 for Singapore). Just update index.py and re-run fun deploy.
If everything works, running the curl command should produce an output like this:
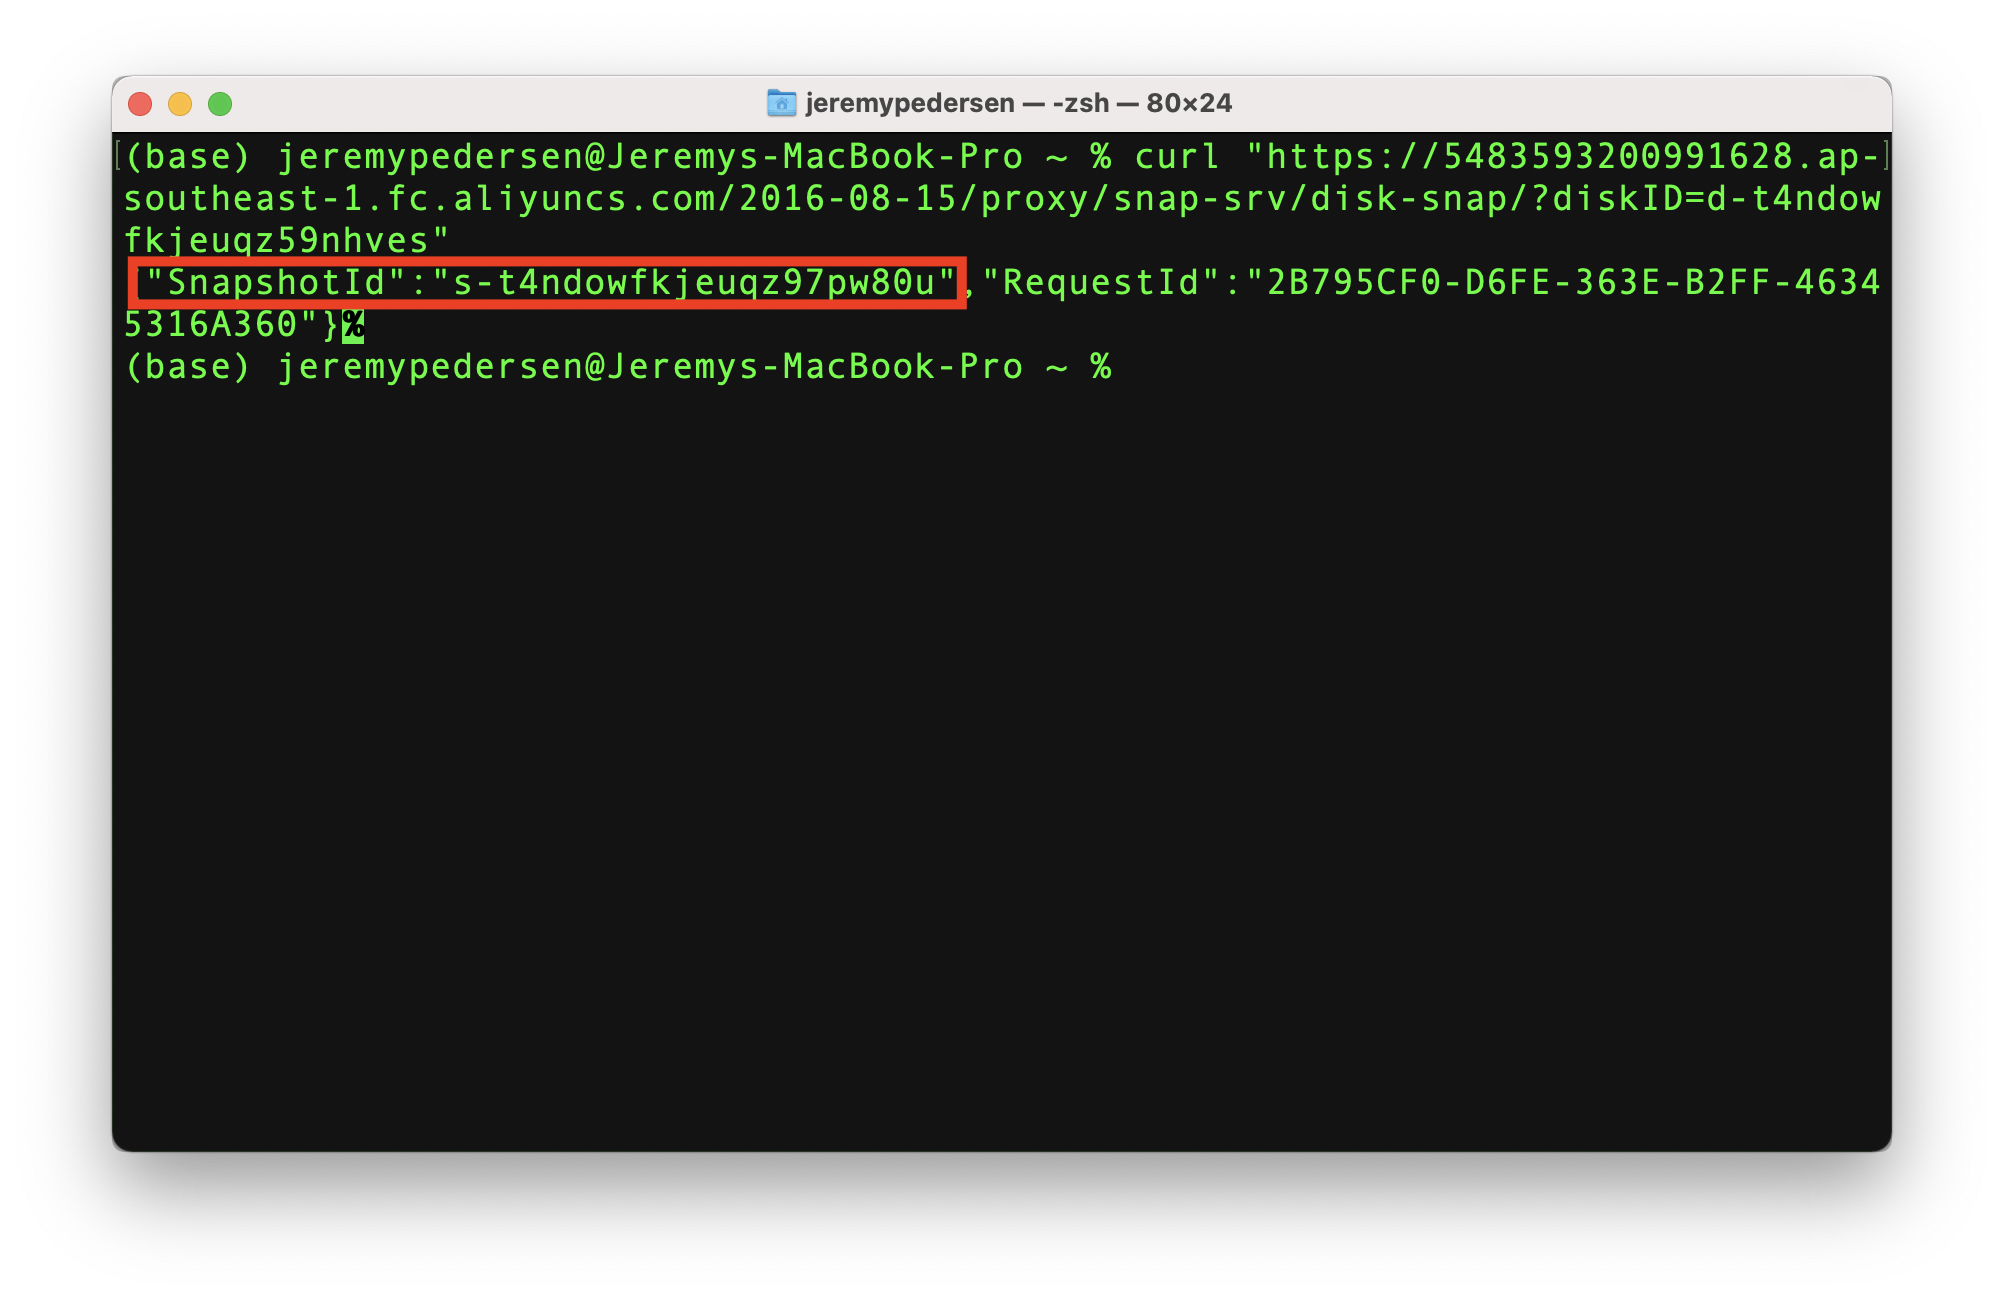
Note the "snapshot ID" above. This means a snapshot request was successfully submitted and the snapshot is being created. We should see this if we return to the ECS console "Snapshots" page:
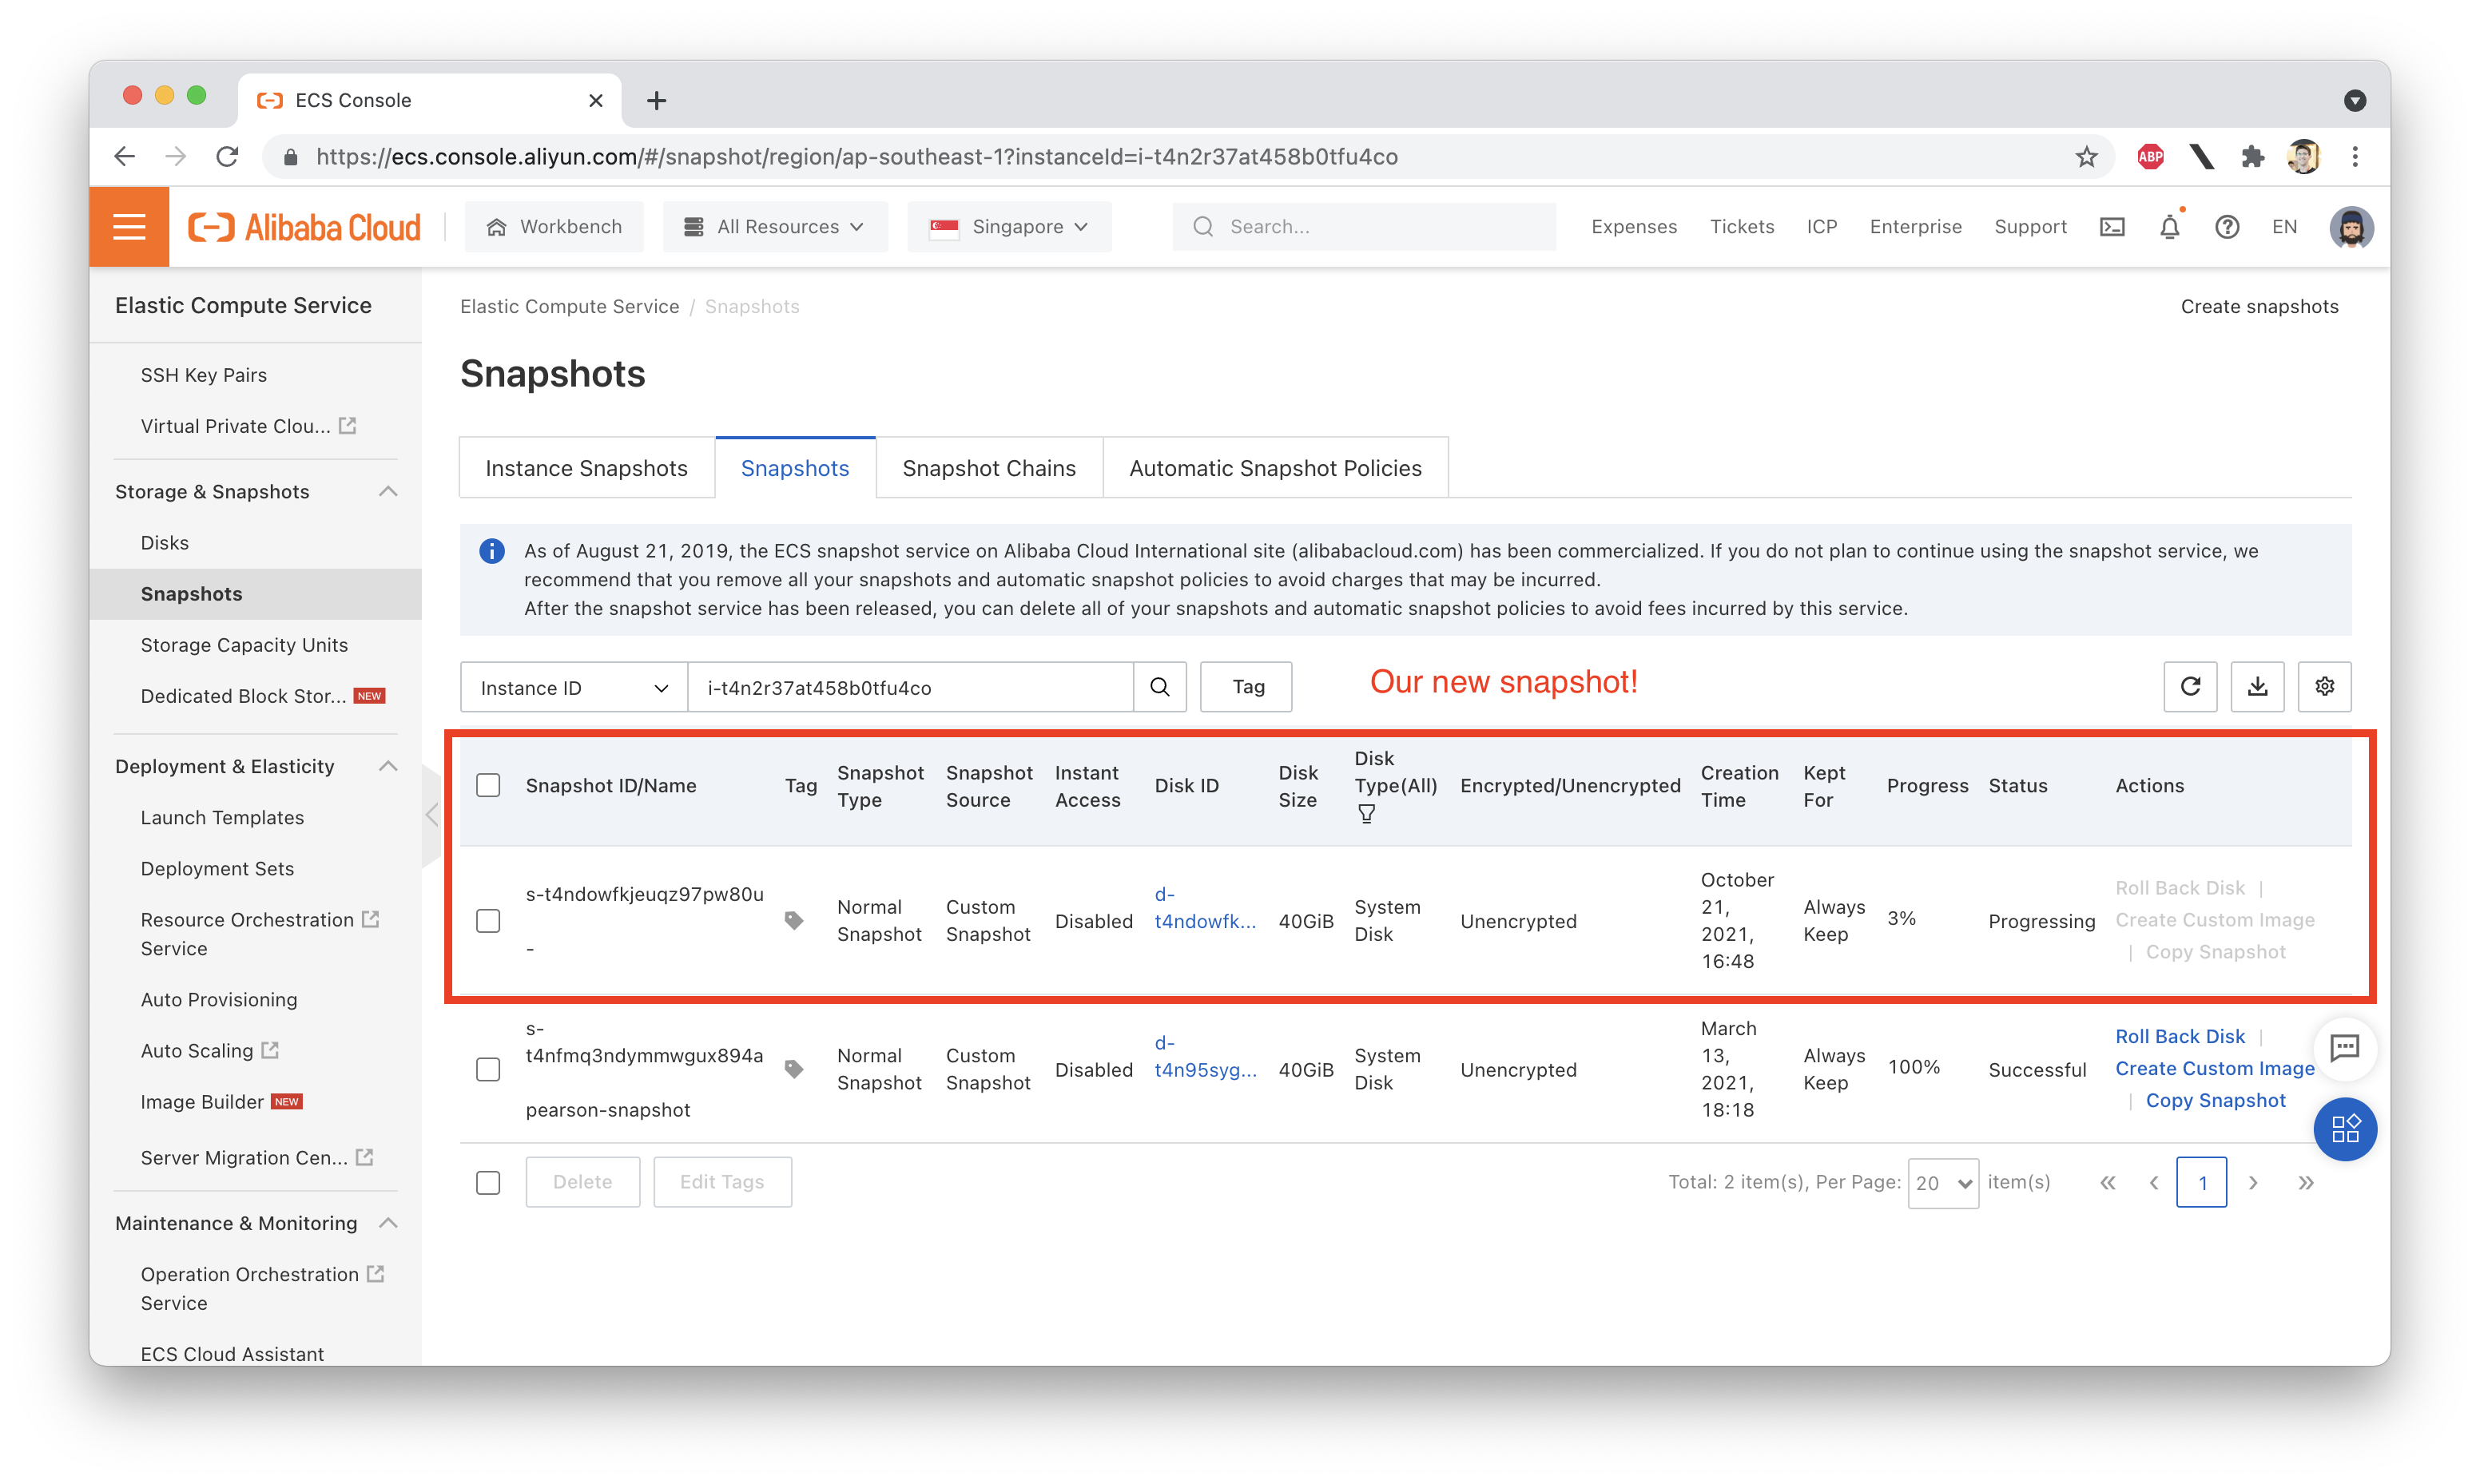
Ok, we did it! Now you know how to make Alibaba Cloud API calls from within a Function Compute function.
There is no fun destroy command, so once you're done with your FC function, remember to go into the Function Compute console and manually delete:
snap-srv)Note that you have to delete them in that order! The console won't let you delete the service and all of its functions in one step, you must first delete your triggers, then your functions, then your services.
Try playing around a little more with Function Compute. Try creating event-triggered or time-triggered functions. Try creating HTTP functions with different numbers of parameters, and learn how to parse parameters effectively.
Use the OpenAPI Explorer to learn what other Alibaba Cloud API calls you can make, and what their parameters are.
Great! Reach out to me at jierui.pjr@alibabacloud.com and I'll do my best to answer in a future Friday Q&A blog.
You can also follow the Alibaba Cloud Academy LinkedIn Page. We'll re-post these blogs there each Friday.
Friday Blog - Week 30 - Understanding Network Traffic Costs - Part 2
Friday Blog - Week 32 - No-code APIs with DataService Studio
JDP - December 23, 2021
JDP - October 8, 2021
JDP - August 27, 2021
JDP - June 24, 2022
JDP - June 10, 2022
JDP - July 23, 2021
 Function Compute
Alibaba Cloud Function Compute is a fully-managed event-driven compute service. It allows you to focus on writing and uploading code without the need to manage infrastructure such as servers.
Learn More Alibaba Cloud Academy
Alibaba Cloud provides beginners and programmers with online course about cloud computing and big data certification including machine learning, Devops, big data analysis and networking.
Learn More Serverless Workflow
Visualization, O&M-free orchestration, and Coordination of Stateful Application Scenarios
Learn More Serverless Application Engine
Serverless Application Engine (SAE) is the world's first application-oriented serverless PaaS, providing a cost-effective and highly efficient one-stop application hosting solution.
Learn MoreMore Posts by JDP
230600188480799430 November 21, 2021 at 6:36 pm
Looking forward to having a new blog based on the new FC dev tool