By Partha Sarathy, Alibaba Cloud Tech Share Author. Tech Share is Alibaba Cloud's incentive program to encourage the sharing of technical knowledge and best practices within the cloud community.
In today's article, I'll be showing you how to deploy a Ghost blog like a pro on Alibaba Cloud's platform.
If you don't have an Alibaba Cloud account, you can create one by clicking here. If you are a new user, you can enjoy a free trial worth $300 - $1200.
Ghost is an open-source publishing platform which can be used to create blogs, magazines and news websites. It is written in JavaScript. It uses Node.js to execute JavaScript code in the Server-side & MySQL for database operations.

Both Ghost and WordPress can be used for creating blogs. However, both platform has its own advantages and disadvantages. Let's compare them.
WordPress is written in PHP whereas Ghost is written in JavaScript. PHP is very slow compared to JavaScript. So blogs powered by Ghost will load a lot faster than WordPress.
Ghost also has built-in lossless image compression, code minification, etc. These features help us to improve our page performance
Both Ghost and WordPress do not require any programming skills to create blogs.
But Ghost is very simple and easy to use compared to WordPress. It makes you a lot easier to start a blog on Ghost. WordPress has a lot of features that are only used by advanced users
WordPress is the most vulnerable web application in the web because of its popularity. On the other hand, Ghost is new and less popular. It has many built-in security features that WordPress doesn't have.
For example, in Ghost, you need not to install anything to serve your blog in HTTPS. But WordPress requires you to install third-party plugins to achieve the same.
Ghost has a built in functionality for SEO. But in WordPress, we have to install a 3rd party SEO plugin for optimizing our site for SEO. Additionally, Ghost blogs always load faster than WordPress. So Ghost blogs always rank higher in Search Engines.
WordPress has a plugin ecosystem. WordPress has thousands of plugins available on the internet. So if you want to extend your website's functionality Ghost may not be the right choice for you
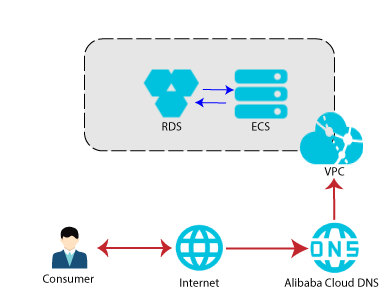
Here is the architectural diagram of our deployment process. Our blog will be hosted on an Alibaba Cloud Elastic Compute Service (ECS) instance.
Ghost blogs also require a database server. We will use Alibaba Cloud's highly available managed MySQL database service, ApsaraDB for RDS MySQL.
Both the RDS instance and the ECS instance will be in the same Virtual Private Cloud (VPC). Only the ECS instance is exposed to the internet. Which means you can only access the RDS instance only from the ECS.
An Elastic IP will be attached to our ECS instance. We also register a domain name for our blog. The domain name will be associated with the Elastic IP Address (EIP) using Alibaba Cloud DNS service. If you can't understand the terms, don't worry. I will explain everything in detail
VPC stands for Virtual Private Cloud. Each VPC is logically isolated. Every VPC has its own Route Table, VSwitch, etc.
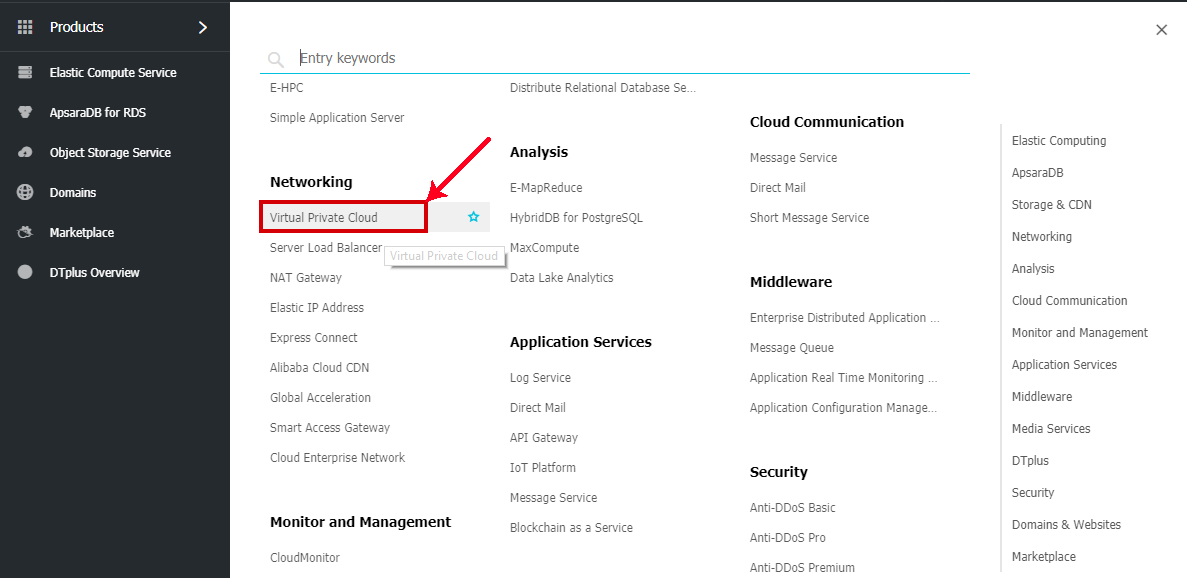
Let's create a VPC
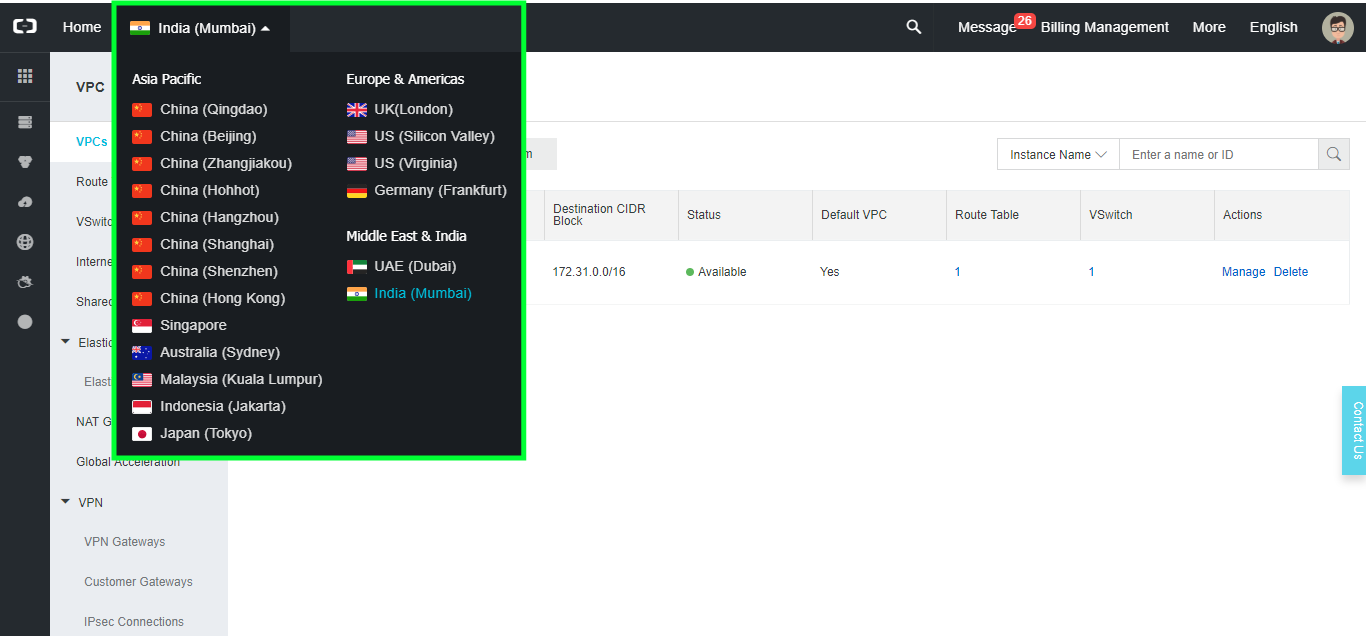
Regions are physical locations of Alibaba Cloud Data Centers. A region may have one or more Data Centers. They are called Availability Zones
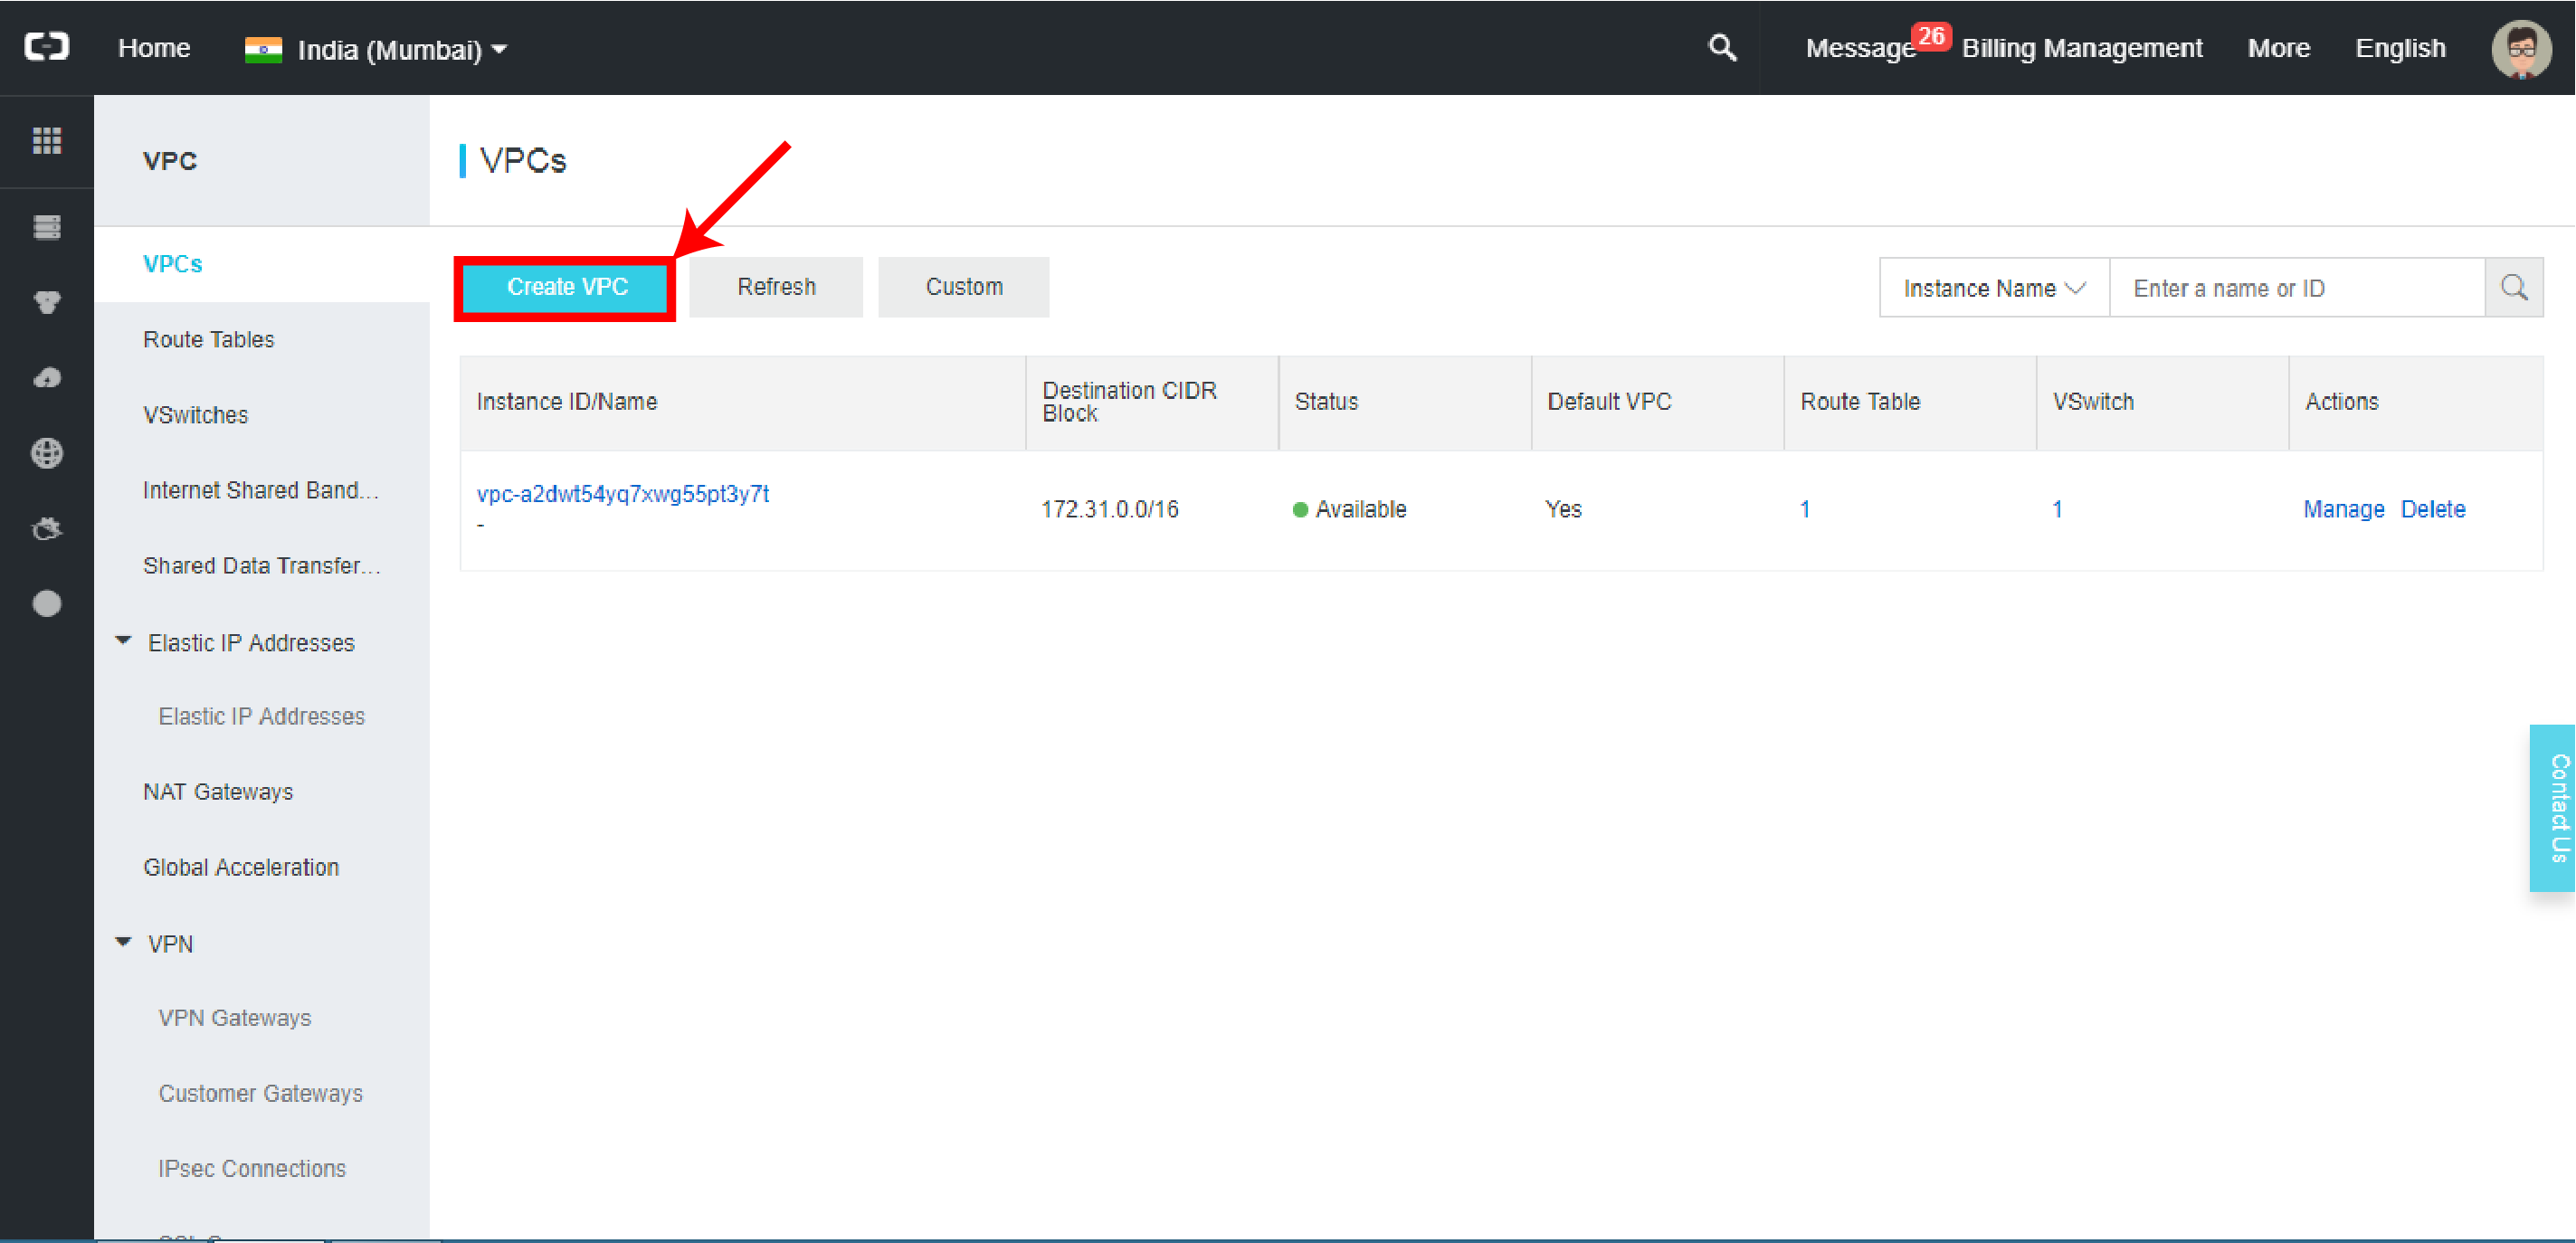
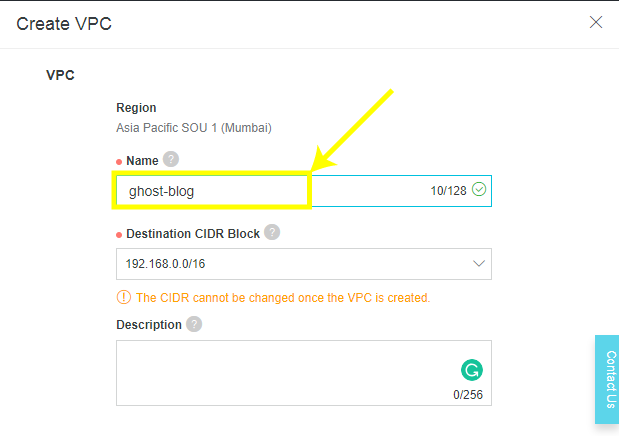
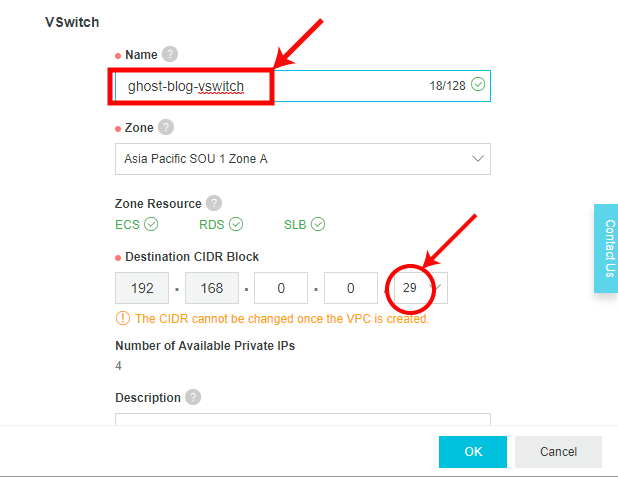
Leave other fields as default and head over to VSwitch section
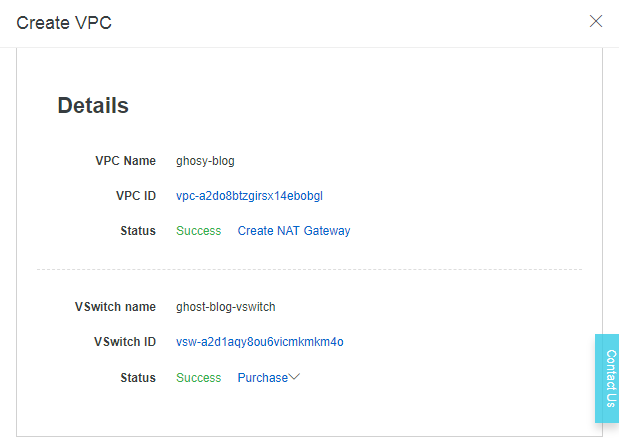
The VPC will be created successfully. After the VPC creation is successful, the VPC details will be displayed as follows
ECS stands for Elastic Compute Cloud, an Alibaba Cloud service that offers scalable virtual machines on the cloud. ECS instances are resizable and both horizontally and vertically scalable.
Let's say, our blog has daily 100 visitors and our current ECS instance is capable of handling the load. What will you do if our daily visitors are increased from 100 to 200?
We have to upgrade our ECS instance, right?
Well, Now we have two options, We can either increase the capacity of ECS our instance or increase the number of ECS instances and distribute the traffic via Elastic Load Balancer ( or ELB). Increasing the size of an instance is called Vertical Scaling and increasing the numbers of the instances is called Horizontal Scaling.
If our daily visitors decreases from 200 to 100, we can release the resources that are no longer needed. So, we pay only for what we actually use.
Let's create an ECS instance
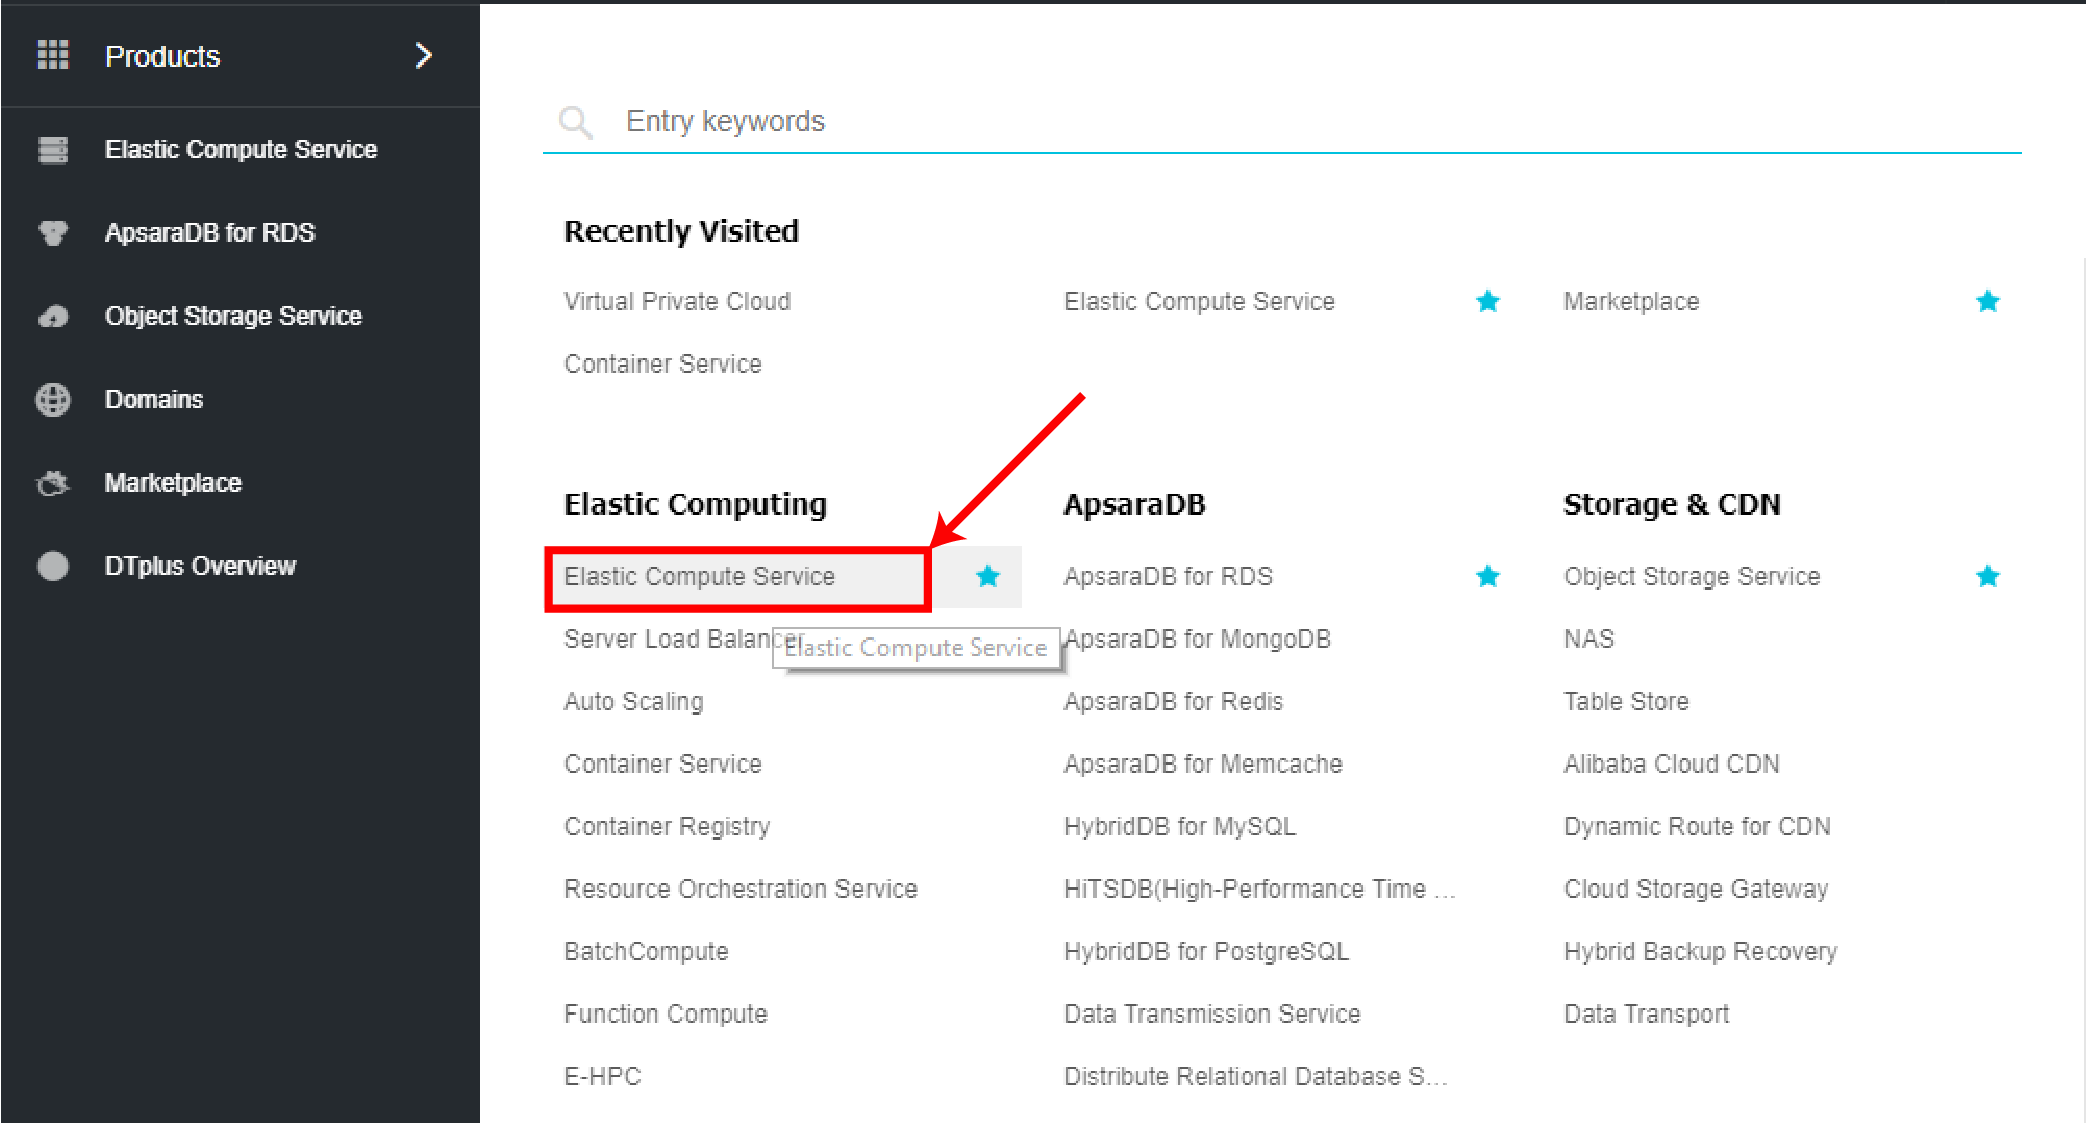
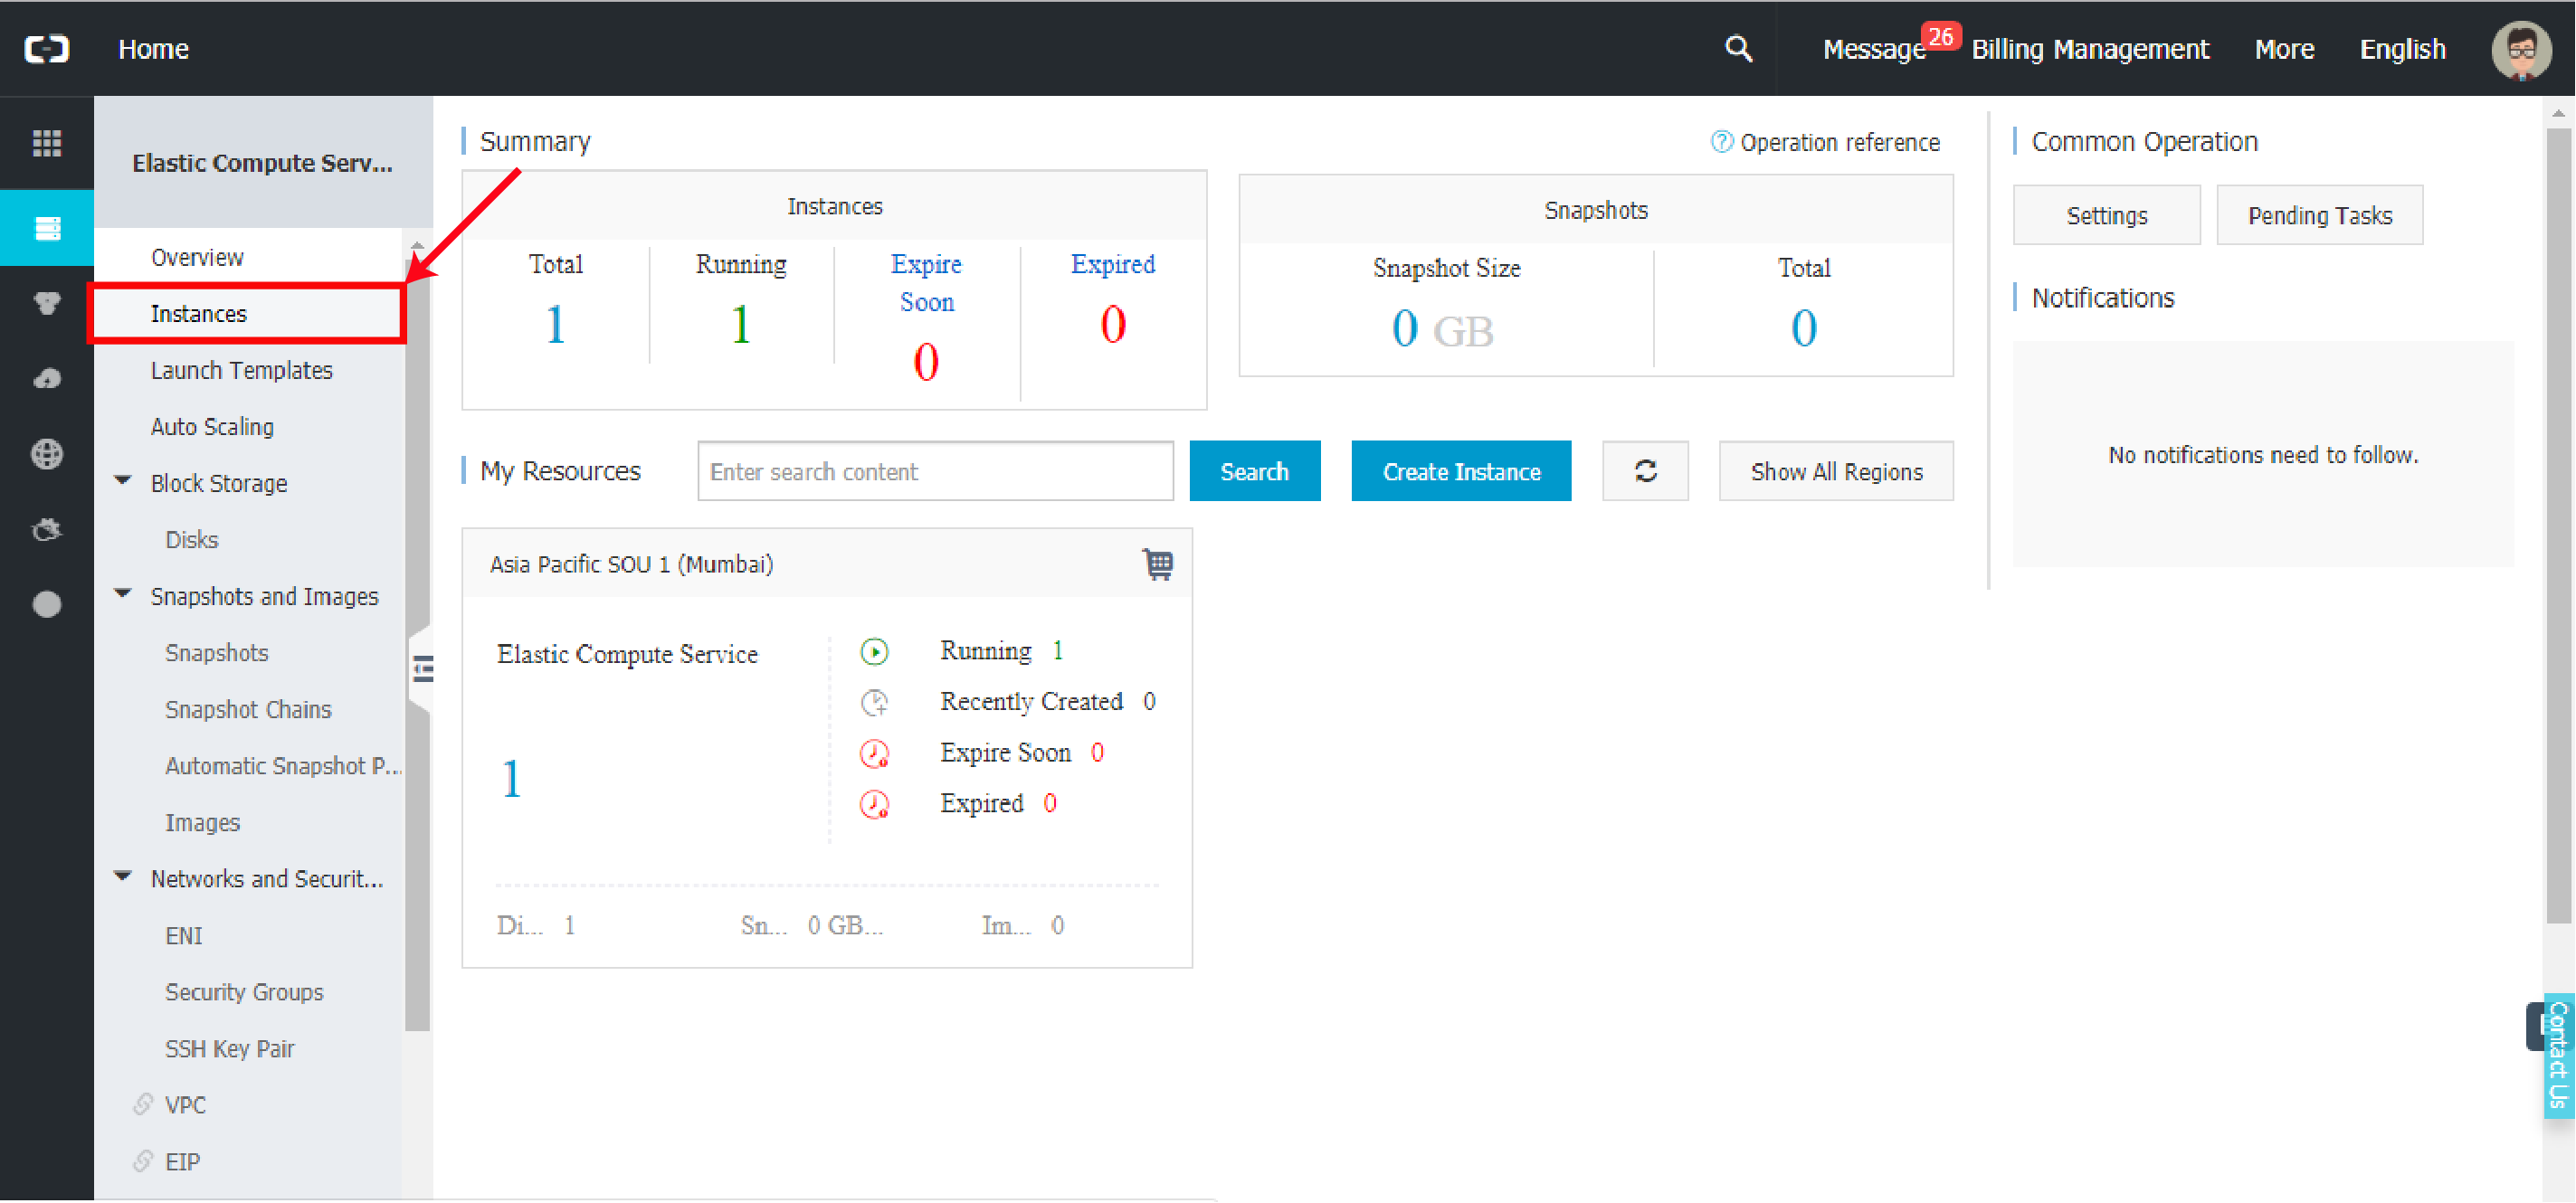
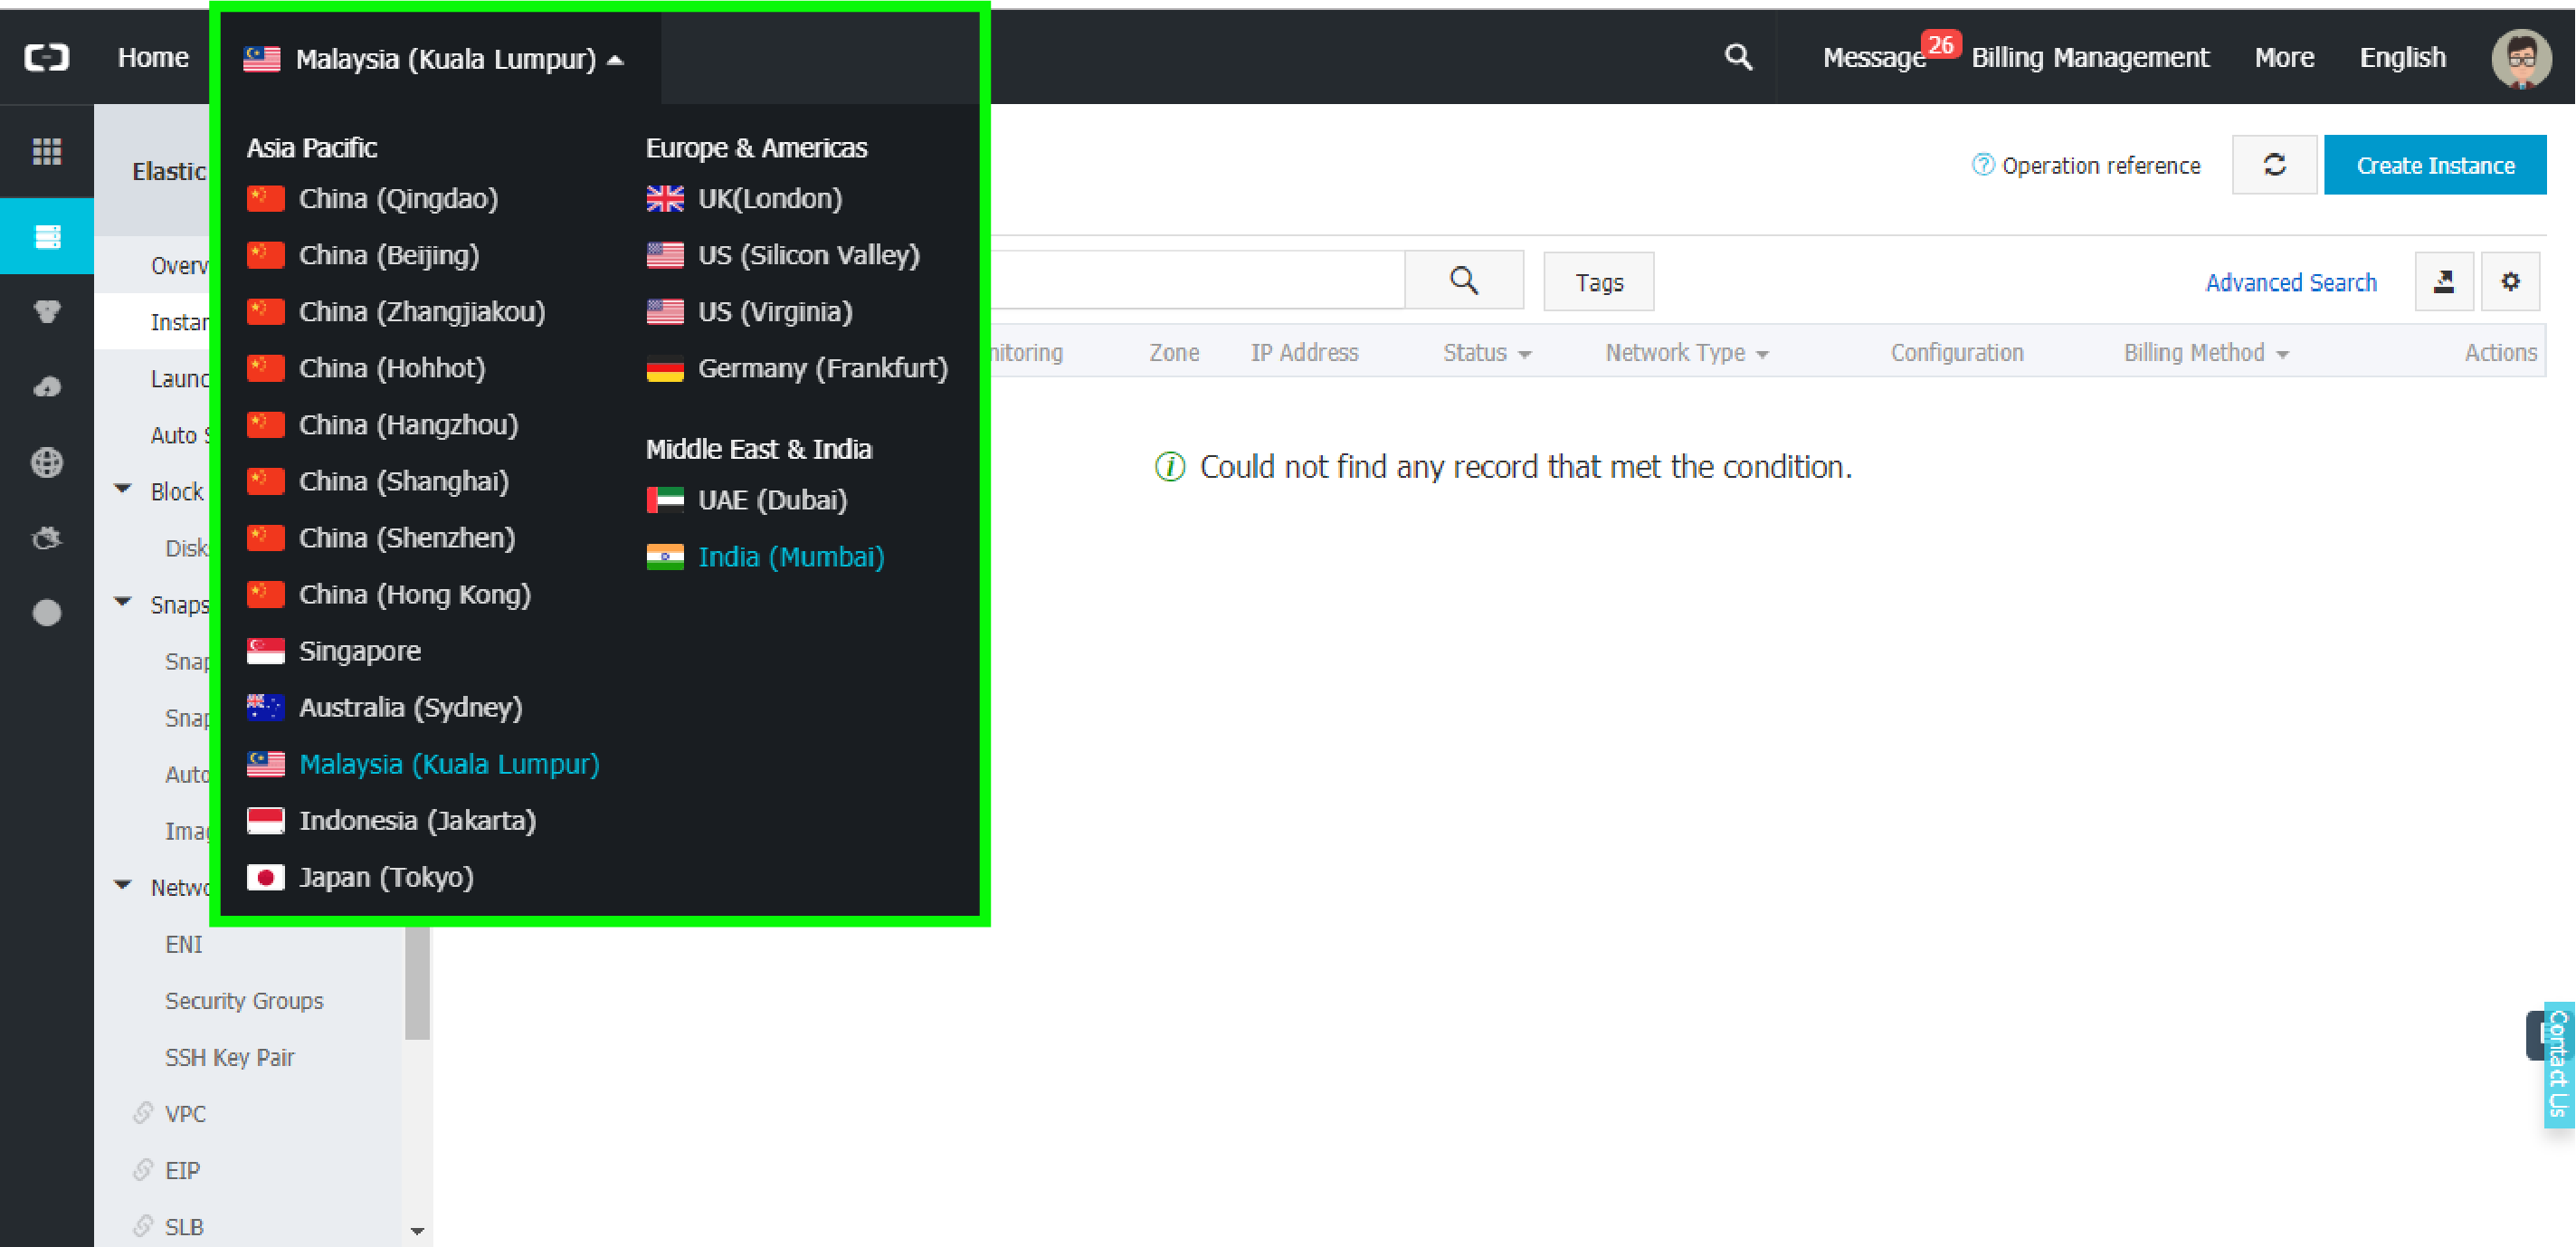
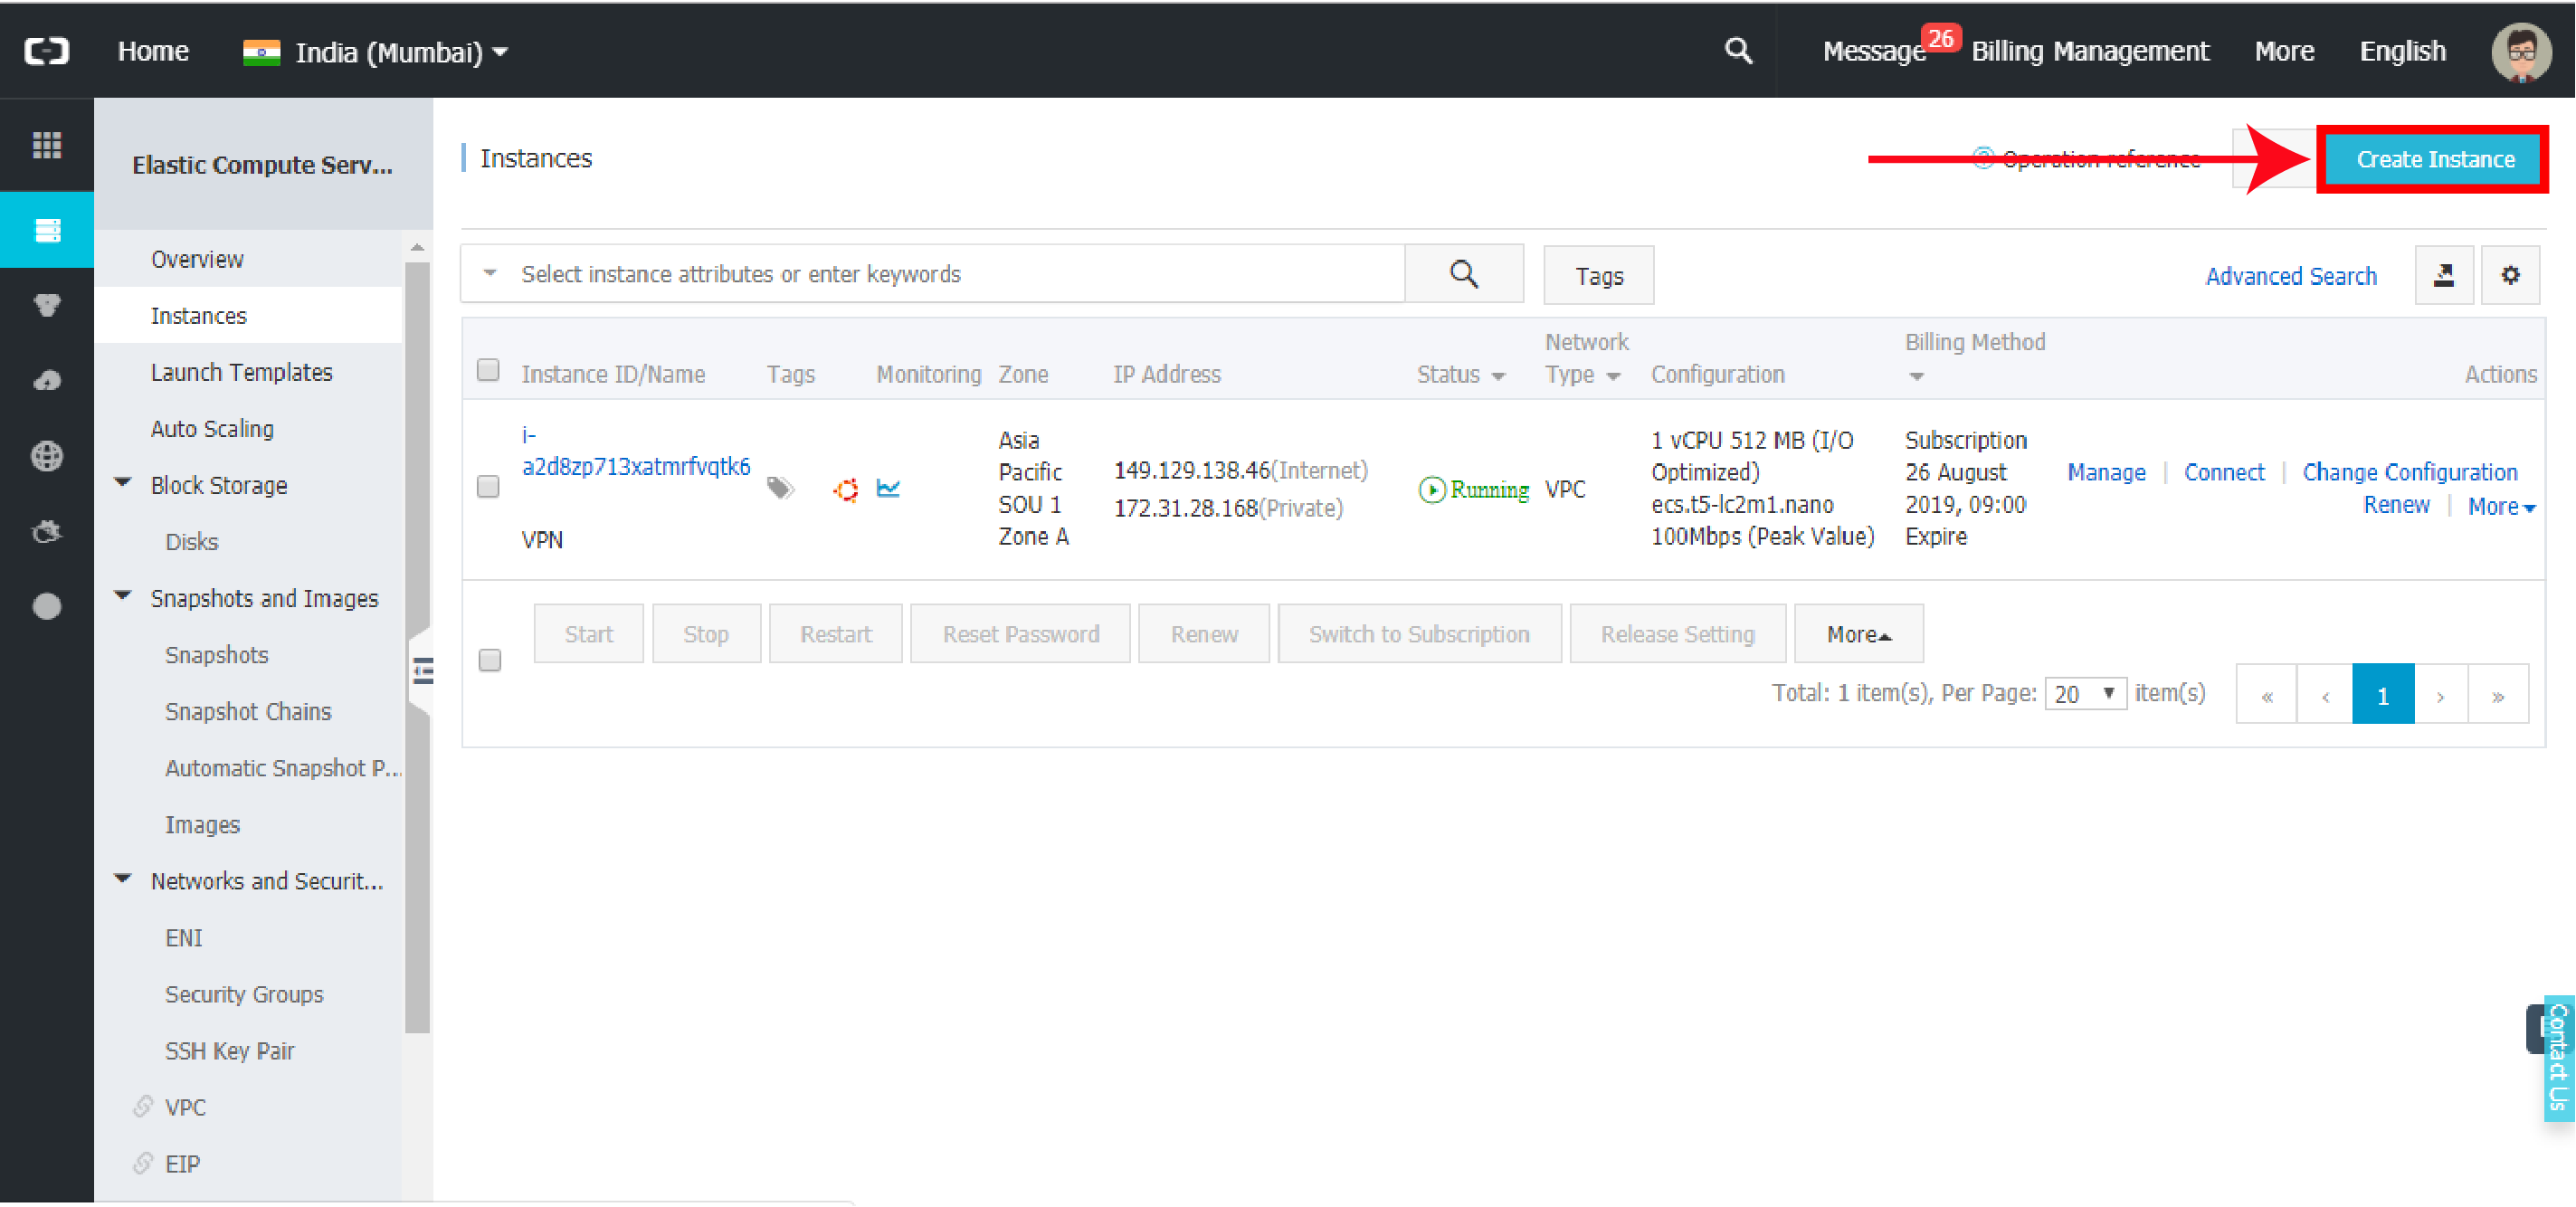
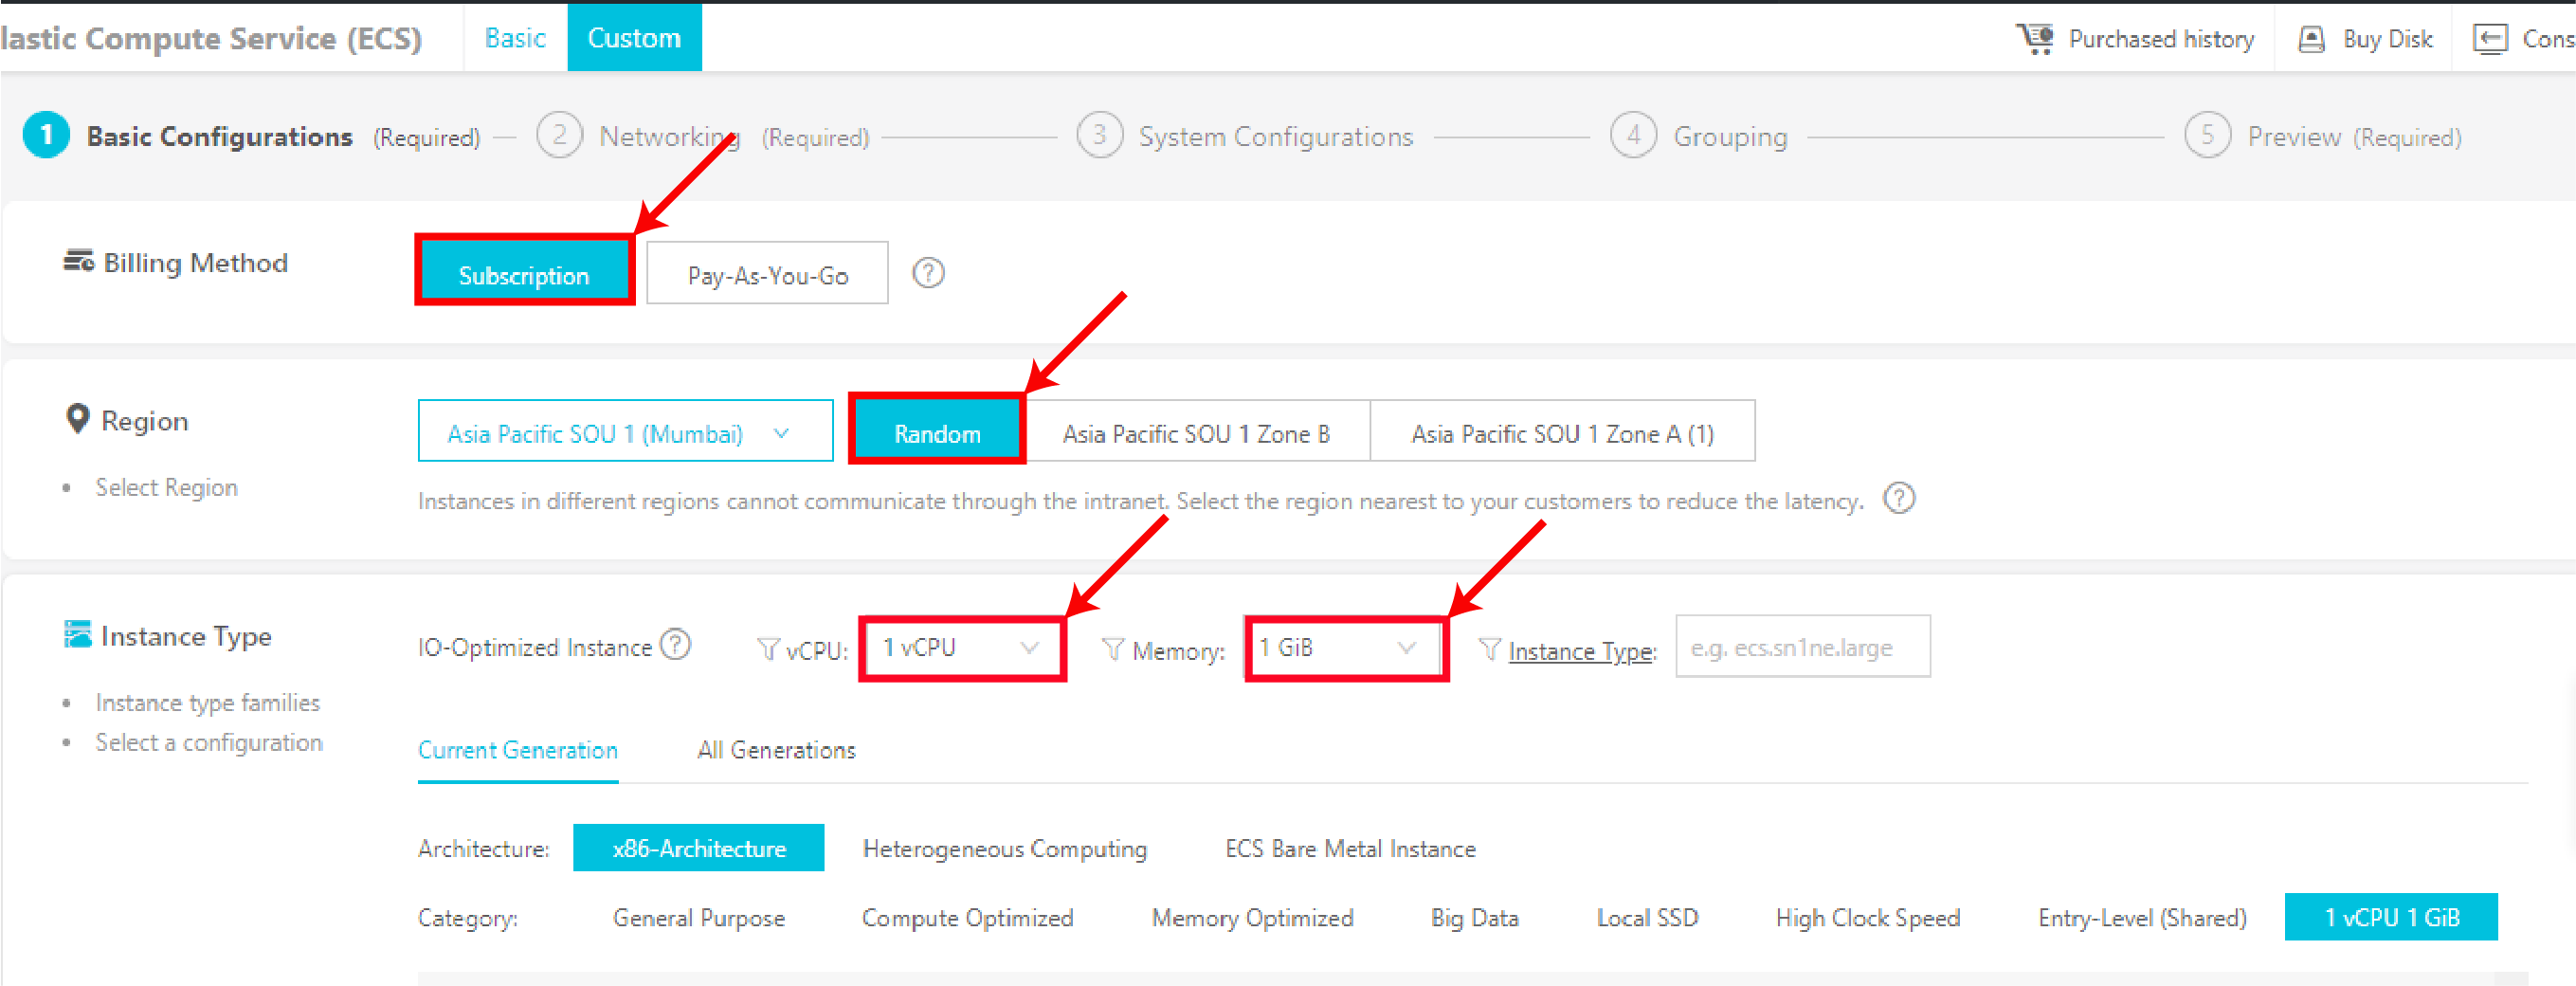

Now, we have to select an Operating System for our ECS instance. We will use Ubuntu 18.04 LTS. Ubuntu is one of the most popular Linux distributions in the world. It is based on Debian.

Now we have to add storage to our instance. To reduce costs, I've chosen Ultra Cloud Disk. If you want more performance, go for SSD Cloud Disk.

Go to the next page by clicking Next: Networking at the bottom right corner of the page.

We need a public IP address to reach our ECS instance over the internet

Security Groups are used to set firewall rules. We'll use the default security group.

Go to the next page by clicking Next: System Configuration at the bottom right corner of the page.
We have to choose an authentication method to access our instance. We can use either SSH key pair or password-based authentication. For simplicity, I'm going with password-based authentication although it is less secure compared with SSH Key-pair based authentication.
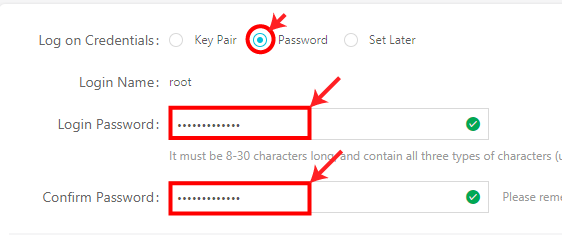
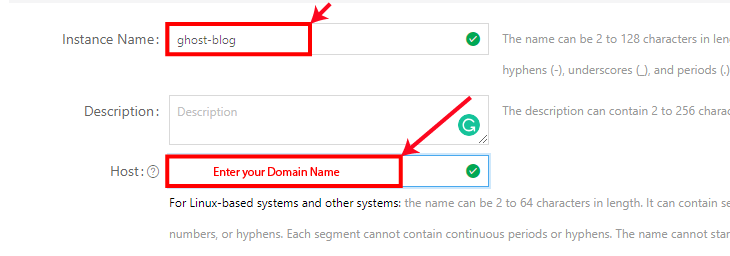
Now we are ready to create and launch our ECS instance. Click the Preview button at the bottom right of the page. Review the details and complete the purchase.
After we complete the purchase, the ECS instances will be created. Note down the public IP address of the ECS instance.

When we deploy an ECS instance, we'll get an IP address to access it. However, it is not easy for our end users to remember our IP address. Instead, we have to register a domain name for our blog.
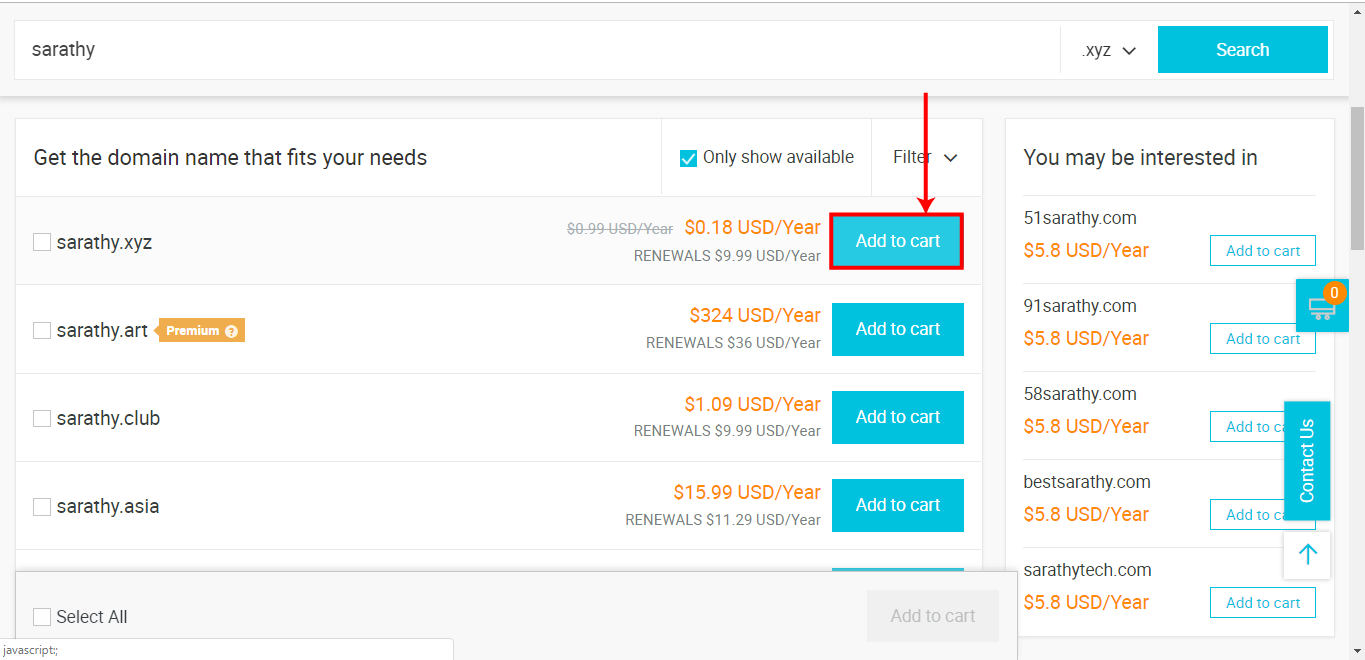
At the time of writing this article, Alibaba Cloud is offering a free .TECH to new users. If you're an old user, you can get a .XYZ domain for only 0.18$ for the first year.
Let's register a domain name
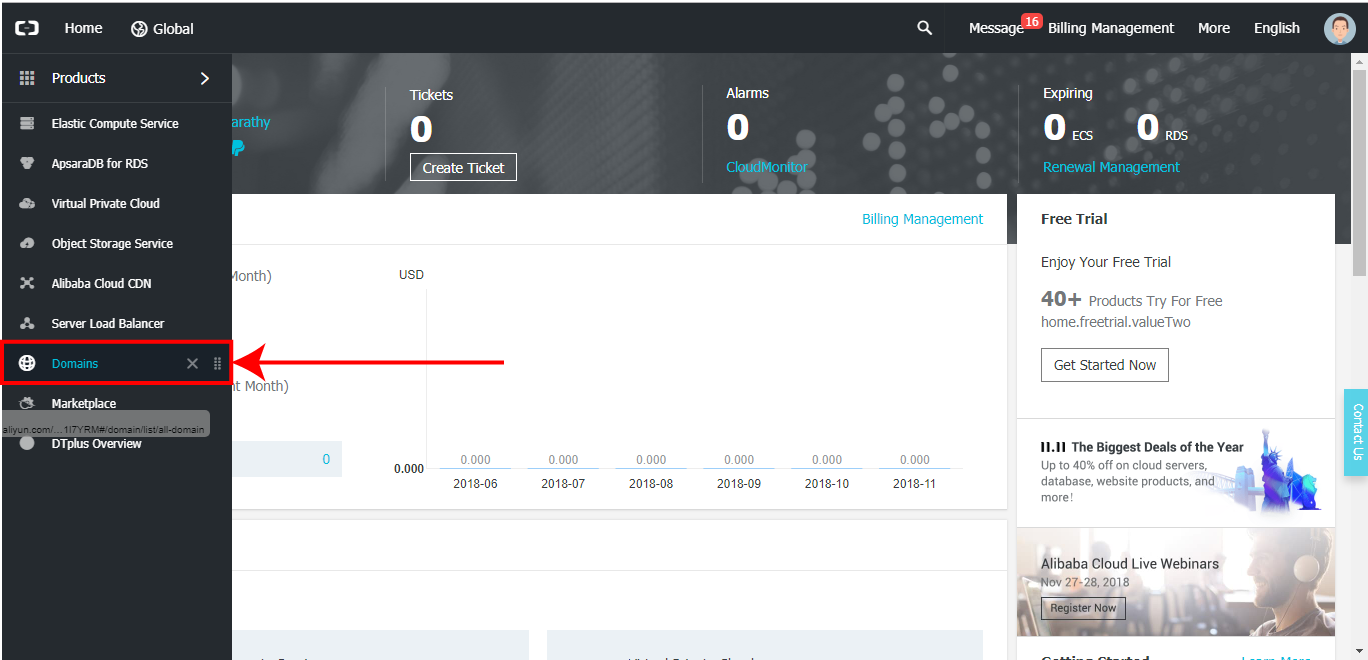

You will be redirected to a page similar to the following image where you can buy a domain for our blog.

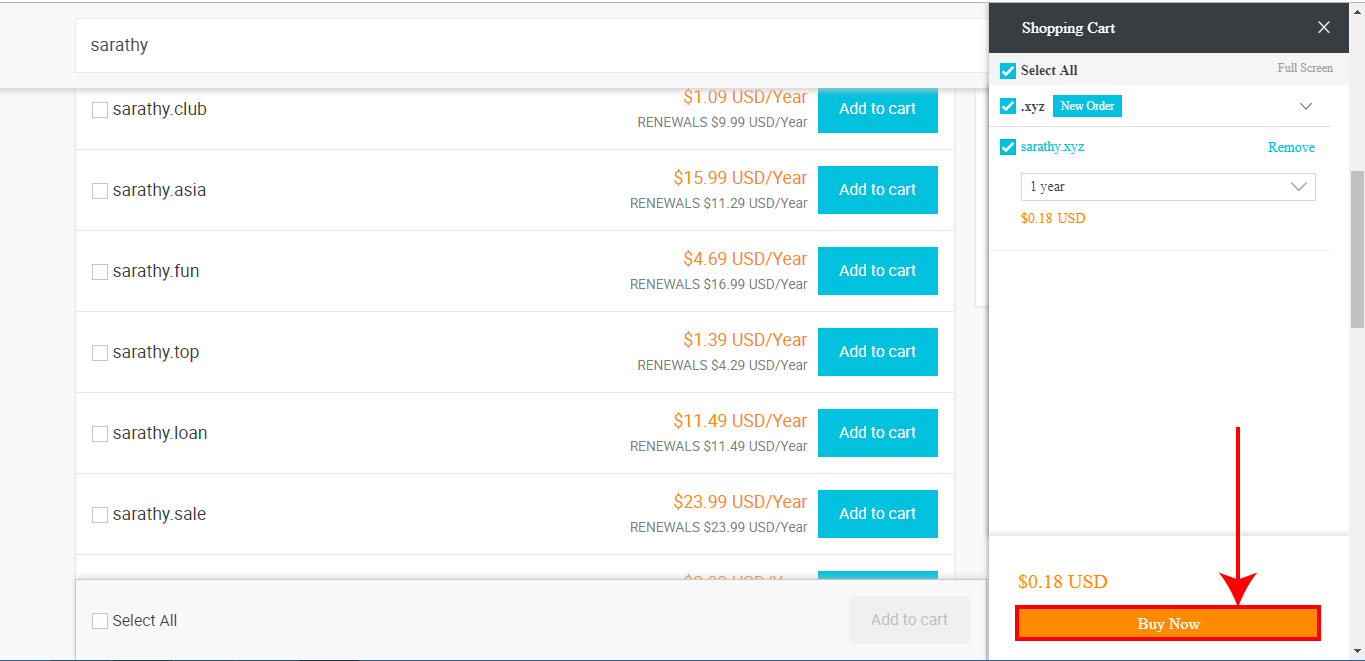
The search results will be displayed. Choose your desired domain from the list & click Add To Cart
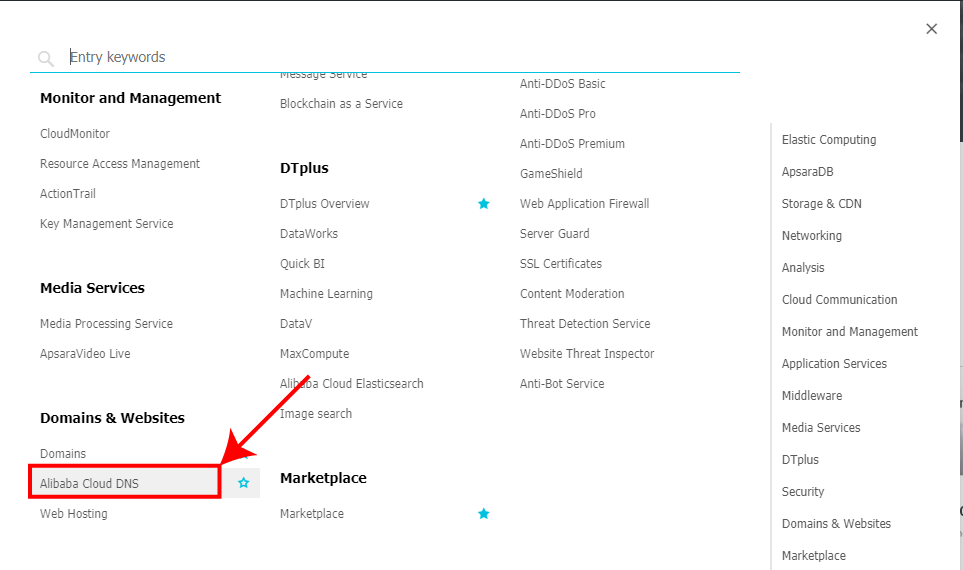


blog.example.com (Replace example.com with your domain name)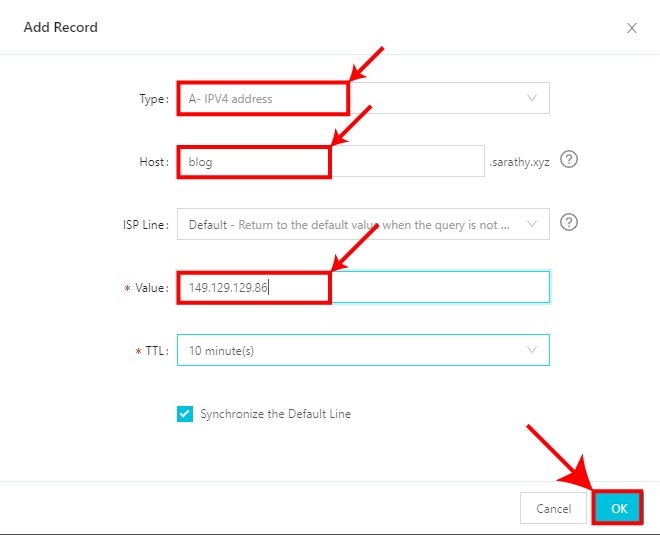
Your DNS record should look similar to the below picture.

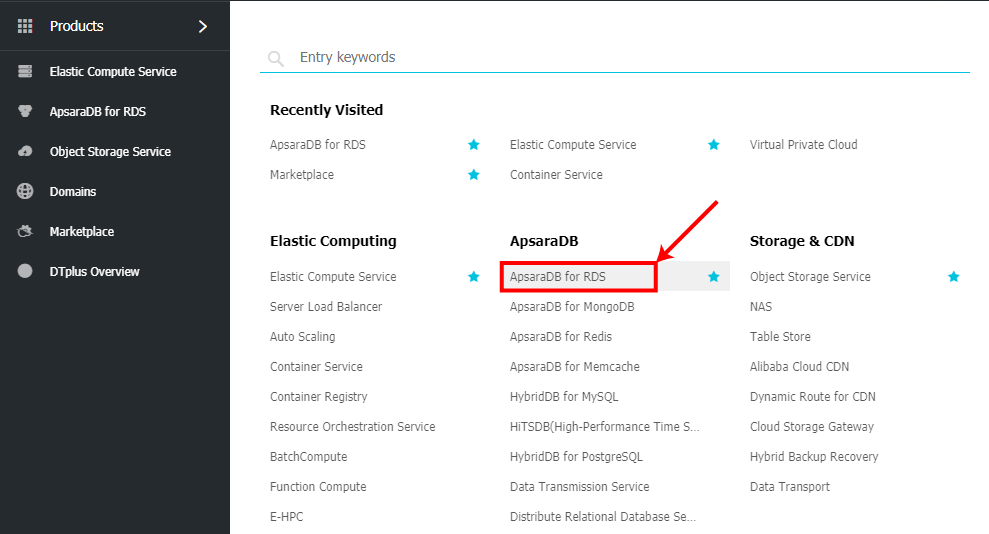
ApsaraDB for RDS is a managed Relational Database service being offered by Alibaba Cloud.
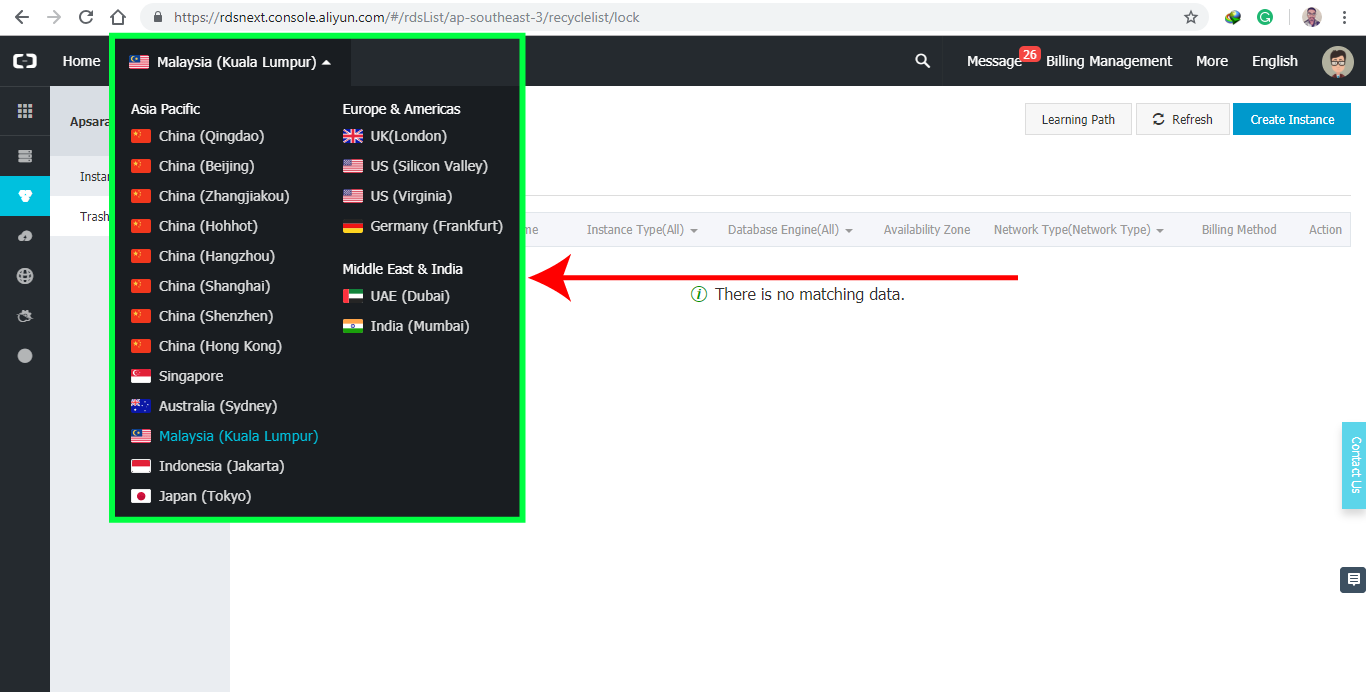
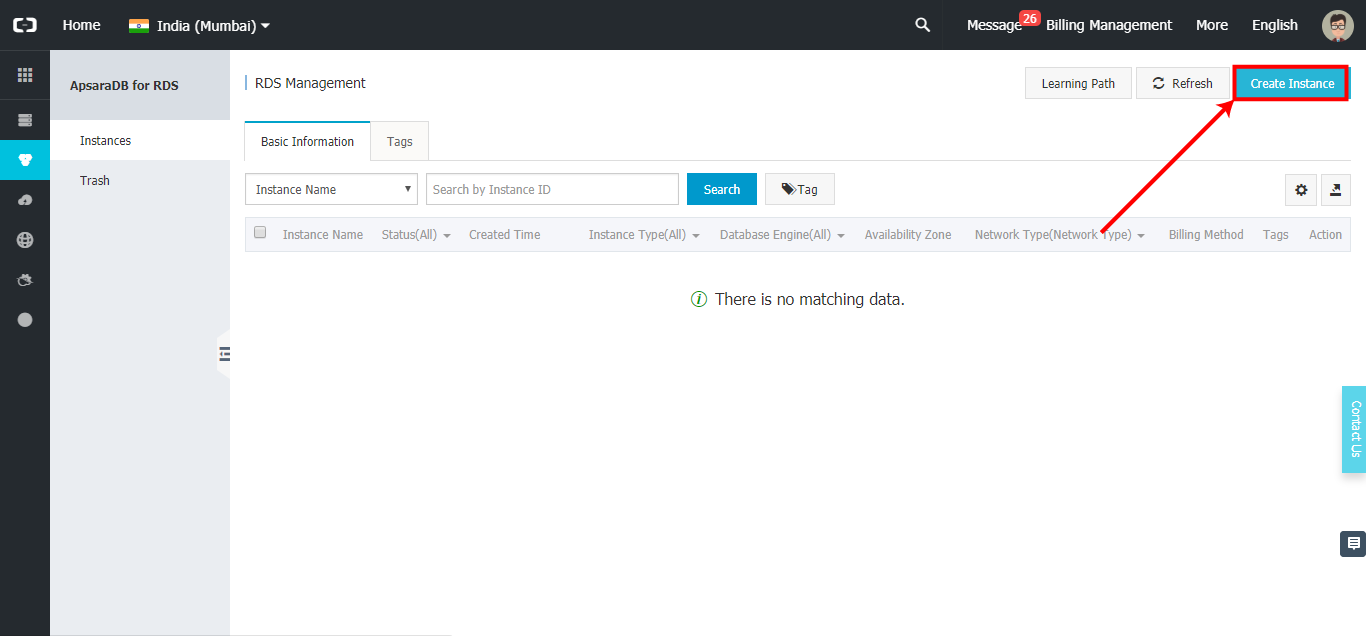
Let's create an RDS instance for our blog.
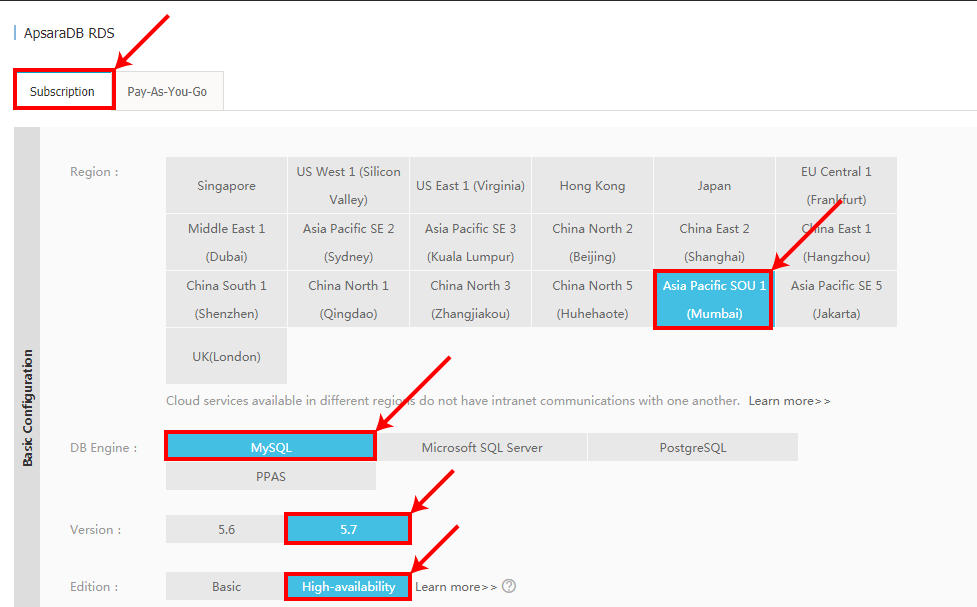
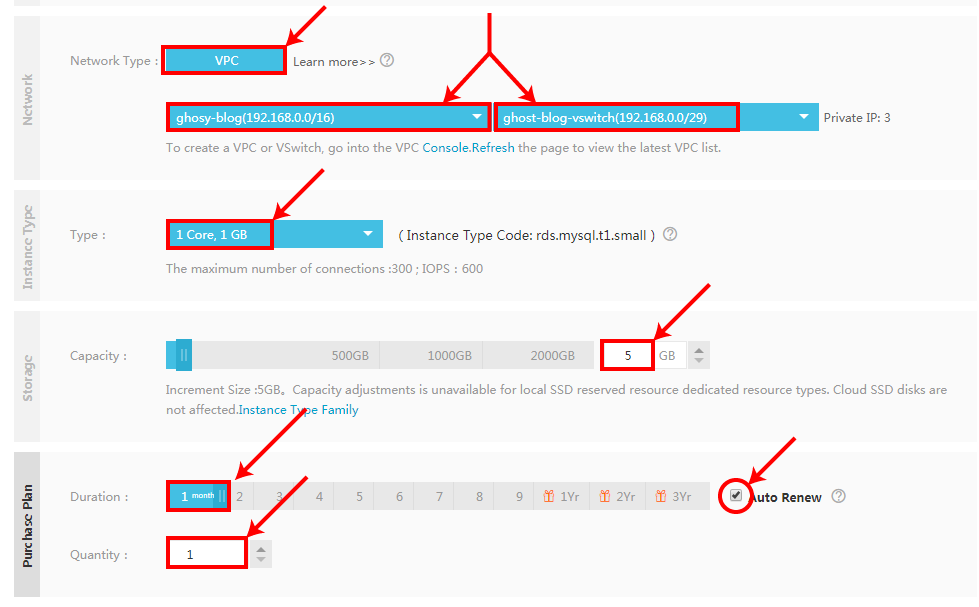
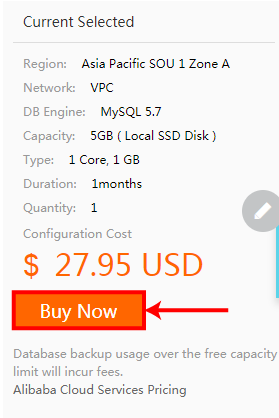
Review the details. If everything is OK, proceed
to buy by clicking the Buy Now button

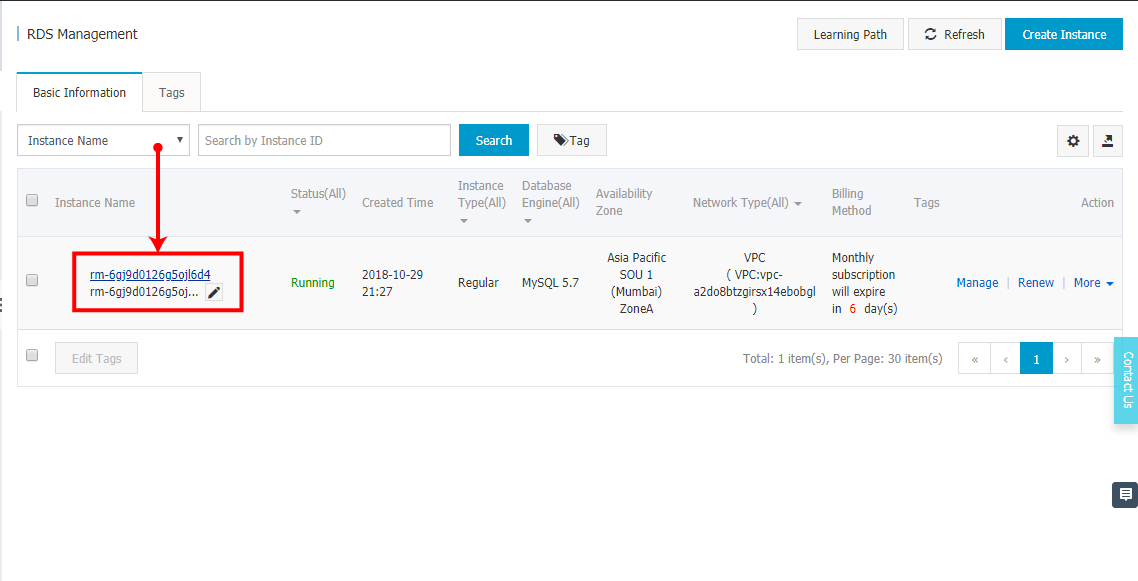
Now we are going to whitelist our VPC in RDS security settings. So, our RDS instance can be only accessed within the VPC.
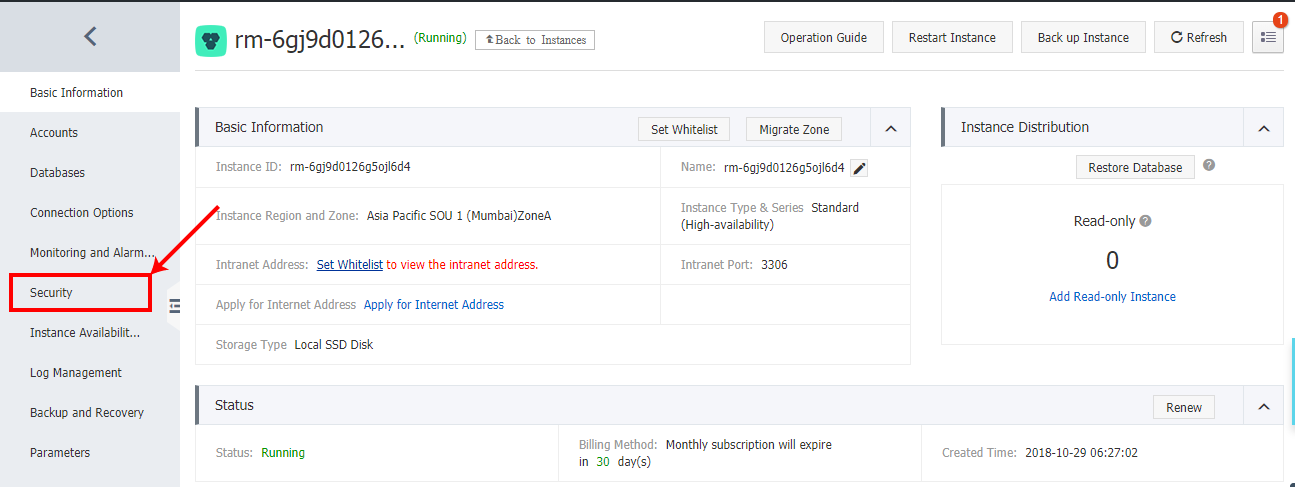

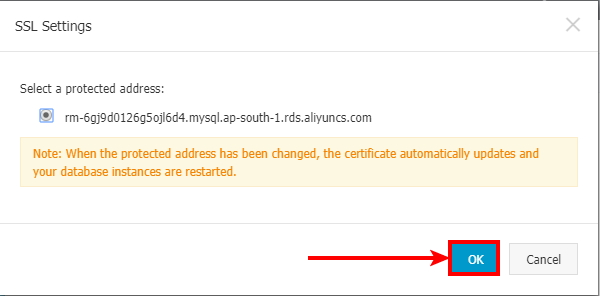
The domain name of our RDS instance will be displayed. Click OK. Also note down the domain name of our instance. This will be our MYSQL hostname
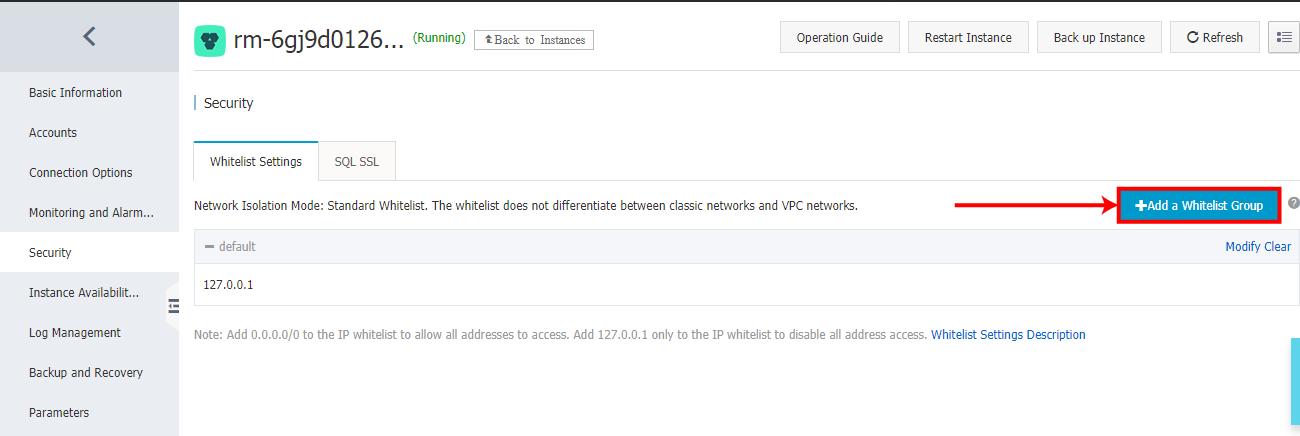
A new tab called Whitelist Settings will appear in the Security section.
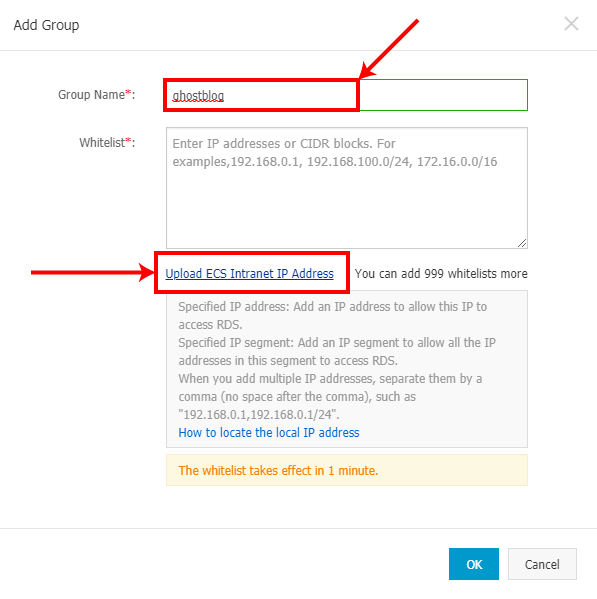
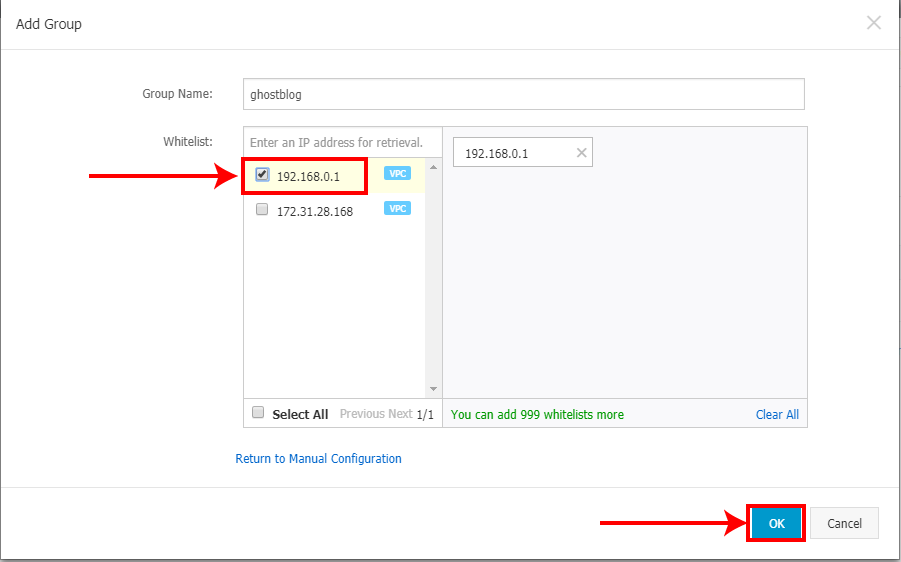
Now our RDS instance has been successfully configured to be accessed from only our ECS instance.
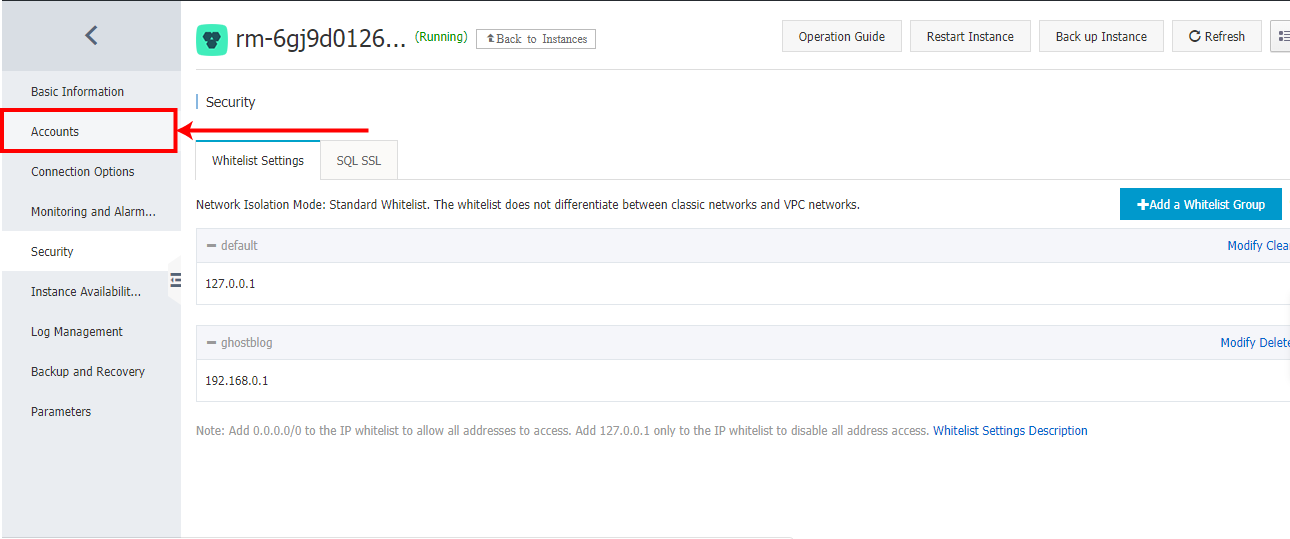
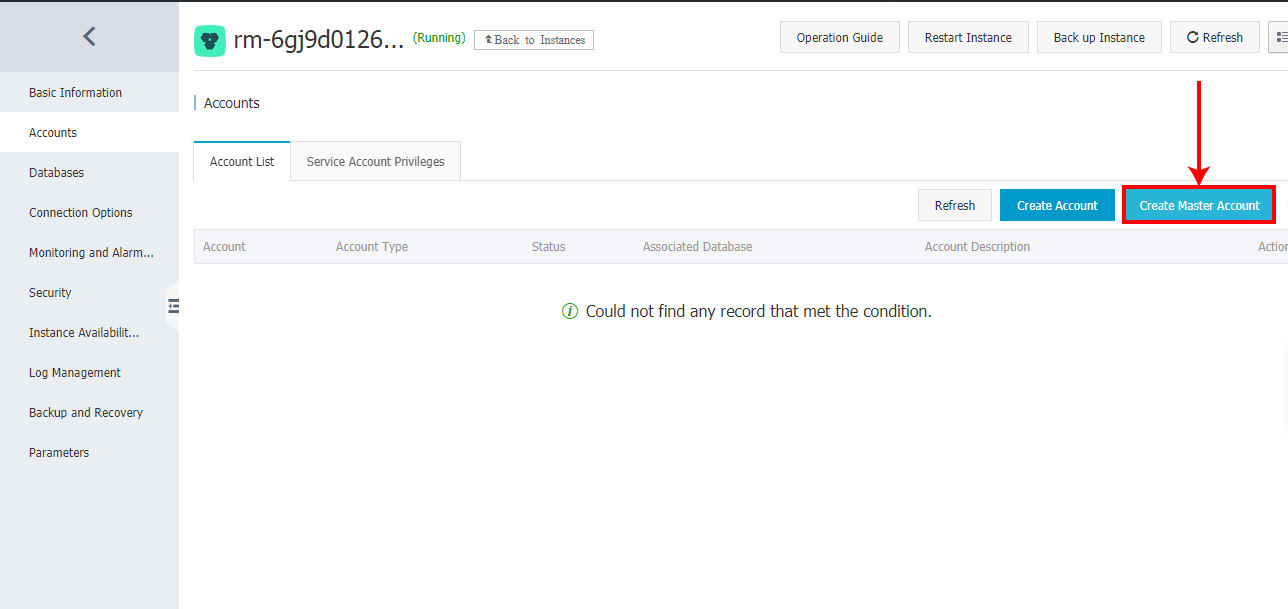
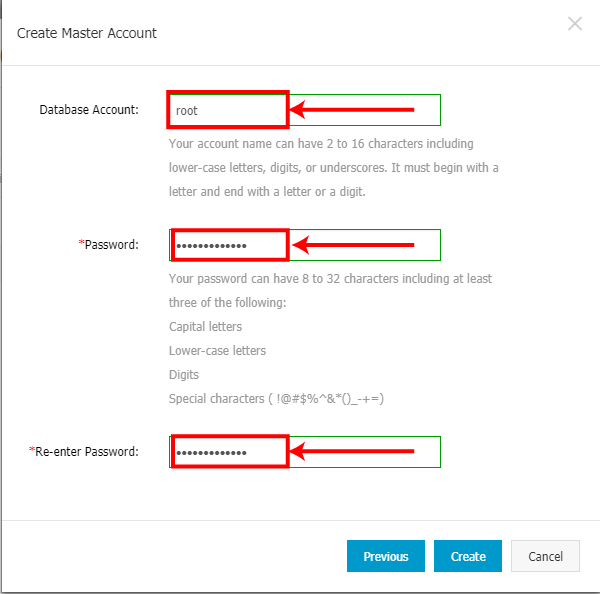
Let's create a MySQL root account.
Our ECS instance is also a computer located at Alibaba Cloud data center. It doesn't have a Graphical User Interface (You can install GUI if you want, It's not needed for deploying our ghost blog).
We can connect to our ECS instance in two ways. The first one is VNC and the other one is SSH.
VNC stands for Virtual Network Computing and SSH stands for Secure Shell. Both are used to connect to virtual servers like Alibaba Cloud ECS. VNC
VNC requires a high-speed internet connection whereas SSH works fine even in slow connections. However, SSH can't be used for accessing GUI.
If you have a high-speed internet connection go ahead with VNC. Or stick with SSH

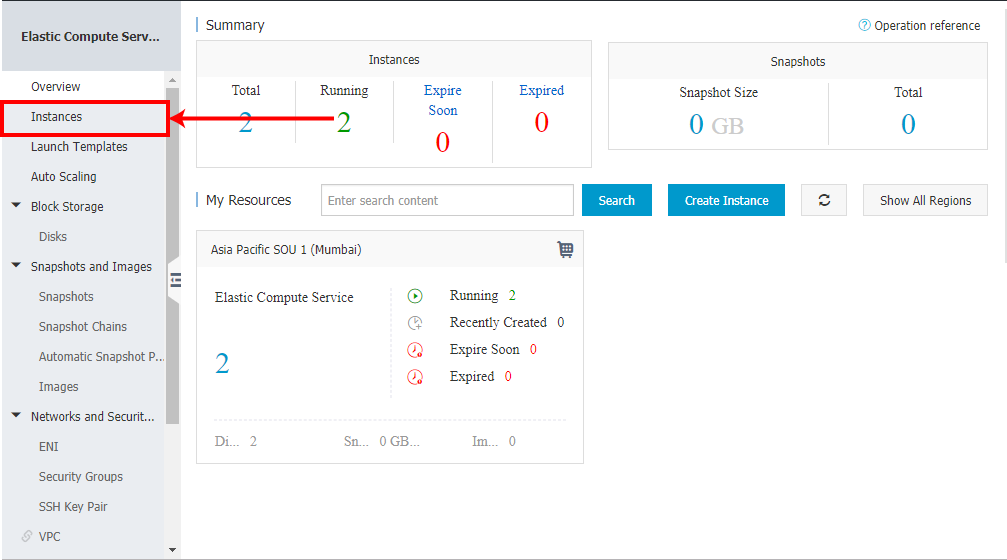

A new browser tab will be opened and a six-digit password will be displayed.
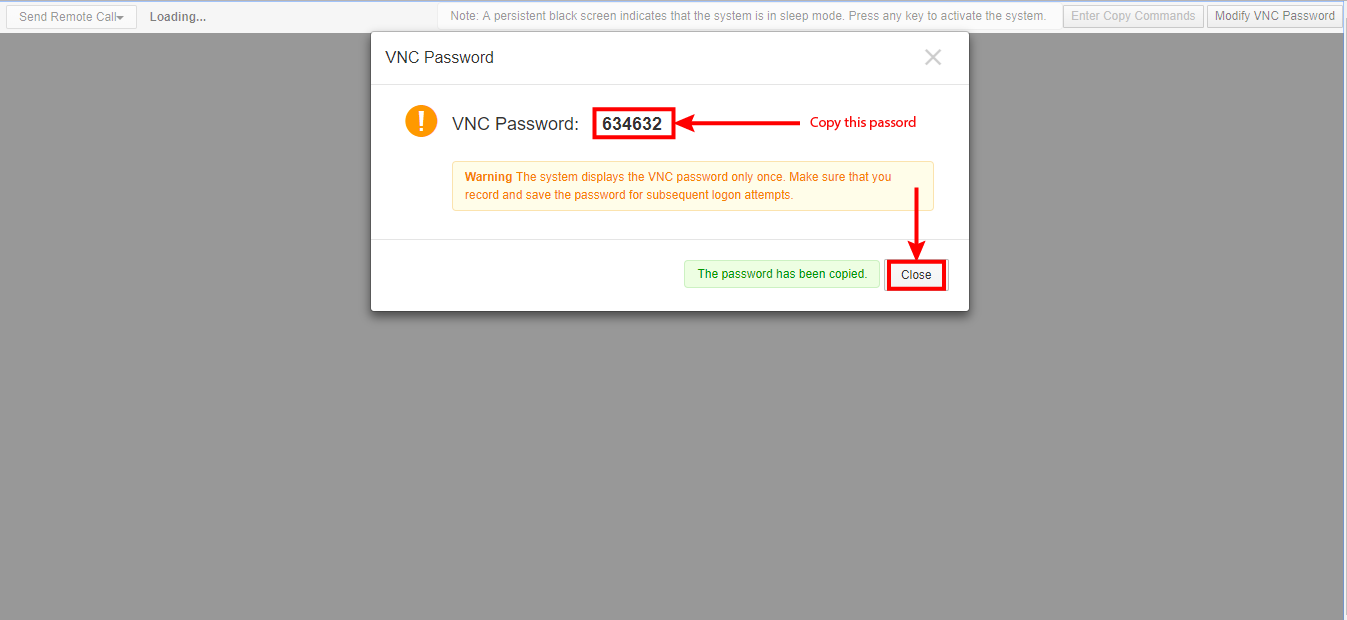
A new VNC session will be opened as follows. It will ask for our ECS instance's username password
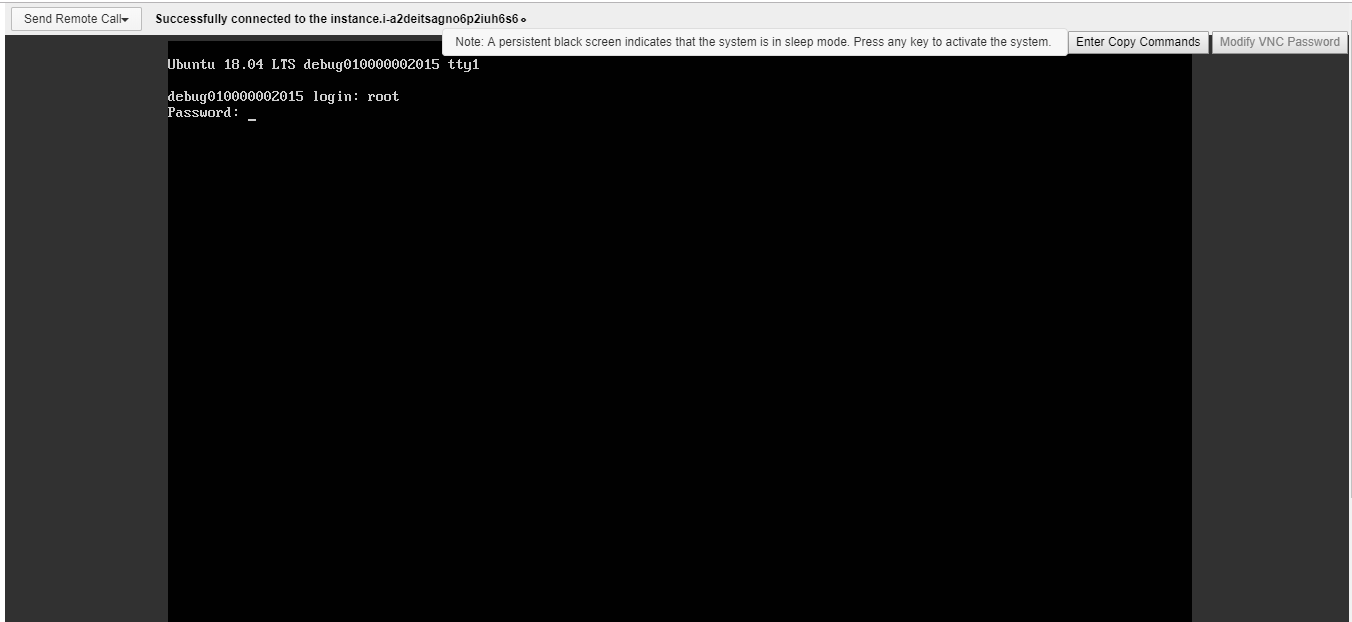
Enter username as root followed by the password you entered in Step 2.
After successful login, you will be presented with the following screen
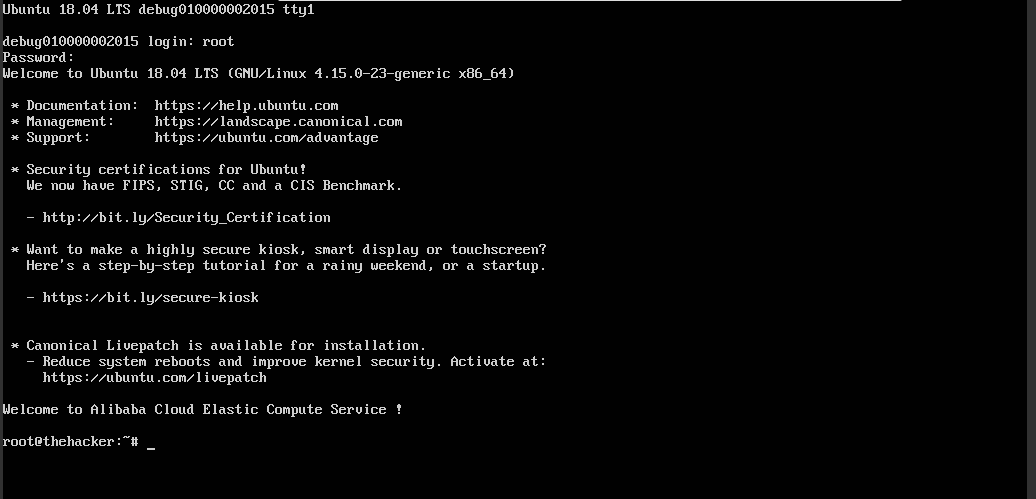
Now we've successfully connected to our ECS instance via VNC. We're ready to execute commands.
Open your Terminal Application if you are using MacoS or Linux based Operating systems. If you're using Windows 10, open Command Prompt.
I'm using Enterprise edition of Microsoft Windows 10
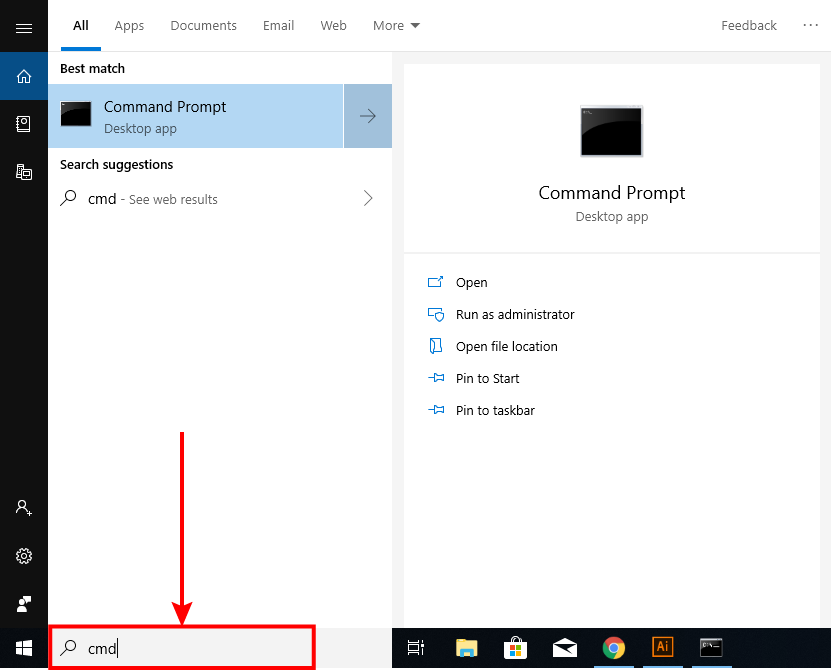
Windows Command Prompt will be opened.
If you get the following output, you're ready to follow the next step.
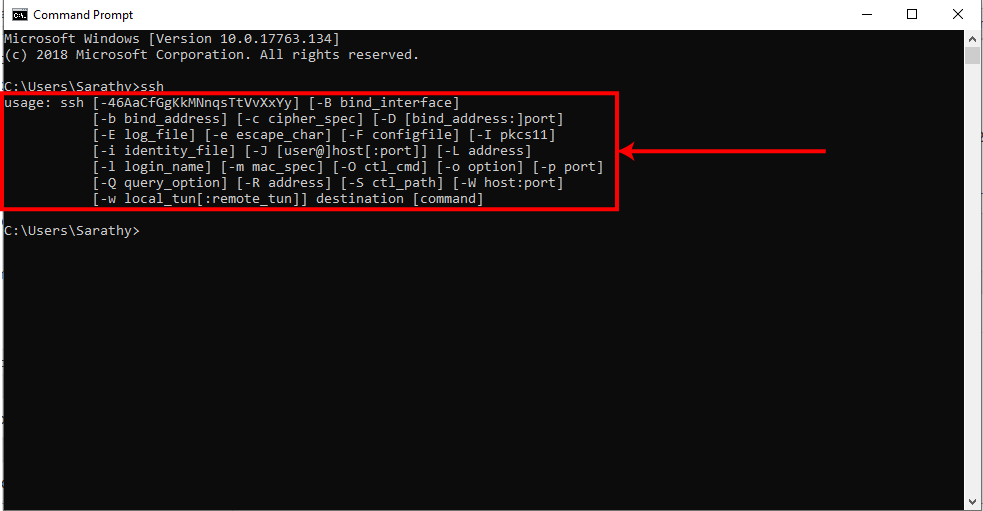
Let's connect to our instance.
Type the following command. Don't forget to replace instace-ip with your instance's public IP address
ssh root@instace-ipAccept the SSH fingerprint by typing yes
If the login was successful, you'll be presented with the following screen.
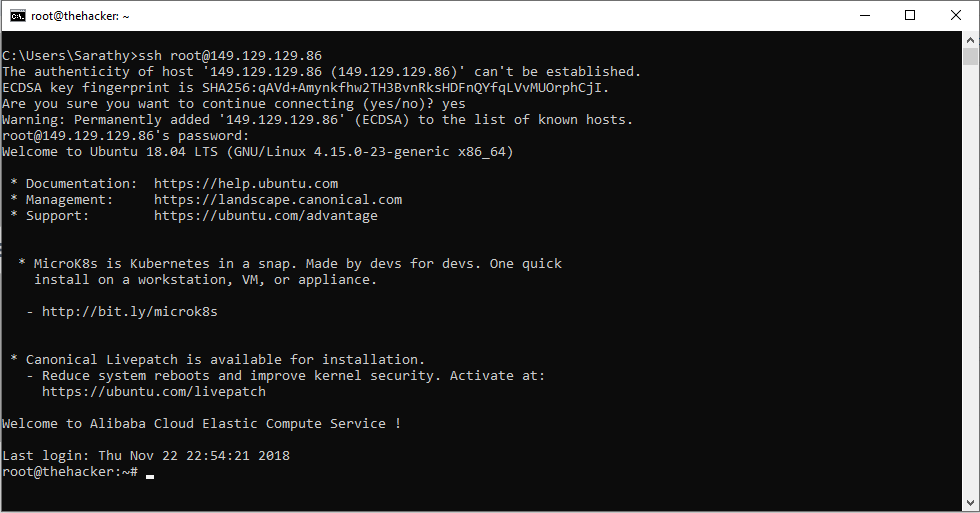
echo "blog.sarathy.xyz" > /etc/hostnameThe echo command is used to display text in the standard output. The > symbol redirects the output to the /etc/hostname file. Don't forget to replace sarathy.xyz with your domain name
[terminall]hostname -F /etc/hostname[/terminal]
The above command sets the Fully Qualified Domain Name(FQDN) to match our hostname.

adduser sarathyReplace sarathy with your own username.
Enter a STRONG PASSWORD for both password and confirm password fields. Skip the rest of the questions. Finally, answer Yes by pressing Y
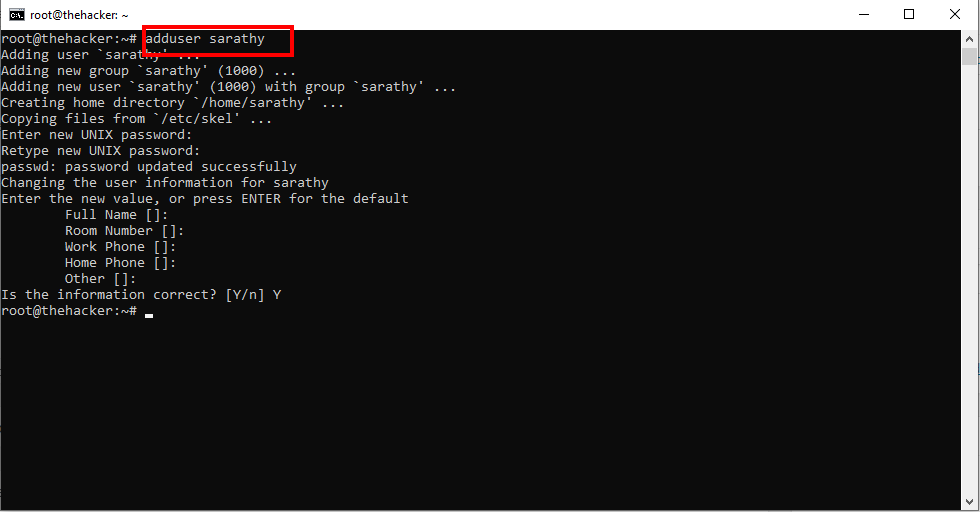
We have successfully added an unprivileged user. In order to perform tasks that require root privileges, we have to add our newly created user to the sudoers group. The usermod command is used to achieve the task
Let's do it now
usermod -a -G sudo sarathy
Terminate the current SSH session by typing exit or by pressing Ctrl+D
Login to our ECS instance with the newly created user. To do that follow the same same steps exactly in Step 7. Don't forget to replace root with the newly created user.
The apt command in Ubuntu helps us to install, update or remove packages.
Let's update the package list
sudo apt updateAfter executing the above command, the number of packages that can be upgraded will be shown as follows
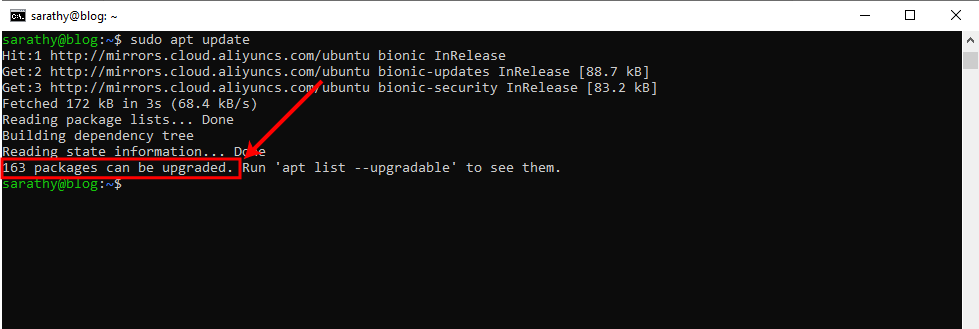
We're going the upgrade the entire system including programs and kernel to the latest version. The following command will do this. It may take some minutes to complete. Be patient & never interrupt the operation.
sudo apt dist-upgrade -yWhen the operation is completed, we have to reboot our instance to boot the using the updated kernel. In Linux, the reboot command is used to reboot the system.
Reboot the system. Then log in again
To match our local time with the instance's time, we have to configure the default Timezone.
Execute the following command to set our timezone
dpkg-reconfigure tzdataChoose your timezone & hit Enter
The output would be similar to the following image

Nginx is a high-performance web server can be used for serving web pages, load balancing etc.
You can install Nginx by typing the following command
sudo apt install nginx -yVerify the installation
nginx -vThe above command will display the currently installed version of Nginx

Let's start Nginx
sudo systemctl start nginxStart Nginx during boot
sudo systemctl enable nginxYou'll get the following output

Nodejs is a runtime environment for JavaScript
Install Nodejs by typing the following command
sudo apt install nodejs -yVerify the installation
node -vThis will display the installed version of Nodejs as follows

NPM stands for Node Package Manager. npm is used to install, upgrade or remove NodeJS packages.
Install npm by typing the following command
sudo apt install npm -yVerify the installation
npm -vThe installed version of NPM will be displayed as follows

ghost-cli is an npm package used to manage Ghost blog. We'll install the latest version of Ghost-CLI globally using npm. Install it by typing.,
sudo npm install ghost-cli@latest -gThe installation may take several minutes. After the installation is successful, go ahead to the next step

We have completed the essential steps for deploying our Ghost blog
Let's create a directory for saving our blog's resources. The mkdir command in Linux used to create directories
sudo mkdir -p /var/www/ghostChange the ownership of the directory. Replace sarathy with your username. We'll use the chown command to change ownership
sudo chown -R sarathy:sarathy /var/www/ghostNow we have to modify the file permission of the directory. The chmod command is used to modify file permission in Linux
sudo chmod 775 /var/www/ghost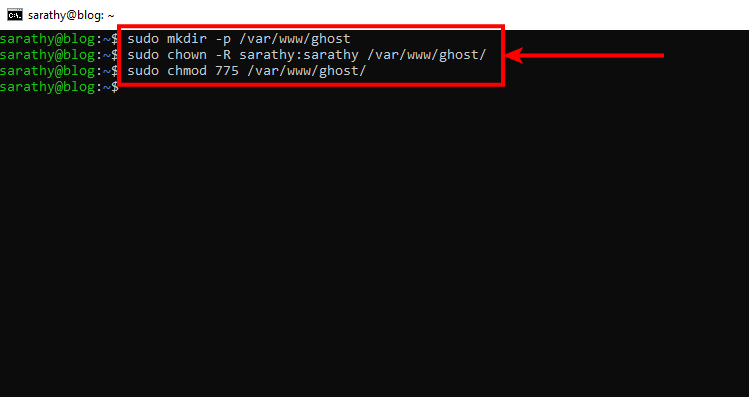
Navigate to the installation directory by typing the following command. In Linux, the cd command is used to change directories. The pwd command is used to print the current working directory
cd /var/www/ghostStart the Ghost Installer by typing,
ghost installThe installer will ask several questions.
First, the installer will warn us that MySQL is not installed. We need not to install MySQL in our ECS instance as we're using APsara for RDS as our MySQL server.
Ignore the warnig & continue the installation by pressing Yes

Then enter your instance's password to grant superuser rights to Ghost Installer
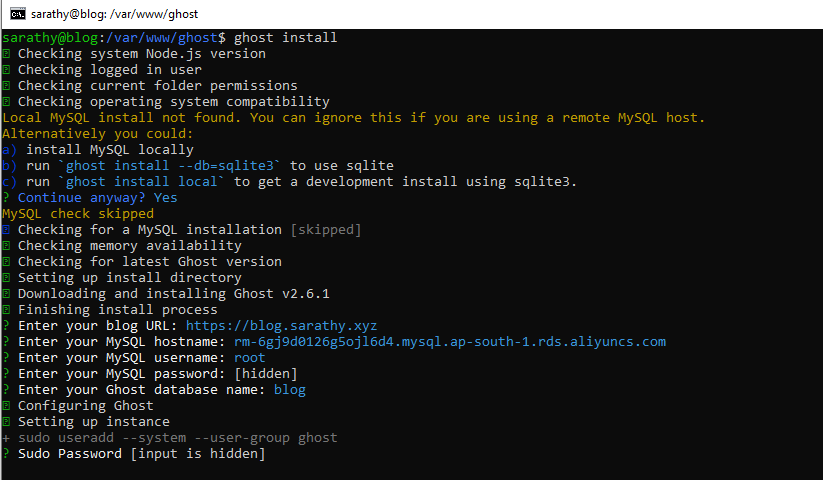
Now Ghost installer will install a free SSL certificate provided Let's Encrypt and configure HTTPS for our blog. You'll be asked to enter an Email address. Lets Encrypt certificates have to be renewed every 90 days. Provide a valid Email address to receive certificate renewal reminders.
Once the installation is successful, you'll get the following message
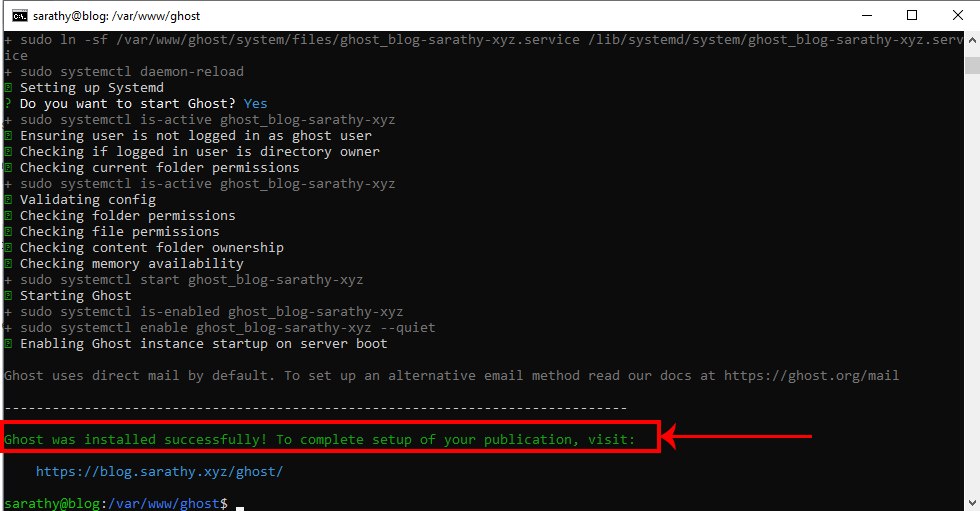
In this article, we have shown you how to deploy a Ghost blog on Alibaba Cloud using ECS, RDS, VPC and Alibaba Cloud DNS. The installation is not yet completed. I will cover the rest in my next article. If you can't wait, Go to https://blog.your-domain.com/ghost to complete the installation.
If you have any questions or comments, feel free to ask in the comment section below.

2,593 posts | 776 followers
FollowAlibaba Clouder - August 13, 2020
Alibaba Cloud Community - December 23, 2021
Alibaba Clouder - December 19, 2018
Alibaba Clouder - May 5, 2019
Alibaba Cloud Community - January 10, 2024
Alibaba Clouder - May 6, 2019

2,593 posts | 776 followers
Follow ECS(Elastic Compute Service)
Elastic and secure virtual cloud servers to cater all your cloud hosting needs.
Learn More Simple Application Server
Cloud-based and lightweight servers that are easy to set up and manage
Learn More OSS(Object Storage Service)
An encrypted and secure cloud storage service which stores, processes and accesses massive amounts of data from anywhere in the world
Learn MoreMore Posts by Alibaba Clouder
Start building with 50+ products and up to 12 months usage for Elastic Compute Service
Get Started for Free Get Started for Free