If you want to collect and analyze information about website users, such as the browsers that are used by the users, their browsing behavior records, and their purchasing behavior records, you can use web tracking SDK for JavaScript to upload user logs to a logstore. You can use web tracking SDK for JavaScript to upload logs directly from web pages to Simple Log Service, without the need to upload logs to an application server. This helps reduces server loads. This topic describes how to use web tracking SDK for JavaScript to collect website logs.
Prerequisites
The web tracking feature is enabled for your logstore. For more information about how to enable and use the web tracking feature, see Use the web tracking feature to collect logs.
Limits
If you use web tracking SDK for JavaScript to upload website logs, you can write no more than 3 MB of log data or 4,096 logs at a time. For more information about web tracking SDK for JavaScript, see Web tracking SDK for JavaScript.
Procedure
Step 1: Install and configure the SDK
npm method
Install Node.js.
Run the following code on your server to install dependencies:
npm install --save @aliyun-sls/web-track-browserAdd the following code to your program to configure the SDK:
import SlsTracker from '@aliyun-sls/web-track-browser'

const opts = {
  host: '${host}', // The Simple Log Service endpoint for the region where your project resides. Example: cn-hangzhou.log.aliyuncs.com.
  project: '${project}', // The name of the project.
  logstore: '${logstore}', // The name of the logstore.
  time: 10, // The interval at which logs are sent. Default value: 10. Unit: seconds.
  count: 10, // The maximum number of logs that can be sent in each request. Default value: 10.
  topic: 'topic',// The custom topic of logs.
  source: 'source',
  tags: {
    tags: 'tags',
  },
}

const tracker = new SlsTracker(opts)  // Create an SlsTracker object.
Parameter
Required
Description
host
Yes
The Simple Log Service endpoint for the region where your project resides. In this example, the Simple Log Service endpoint for the China (Hangzhou) region is used. Replace this parameter value with your actual endpoint. For more information, see Endpoints.
project
Yes
The name of the project.
logstore
Yes
The name of the logstore.
time
No
The interval at which logs are sent. Default value: 10. Unit: seconds.
count
No
The maximum number of logs that can be sent in each request. Default value: 10.
topic
No
The topic of logs. You can specify a custom value to identify logs.
source
No
The source of logs. You can specify a custom value to identify logs.
tags
No
The tag information about logs. You can specify a custom value to identify logs.
CDN method
If the CDN method is used, the maximum SDK version is 0.3.5.
Add the following code to
<body>of your HTML file. You can use Alibaba Cloud CDN to import the resource file of web tracking SDK for JavaScript. For more information about SDK versions, see Web tracking SDK for JavaScript.<script src="https://g.alicdn.com/sls/sls-js-sdk/0.3.5/web-track-browser.js"></script>Add the following code to the JavaScript file of your website:
if (window.SLS_Tracker) {
       const tracker = new SLS_Tracker({
       host: '${host}', // The Simple Log Service endpoint for the region where your project resides. Example: cn-hangzhou.log.aliyuncs.com.
       project: '${project}', // The name of the project.
       logstore: '${logstore}', // The name of the logstore.
       time: 10, // The interval at which logs are sent. Default value: 10. Unit: seconds.
       count: 10, // The maximum number of logs that can be sent in each request. Default value: 10.
       topic: 'topic',// The custom topic of logs.
       source: 'source',
       tags: {
           tags: 'tags',
       },
    })
}
Parameter
Required
Description
host
Yes
The Simple Log Service endpoint for the region where your project resides. In this example, the Simple Log Service endpoint for the China (Hangzhou) region is used. Replace this parameter value with your actual endpoint. For more information, see Endpoints.
project
Yes
The name of the project.
logstore
Yes
The name of the logstore.
time
No
The interval at which logs are sent. Default value: 10. Unit: seconds.
count
No
The maximum number of logs that can be sent in each request. Default value: 10.
topic
No
The topic of logs. You can specify a custom value to identify logs.
source
No
The source of logs. You can specify a custom value to identify logs.
tags
No
The tag information about logs. You can specify a custom value to identify logs.
Step 2: Upload logs
When you upload a single log, the log is uploaded as a separate object. When you upload multiple logs, the logs are uploaded as an array that contains multiple objects.
Upload a single log. The type is
object. Example:tracker.send({ eventType:'view_product', productName: 'Tablet', price: 500 })Immediately upload a single log. The time and count parameters do not take effect. The type is
object. Example:tracker.sendImmediate({ eventType:'view_product', productName: 'Tablet', price: 500 })Upload multiple logs at a time. The type is
array. Example:tracker.sendBatchLogs([ { eventType: 'view_product', productName: 'Tablet', price: 500 }, { eventType: 'view_product', productName: 'Laptop', price: 1200 } ])Immediately upload multiple logs at a time. The time and count parameters do not take effect. The type is
array. Example:tracker.sendBatchLogsImmediate([ { eventType:'view_product', productName: 'Tablet', price: 500 }, { eventType:'view_product', productName: 'Laptop', price: 1200 } ])
Step 3: View the upload result
You can view the upload result by using the console or calling API operations.
Console
Log on to the Simple Log Service console.
In the Projects section, click the project you want.
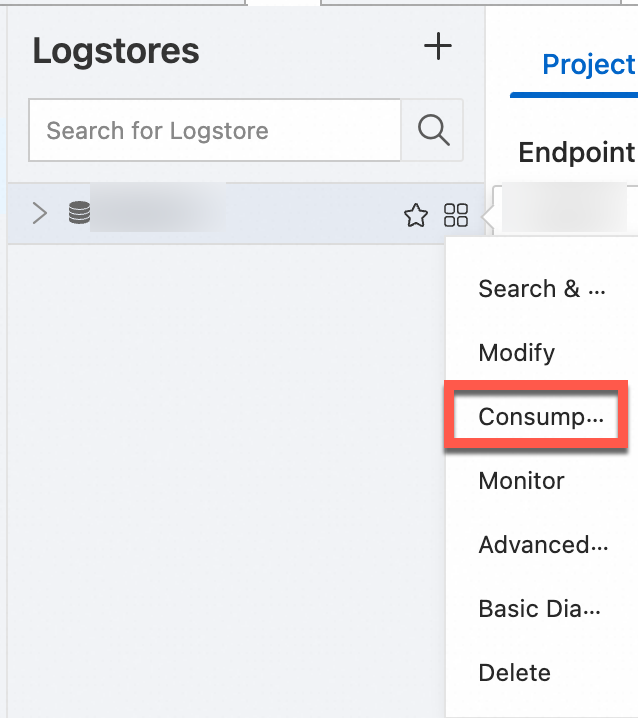
On the tab, click the logstore you want. Then click Consumption Preview to view the logs.
If you need to perform query analysis on the logs, see Guide to log query and analysis.
API
Call the CreateIndex operation to create full-text indexes or field indexes. If you want to use the SELECT statement, you must create field indexes.
Call the GetLogsV2 operation to query logs in a logstore. The returned result is an array of logs. Each element in the array is a log.
FAQ
What do I do if the "401 Authorization Required" error is reported when I debug code?
Before you use web tracking SDK for JavaScript to write logs to a logstore, you must enable the web tracking feature for the logstore. For more information, see Use the web tracking feature to collect logs.
References
If the response that is returned by Simple Log Service contains error information after you call an API operation, the call fails. You can handle errors based on the error codes that are returned when API calls fail. For more information, see Error codes.
Simple Log Service is also compatible with Alibaba Cloud SDKs. For more information, see Simple Log Service_SDK Center_Alibaba Cloud OpenAPI Explorer.
Simple Log Service provides the command-line interface (CLI) to meet the requirements for automated configurations in Simple Log Service. For more information, see Overview of Simple Log Service CLI.